


In this article, you will learn how to implement Google Maps in your Android Kotlin project. Android Studio is the recommended development environment for building an app with the Maps SDK for Android.
By the way! If you are interested in becoming a professional software developer, make sure to check out our courses!
Download Android Studio
Follow the guides to download and install Android Studio.
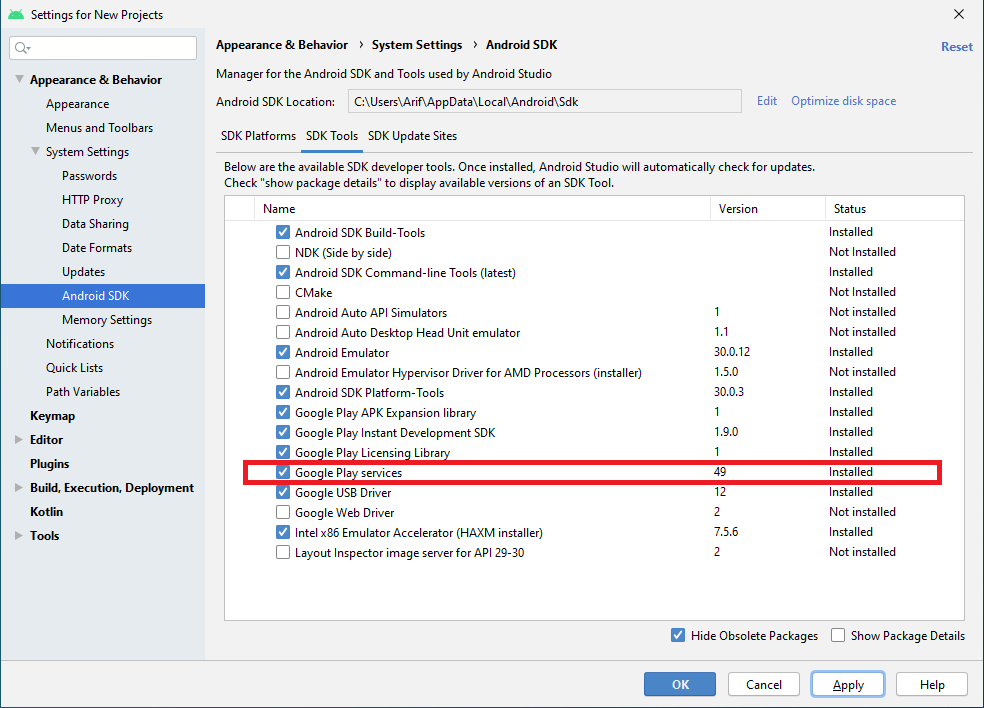
Install the Google Play services SDK
Add Google Play services to Android Studio.
Create a New Google Maps project
Follow these steps to create a new app project with a map activity:
- Start Android Studio.
- Create a new project as follows:
If you are starting the Android Studio, you will see the Welcome to Android Studio dialog, choose Start a new Android Studio project, available under ‘Quick Start’ on the right of the dialog.
If your Android Studio is already open or open directly without the welcome popup, click File in the Android Studio menu bar, then New, New Project. - Now, as you see the Choose your project dialog, select the tab that corresponds to the platform you intended to develop an application for as most users will want to keep the default Phone and Tablet.
- Select Google Maps Activity, then click Next.
- Enter your app name, package name, and project location, programming language (Java or Kotlin), and the minimum Android API level supported by your app, then click Finish.
After creating the new project, Android Studio starts Gradle and builds your project, which may take a few seconds.
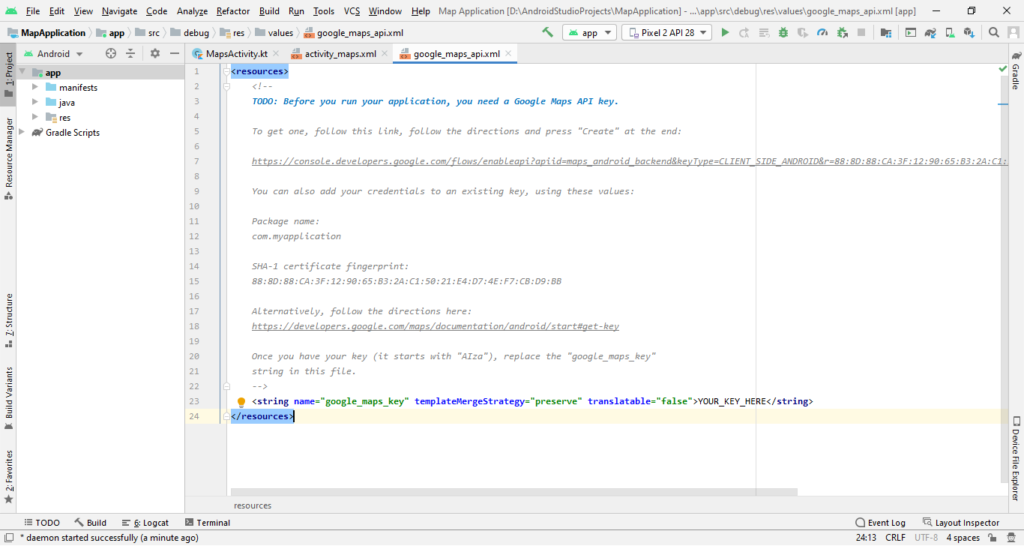
Once the building of the project finished, Android Studio opens the google_maps_api.xml and the MapsActivity.java files in the editor. (Note that your activity may have a different name, but it will be the one you configured during setup.) Notice that the google_maps_api.xml file contains instructions for getting a Google Maps API key before running the application. The next section describes getting the API key in more detail.
The form you have selected does not exist.
The form you have selected does not exist.
Getting a Google Maps API key
The Google Maps API key
Your application needs an API key to access the Google Maps servers. The type of key you need is an API key with restriction for Android apps. The key is free. You can use it with any of your applications that call the Maps SDK for Android, and it supports an unlimited number of users.
Now, go with one of the following ways to get your API key from Android Studio:
First way: Use the link provided in the google_maps_api.xml file that Android Studio created for you:
- Please copy the link provided in the google_maps_api.xml file and paste it into your browser. The link takes you to the Google Cloud Platform Console and supplies the required information to the Google Cloud Platform Console via URL parameters, thus reducing the manual input required.
- Follow the instructions to create a new project on the Google Cloud Platform Console or select an existing project.
- Create an Android-restricted API key for your project.
- Copy the resulting API key, go back to Android Studio, and paste the API key into the <string> element in the google_maps_api.xml file.
Second way: Use the credentials provided in the google_maps_api.xml file that Android Studio created for you:
- Copy the credentials details provided in the google_maps_api.xml file.
- Now go to the Google Cloud Platform Console.
- Use the copied credentials to create a new API key or add your app to an existing API key.
Third way: You can also get the API key following the instruction Get an API Key.
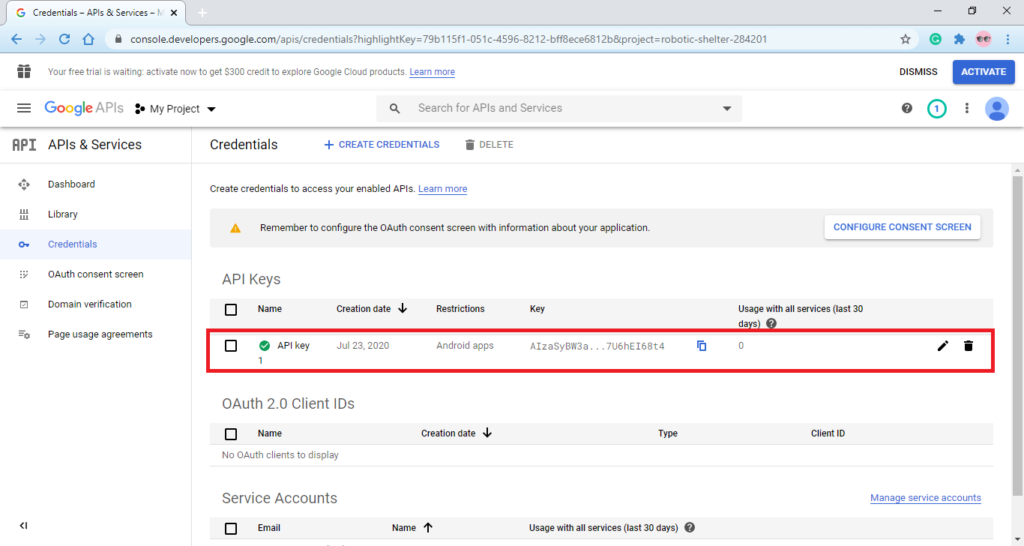
Once you follow the above steps to generate the API key, it will look like below from where you can copy the API key and paste it in your project.
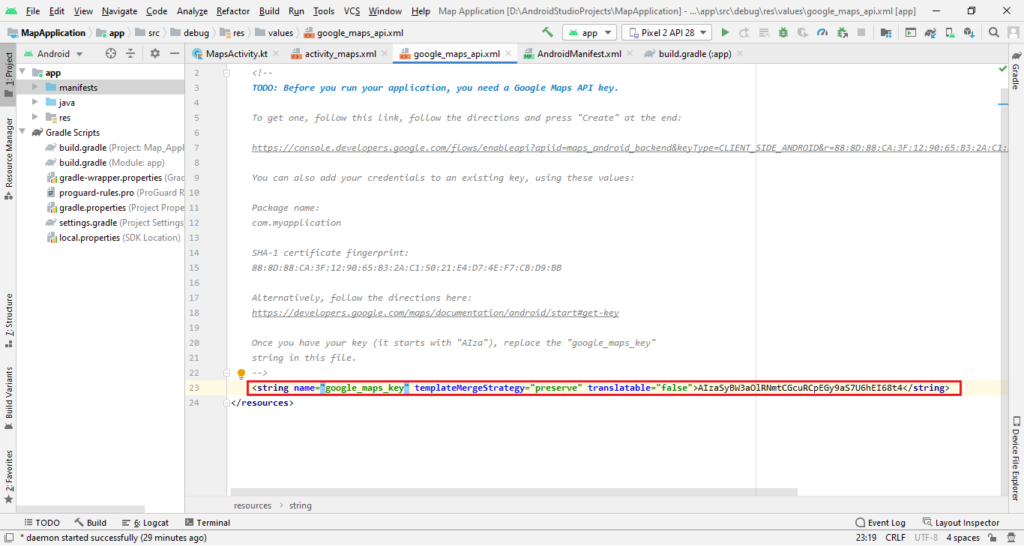
After copying the API key paste it in the google_maps_api.xml file as below:
Look at the code
Now, look at the following files in your Android Studio project.
The form you have selected does not exist.
The form you have selected does not exist.
XML layout file
The XML file that defines the app’s layout is at res/layout/activity_maps.xml. By default, it contains the following code:
<fragment xmlns:android="http://schemas.android.com/apk/res/android"
    xmlns:map="http://schemas.android.com/apk/res-auto"
    xmlns:tools="http://schemas.android.com/tools"
    android:id="@+id/map"
    android:name="com.google.android.gms.maps.SupportMapFragment"
    android:layout_width="match_parent"
    android:layout_height="match_parent"
    tools:context=".MapsActivity" />
Java/Kotlin maps activity file
The Kotlin/Java file that defines the maps activity is named MapsActivity.java. By default, it should contain the following code after your package name:
package com.myapplication

import androidx.appcompat.app.AppCompatActivity
import android.os.Bundle

import com.google.android.gms.maps.CameraUpdateFactory
import com.google.android.gms.maps.GoogleMap
import com.google.android.gms.maps.OnMapReadyCallback
import com.google.android.gms.maps.SupportMapFragment
import com.google.android.gms.maps.model.LatLng
import com.google.android.gms.maps.model.MarkerOptions

class MapsActivity : AppCompatActivity(), OnMapReadyCallback {

    private lateinit var mMap: GoogleMap

    override fun onCreate(savedInstanceState: Bundle?) {
        super.onCreate(savedInstanceState)
        setContentView(R.layout.activity_maps)
        // Obtain the SupportMapFragment and get notified when the map is ready to be used.
        val mapFragment = supportFragmentManager
                .findFragmentById(R.id.map) as SupportMapFragment
        mapFragment.getMapAsync(this)
    }

    /**
     * Manipulates the map once available.
     * This callback is triggered when the map is ready to be used.
     * This is where we can add markers or lines, add listeners or move the camera. In this case,
     * we just add a marker near Sydney, Australia.
     * If Google Play services is not installed on the device, the user will be prompted to install
     * it inside the SupportMapFragment. This method will only be triggered once the user has
     * installed Google Play services and returned to the app.
     */
    override fun onMapReady(googleMap: GoogleMap) {
        mMap = googleMap

        // Add a marker in Sydney and move the camera
        val sydney = LatLng(-34.0, 151.0)
        mMap.addMarker(MarkerOptions().position(sydney).title("Marker in Sydney"))
        mMap.moveCamera(CameraUpdateFactory.newLatLng(sydney))
    }
}
If your maps activity file doesn’t contain the above code, replace the contents of the file with the above code, after your package name.
The form you have selected does not exist.
The form you have selected does not exist.
Build and run your app
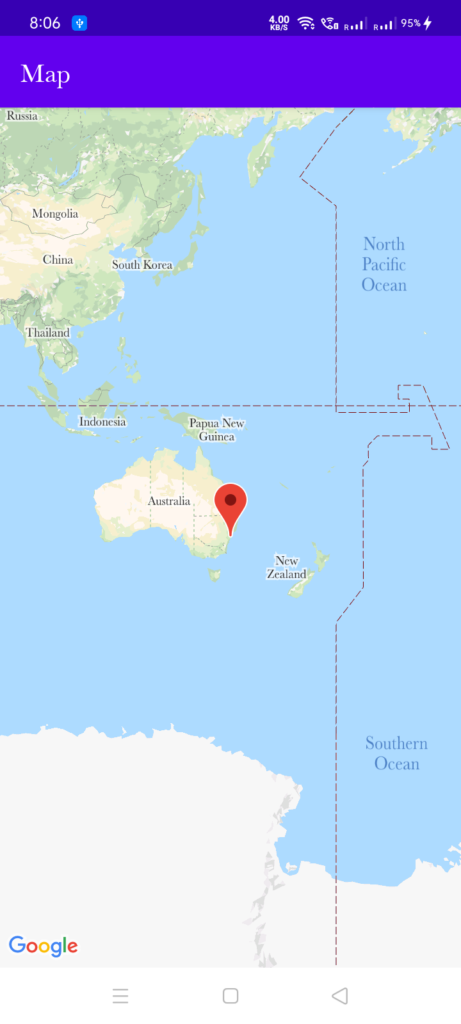
Your Google Maps app
Now, you can connect your android device to run the app. Once connected, click the Run menu option (or the play button icon) to run your app.
Once the app runs successfully, you should see a map with a marker in Sydney, Australia below. If you don’t see a map, confirm that you’ve completed all the steps described on this page. In particular, check that you’ve added an API key, as described above.
Summary
In this article, you have learned how to implement the Google Map SDK step by step in your android application.
The form you have selected does not exist.
The form you have selected does not exist.