

In this article, you will learn about the Android SQLite Database in-depth with a good example. Using android SQLite database I will show you how to perform all the crud operations like Create, Insert, Update, and Delete.
Android SQLite Database
SQLite database is an opensource, lightweight, no network access, and standalone SQL database that stores data to a text file on a device. SQLite database supports all the relational database features. SQLite is a build-in database implementation that comes with Android. You don’t need to establish any connections like JDBC, ODBC, or any other external connection for it, like what you will need to do in java applications.
In Android, whenever an application needs to store a large amount of data the SQLite is the most preferred. It is better than any other repository systems like SharedPreferences or saving data in files. For many applications in Android, SQLite is the backbone of the app, whether it’s used directly or via some third-party wrapper.
SQLite Database Package
To use the SQLite database in the Android application, the main package will be android.database.sqlite.
Three main components are used to handle SQLite operations in Android:
SQLiteOpenHelper Class
The SQLiteOpenHelper class is used to determine the name and version of the database used in this class. It is responsible for opening the database if it exists, creating if it does not exists and upgrading if required.
There are the onCreate() and onUpgrade() methods.
onCreate() invoked if the database doesn’t exist, meaning the very first time dealing with the SQLite database. Moreover, the onUpgrade() method is used to update the database schema to the most recent or, let’s say, the existing without losing the data:
class DatabaseHandler(context: Context) :
    SQLiteOpenHelper(context, DATABASE_NAME, null, DATABASE_VERSION) {


    override fun onCreate(db: SQLiteDatabase?) {

    }

    override fun onUpgrade(db: SQLiteDatabase?, oldVersion: Int, newVersion: Int) {

    }
SQLiteOpenHelper class have getReadableDatabase() and getWritableDatabase() method in order to access to the object SQLite Database, either in read or write mode.
The form you have selected does not exist.
The form you have selected does not exist.
SQLiteDatabase
The base class of the SQLite database class is SQLiteDatabase.
Android has its implementation to perform CRUD (Create, Read, Update, Delete) operations.
The SQLiteDatabase have methods such as insert(), update(), delete() and also execSQL() which are used for the execution of the database.
For using the methods insert() and update(), you need to define the object ContentValues in terms of KEY and VALUE to the table. The key represents the identity column of the table. And the value represents the record of the table of the column.
The query can be built in the SQLite database with the methods such as rawQuery() and query() using the SQLiteQueryBuilder class. The rawQuery() method accepts an SQL statement as input.
The query() method has a structured interface in terms of parameters to specify the SQL query. The SQLiteQueryBuilder class allows you to create SQL queries.
Example of Query()
return database.query(EmployeeTable,new String[]{key_1,key_2,...},null,null,null,null,null);
Example of rawQuery()
Cursor cursor = getReadableDatabase();
rawQuery("select * from EmployeeTable);
Cursor
The query function will return the cursor object, which results from a query. One record is equal to the row of the query results.
In Android, the cursor can perform buffer query results efficiently as it does not need to load the data into the memory.
The most commonly used methods of the cursor are getCount(), moveToFirst(), moveToNext(). The getCount() used to get the number of records from the query results. The moveToFirst() used to move to the first record of the line. And the moveToNext() used to move to the next line.
For more details, you can have a look at the official documentation of Android SQLiteDatabase.
Step by step guide to build a simple Android application using Android SQLite Database
Create a New Project
Create a new Android Studio project using Kotlin:

Select the option as Start a new Android Studio project:

Select Basic Activity and click on Next:

Name the project as you want and update the package name. I have named the project asSQLiteDemo and also updated the package name. Also, select the project location where you want to save the project.
Create a project using Kotlin.
In this demo project, I will show you how to add the records to the database. I will show how to insert the employee name and email ID. Update, delete or display them on the list.
Now, before moving further in this project, I will use the Android RecyclerView to display the inserted data in the list view format. I assume that you are familiar with the Android RecyclerView concept. If you are not, then do not worry. You can check out my other article Android RecyclerView in Kotlin, where you learn about recycler view in Android using Kotlin.
The form you have selected does not exist.
The form you have selected does not exist.
Let’s start with the designing of the application.
- Go to the activity_main.xml file located in the layout folder in resources. Remove the FloatingActionButton component.
- Go to MainActivity.kt and remove the click event of the fab button.
- Go to content_main.xml and remove the fragment tag. I am asking you to do this because we are not going to use these components to avoid the confusion of an unnecessary piece of code.
Add the design code of the main activity in the content_main.xml:
<?xml version="1.0" encoding="utf-8"?>
<LinearLayout xmlns:android="http://schemas.android.com/apk/res/android"
    xmlns:app="http://schemas.android.com/apk/res-auto"
    xmlns:tools="http://schemas.android.com/tools"
    android:layout_width="match_parent"
    android:layout_height="match_parent"
    android:orientation="vertical"
    android:padding="10dp"
    app:layout_behavior="@string/appbar_scrolling_view_behavior"
    tools:context=".MainActivity"
    tools:showIn="@layout/activity_main">

    <LinearLayout
        android:layout_width="match_parent"
        android:layout_height="wrap_content"
        android:gravity="center"
        android:orientation="horizontal">

        <TextView
            android:layout_width="0dp"
            android:layout_height="wrap_content"
            android:layout_weight="0.25"
            android:text="Name"
            android:textSize="18sp" />

        <EditText
            android:id="@+id/etName"
            android:layout_width="0dp"
            android:layout_height="wrap_content"
            android:layout_weight="0.75"
            android:hint="Enter Name" />
    </LinearLayout>

    <LinearLayout
        android:layout_width="match_parent"
        android:layout_height="wrap_content"
        android:gravity="center"
        android:orientation="horizontal">

        <TextView
            android:layout_width="0dp"
            android:layout_height="wrap_content"
            android:layout_weight="0.25"
            android:text="Email ID"
            android:textSize="18sp" />

        <EditText
            android:id="@+id/etEmailId"
            android:layout_width="0dp"
            android:layout_height="wrap_content"
            android:layout_weight="0.75"
            android:hint="Enter Email ID"
            android:inputType="textEmailAddress" />
    </LinearLayout>

    <Button
        android:id="@+id/btnAdd"
        android:layout_width="match_parent"
        android:layout_height="wrap_content"
        android:text="ADD RECORD" />


    <LinearLayout
        android:layout_width="match_parent"
        android:layout_height="wrap_content"
        android:layout_marginTop="10dp"
        android:gravity="center_vertical"
        android:orientation="horizontal"
        android:padding="10dp">

        <TextView
            android:id="@+id/tvName"
            android:layout_width="match_parent"
            android:layout_height="wrap_content"
            android:gravity="center"
            android:text="All the inserted records."
            android:textColor="@android:color/black"
            android:textSize="18sp"
            android:textStyle="bold" />
    </LinearLayout>

    <androidx.recyclerview.widget.RecyclerView
        android:id="@+id/rvItemsList"
        android:layout_width="match_parent"
        android:layout_height="match_parent"
        android:visibility="visible"
        tools:visibility="gone" />

    <TextView
        android:id="@+id/tvNoRecordsAvailable"
        android:layout_width="match_parent"
        android:layout_height="match_parent"
        android:gravity="center"
        android:text="No records available!!!"
        android:textSize="18sp"
        android:visibility="gone"
        tools:visibility="visible" />

</LinearLayout>
In the content_main.xml file, I used the list of components as LinearLayout, TextView, EditText, Button, and RecyclerView to design the UI.
Create a DatabaseHandler.kt class
Add the below code of the file:
import android.content.Context
import android.database.sqlite.SQLiteDatabase
import android.database.sqlite.SQLiteOpenHelper

//creating the database logic, extending the SQLiteOpenHelper base class
class DatabaseHandler(context: Context) :
    SQLiteOpenHelper(context, DATABASE_NAME, null, DATABASE_VERSION) {

    companion object {
        private val DATABASE_VERSION = 1
        private val DATABASE_NAME = "EmployeeDatabase"

        private val TABLE_CONTACTS = "EmployeeTable"

        private val KEY_ID = "_id"
        private val KEY_NAME = "name"
        private val KEY_EMAIL = "email"
    }

    override fun onCreate(db: SQLiteDatabase?) {
        //creating table with fields
        val CREATE_CONTACTS_TABLE = ("CREATE TABLE " + TABLE_CONTACTS + "("
                + KEY_ID + " INTEGER PRIMARY KEY," + KEY_NAME + " TEXT,"
                + KEY_EMAIL + " TEXT" + ")")
        db?.execSQL(CREATE_CONTACTS_TABLE)
    }

    override fun onUpgrade(db: SQLiteDatabase?, oldVersion: Int, newVersion: Int) {
        db!!.execSQL("DROP TABLE IF EXISTS $TABLE_CONTACTS")
        onCreate(db)
    }
}
In the above class, the SQLiteOpenHelper is extended, and based on that the methods are auto-implemented. You need to name the database and also need to define the database version to it.
After naming the database and defining the version, I have declared the table name as “EmployeeTable” and added the columns. I have created a constant private variable, so to speak while using them to create the table.
I have written a code to create the table in the onCreate method. Here the table is created for the very first time while dealing with SQLite in the application. The onUpgrade method is used to update the database schema the most recent. If we want to add the fourth column without deleting the database, we can use this method.
Create a Data Model class
Create a data model class as EmpModelClass.kt. Add the below code in it:
//creating a Data Model Class
class EmpModelClass(val id: Int, val name: String, val email: String)
The data model class is used to deal with database and RecyclerView in our example. Instead of passing all the values back and forth we can assign them to the data model class and pass the data model class to operate.
Insert record in the database
Add the method to insert the employee details in the database DatabaseHandler.kt class:
    /**
     * Function to insert data
     */
    fun addEmployee(emp: EmpModelClass): Long {
        val db = this.writableDatabase

        val contentValues = ContentValues()
        contentValues.put(KEY_NAME, emp.name) // EmpModelClass Name
        contentValues.put(KEY_EMAIL, emp.email) // EmpModelClass Email

        // Inserting employee details using insert query.
        val success = db.insert(TABLE_CONTACTS, null, contentValues)
        //2nd argument is String containing nullColumnHack

        db.close() // Closing database connection
        return success
    }
Create a method to Add the record in the MainActivity.kt class:
//Method for saving the employee records in database
    private fun addRecord() {
        val name = etName.text.toString()
        val email = etEmailId.text.toString()
        val databaseHandler: DatabaseHandler = DatabaseHandler(this)
        if (!name.isEmpty() && !email.isEmpty()) {
            val status =
                databaseHandler.addEmployee(EmpModelClass(0, name, email))
            if (status > -1) {
                Toast.makeText(applicationContext, "Record saved", Toast.LENGTH_LONG).show()
                etName.text.clear()
                etEmailId.text.clear()
            }
        } else {
            Toast.makeText(
                applicationContext,
                "Name or Email cannot be blank",
                Toast.LENGTH_LONG
            ).show()
        }
    }
In the above code, the employee name and email id is captured and the details inserted into the database. Also, we have validated the input as it should not be empty.
Assign the click event to the add record button
Assign the click event to add a record and call the add record method when you click on it:
        // Click even of the add button.
        btnAdd.setOnClickListener { view ->

            addRecord()
        }
Output after inserting the employee record
You can see in the screenshot above that the toast message appeared as Record Saved. That means our entry is inserted successfully in the database.
Create a Custom Layout file for RecyclerView
Add the custom layout file for RecyclerView as item_row.xml in the resource layout:
<?xml version="1.0" encoding="utf-8"?>
<LinearLayout xmlns:android="http://schemas.android.com/apk/res/android"
    xmlns:tools="http://schemas.android.com/tools"
    android:id="@+id/llMain"
    android:layout_width="match_parent"
    android:layout_height="wrap_content"
    android:gravity="center_vertical"
    android:orientation="horizontal"
    android:padding="10dp">

    <TextView
        android:id="@+id/tvName"
        android:layout_width="wrap_content"
        android:layout_height="wrap_content"
        android:textColor="@android:color/black"
        android:textSize="16sp"
        tools:text="Name" />

    <TextView
        android:layout_width="wrap_content"
        android:layout_height="wrap_content"
        android:layout_marginStart="5dp"
        android:layout_marginEnd="5dp"
        android:textSize="18sp"
        android:textStyle="bold"
        tools:text=":" />

    <TextView
        android:id="@+id/tvEmail"
        android:layout_width="0dp"
        android:layout_height="wrap_content"
        android:layout_weight="1"
        android:textColor="@android:color/black"
        android:textSize="16sp"
        tools:text="Email" />

    <ImageView
        android:id="@+id/ivEdit"
        android:layout_width="50dp"
        android:layout_height="50dp"
        android:contentDescription="image"
        android:foreground="?attr/selectableItemBackgroundBorderless"
        android:scaleType="center"
        android:src="@drawable/ic_action_edit" />

    <ImageView
        android:id="@+id/ivDelete"
        android:layout_width="50dp"
        android:layout_height="50dp"
        android:contentDescription="image"
        android:foreground="?attr/selectableItemBackgroundBorderless"
        android:scaleType="center"
        android:src="@drawable/ic_action_delete" />
</LinearLayout>
The images used in the ic_action_edit and ic_action_delete can be replaced by whatever you want.
Create an Item Adapter Class
Create an Item Adapter class named ItemAdapter.kt.
Create the view holder for view items, connect the data source of the RecyclerView and handle the view logic by creating a RecyclerView Adapter:
class ItemAdapter(val context: Context, val items: ArrayList<EmpModelClass>) :
    RecyclerView.Adapter<ItemAdapter.ViewHolder>() {

    /**
     * Inflates the item views which is designed in the XML layout file
     *
     * create a new
     * {@link ViewHolder} and initializes some private fields to be used by RecyclerView.
     */
    override fun onCreateViewHolder(parent: ViewGroup, viewType: Int): ViewHolder {
        return ViewHolder(
            LayoutInflater.from(context).inflate(
                R.layout.items_row,
                parent,
                false
            )
        )
    }

    /**
     * Binds each item in the ArrayList to a view
     *
     * Called when RecyclerView needs a new {@link ViewHolder} of the given type to represent
     * an item.
     *
     * This new ViewHolder should be constructed with a new View that can represent the items
     * of the given type. You can either create a new View manually or inflate it from an XML
     * layout file.
     */
    override fun onBindViewHolder(holder: ViewHolder, position: Int) {

        val item = items.get(position)

        holder.tvName.text = item.name
        holder.tvEmail.text = item.email

        // Updating the background color according to the odd/even positions in list.
        if (position % 2 == 0) {
            holder.llMain.setBackgroundColor(
                ContextCompat.getColor(
                    context,
                    R.color.colorLightGray
                )
            )
        } else {
            holder.llMain.setBackgroundColor(ContextCompat.getColor(context, R.color.colorWhite))
        }
    }

    /**
     * Gets the number of items in the list
     */
    override fun getItemCount(): Int {
        return items.size
    }

    /**
     * A ViewHolder describes an item view and metadata about its place within the RecyclerView.
     */
    class ViewHolder(view: View) : RecyclerView.ViewHolder(view) {
        // Holds the TextView that will add each item to
        val llMain = view.llMain
        val tvName = view.tvName
        val tvEmail = view.tvEmail
        val ivEdit = view.ivEdit
        val ivDelete = view.ivDelete
    }
}
We used the custom layout file to bind the views to the RecyclerView. In the onCreateViewHolder function, we have inflated it.
In the onBindViewHolder function we have set the text to the TextView from the data list. Also, we have added the different background colors to the CardView based on the odd and even positions.
Add the colors such as colorLightGray and white in the colors.xml.
<color name="colorWhite">#FFFFFF</color>
<color name="colorLightGray">#EBEBEB</color>
Get the inserted records from the database in form of Array List
Create a private method in DatabaseHandler.kt class as below:
    //Method to read the records from database in form of ArrayList
    fun viewEmployee(): ArrayList<EmpModelClass> {

        val empList: ArrayList<EmpModelClass> = ArrayList<EmpModelClass>()

        // Query to select all the records from the table.
        val selectQuery = "SELECT  * FROM $TABLE_CONTACTS"

        val db = this.readableDatabase
        // Cursor is used to read the record one by one. Add them to data model class.
        var cursor: Cursor? = null

        try {
            cursor = db.rawQuery(selectQuery, null)

        } catch (e: SQLiteException) {
            db.execSQL(selectQuery)
            return ArrayList()
        }

        var id: Int
        var name: String
        var email: String

        if (cursor.moveToFirst()) {
            do {
                id = cursor.getInt(cursor.getColumnIndex(KEY_ID))
                name = cursor.getString(cursor.getColumnIndex(KEY_NAME))
                email = cursor.getString(cursor.getColumnIndex(KEY_EMAIL))

                val emp = EmpModelClass(id = id, name = name, email = email)
                empList.add(emp)

            } while (cursor.moveToNext())
        }
        return empList
    }
Create a method in MainActivity.kt to get the list of records using the above code:
    /**
     * Function is used to get the Items List which is added in the database table.
     */
    private fun getItemsList(): ArrayList<EmpModelClass> {
        //creating the instance of DatabaseHandler class
        val databaseHandler: DatabaseHandler = DatabaseHandler(this)
        //calling the viewEmployee method of DatabaseHandler class to read the records
        val empList: ArrayList<EmpModelClass> = databaseHandler.viewEmployee()

        return empList
    }
Now, as we have everything that is required, I mean the list of records and the custom layout for RecyclerView, let’s bind the view to the UI.
Attach the adapter to the RecyclerView
Create a method in the MainActivity.kt to attach the recylerview:
    /**
     * Function is used to show the list on UI of inserted data.
     */
    private fun setupListofDataIntoRecyclerView() {

        if (getItemsList().size > 0) {

            rvItemsList.visibility = View.VISIBLE
            tvNoRecordsAvailable.visibility = View.GONE

            // Set the LayoutManager that this RecyclerView will use.
            rvItemsList.layoutManager = LinearLayoutManager(this)
            // Adapter class is initialized and list is passed in the param.
            val itemAdapter = ItemAdapter(this, getItemsList())
            // adapter instance is set to the recyclerview to inflate the items.
            rvItemsList.adapter = itemAdapter
        } else {

            rvItemsList.visibility = View.GONE
            tvNoRecordsAvailable.visibility = View.VISIBLE
        }
    }
The LayoutManager used here is LinearLayoutManager for the RecyclerView.
Adapter class is initialized and the data list is passed to it.
Finally, the adapter class is attached to the RecyclerView.
Now call the method on the required places in the MainActivity.kt class. First, in the onCreate method and in the add record method when the record is inserted successfully.
Run the app and check the output.
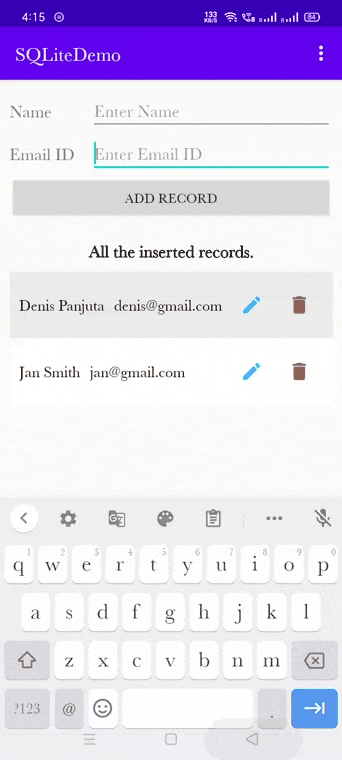
Output to display the list of inserted record in the database:
In the above screenshot, you can see that the record inserted above is displayed in the list format.
Now we will perform the update operation.
Update the record
Create a private method in DatabaseHandler.kt class as below:
    /**
     * Function to update record
     */
    fun updateEmployee(emp: EmpModelClass): Int {
        val db = this.writableDatabase
        val contentValues = ContentValues()
        contentValues.put(KEY_NAME, emp.name) // EmpModelClass Name
        contentValues.put(KEY_EMAIL, emp.email) // EmpModelClass Email

        // Updating Row
        val success = db.update(TABLE_CONTACTS, contentValues, KEY_ID + "=" + emp.id, null)
        //2nd argument is String containing nullColumnHack

        // Closing database connection
        db.close()
        return success
    }
Above method is used to update the record in the database using update query based on the Id.
Custom layout design for update dialog
Now, I will show you how to use the custom dialog to update the records.
If you are worried about how we have created custom dialog you can check out my custom dialog article Android Custom Progress Bar and Alert Dialogs.
Create a custom layout design for update dialog as dialog_update.xml:
<?xml version="1.0" encoding="utf-8"?>
<LinearLayout xmlns:android="http://schemas.android.com/apk/res/android"
    android:layout_width="match_parent"
    android:layout_height="wrap_content"
    android:orientation="vertical"
    android:padding="10dp">

    <TextView
        android:layout_width="wrap_content"
        android:layout_height="wrap_content"
        android:text="Update Record"
        android:textColor="@android:color/black"
        android:textSize="18sp"
        android:textStyle="bold" />

    <LinearLayout
        android:layout_width="match_parent"
        android:layout_height="wrap_content"
        android:gravity="center"
        android:orientation="horizontal">

        <TextView
            android:layout_width="0dp"
            android:layout_height="wrap_content"
            android:layout_weight="0.25"
            android:text="Name"
            android:textSize="18sp" />

        <EditText
            android:id="@+id/etUpdateName"
            android:layout_width="0dp"
            android:layout_height="wrap_content"
            android:layout_weight="0.75"
            android:hint="Enter Name" />
    </LinearLayout>

    <LinearLayout
        android:layout_width="match_parent"
        android:layout_height="wrap_content"
        android:gravity="center"
        android:orientation="horizontal">

        <TextView
            android:layout_width="0dp"
            android:layout_height="wrap_content"
            android:layout_weight="0.25"
            android:text="Email ID"
            android:textSize="18sp" />

        <EditText
            android:id="@+id/etUpdateEmailId"
            android:layout_width="0dp"
            android:layout_height="wrap_content"
            android:layout_weight="0.75"
            android:inputType="textEmailAddress"
            android:hint="Enter Email ID" />
    </LinearLayout>

    <LinearLayout
        android:layout_width="match_parent"
        android:layout_height="wrap_content"
        android:layout_marginTop="10dp"
        android:gravity="end"
        android:orientation="horizontal">

        <TextView
            android:id="@+id/tvUpdate"
            android:layout_width="wrap_content"
            android:layout_height="match_parent"
            android:foreground="?attr/selectableItemBackground"
            android:gravity="center"
            android:padding="10dp"
            android:text="UPDATE"
            android:textColor="@android:color/holo_red_dark"
            android:textStyle="bold" />

        <TextView
            android:id="@+id/tvCancel"
            android:layout_width="wrap_content"
            android:layout_height="match_parent"
            android:foreground="?attr/selectableItemBackground"
            android:gravity="center"
            android:inputType="textEmailAddress"
            android:padding="10dp"
            android:text="CANCEL"
            android:textColor="@android:color/black"
            android:textStyle="bold" />

    </LinearLayout>
</LinearLayout>
Here, I am going to use the custom dialog to update the record. The above file will be used to inflate the view in the custom dialog.
Before creating a method let’s add the design theme for the dialog.
Add the below line of code to your styles.xml in the values folder:
    <style name="Theme_Dialog" parent="ThemeOverlay.AppCompat.Dialog">
        <item name="android:windowMinWidthMajor">90%</item>
        <item name="android:windowMinWidthMinor">90%</item>
    </style>
Now, create a private method in MainActivity.kt class as below to update the record.
     /**
     * Method is used to show the custom update dialog.
     */
    fun updateRecordDialog(empModelClass: EmpModelClass) {
        val updateDialog = Dialog(this, R.style.Theme_Dialog)
        updateDialog.setCancelable(false)
        /*Set the screen content from a layout resource.
         The resource will be inflated, adding all top-level views to the screen.*/
        updateDialog.setContentView(R.layout.dialog_update)

        updateDialog.etUpdateName.setText(empModelClass.name)
        updateDialog.etUpdateEmailId.setText(empModelClass.email)

        updateDialog.tvUpdate.setOnClickListener(View.OnClickListener {

            val name = updateDialog.etUpdateName.text.toString()
            val email = updateDialog.etUpdateEmailId.text.toString()

            val databaseHandler: DatabaseHandler = DatabaseHandler(this)

            if (!name.isEmpty() && !email.isEmpty()) {
                val status =
                    databaseHandler.updateEmployee(EmpModelClass(empModelClass.id, name, email))
                if (status > -1) {
                    Toast.makeText(applicationContext, "Record Updated.", Toast.LENGTH_LONG).show()

                    setupListofDataIntoRecyclerView()

                    updateDialog.dismiss() // Dialog will be dismissed
                }
            } else {
                Toast.makeText(
                    applicationContext,
                    "Name or Email cannot be blank",
                    Toast.LENGTH_LONG
                ).show()
            }
        })
        updateDialog.tvCancel.setOnClickListener(View.OnClickListener {
            updateDialog.dismiss()
        })
        //Start the dialog and display it on screen.
        updateDialog.show()
    }
In the above piece of code, I have used the updated record code of the database handler class and layout file to inflate the view in the dialog.
Now call the update dialog method by clicking the edit button from the list.
Assign, the click event to the edit icon in the ItemAdapter.kt class. Add the below in piece of code in the onBindViewHolder method of ItemAdapter.kt class:
       holder.ivEdit.setOnClickListener { view ->

            if (context is MainActivity) {
                context.updateRecordDialog(item)
            }
        }
Now, run the application and try to update any record and see how it works.
Output of the update record:

Now, you can see that the records are updating.
Delete the record
Create a private method in DatabaseHandler.kt class as below:
    /**
     * Function to delete record
     */
    fun deleteEmployee(emp: EmpModelClass): Int {
        val db = this.writableDatabase
        val contentValues = ContentValues()
        contentValues.put(KEY_ID, emp.id) // EmpModelClass id
        // Deleting Row
        val success = db.delete(TABLE_CONTACTS, KEY_ID + "=" + emp.id, null)
        //2nd argument is String containing nullColumnHack

        // Closing database connection
        db.close()
        return success
    }
The above code is used to delete the record from the database using the delete query with the help of Id.
Now, create a private method in MainActivity.kt class as below to delete the record:
    /**
     * Method is used to show the delete alert dialog.
     */
    fun deleteRecordAlertDialog(empModelClass: EmpModelClass) {
        val builder = AlertDialog.Builder(this)
        //set title for alert dialog
        builder.setTitle("Delete Record")
        //set message for alert dialog
        builder.setMessage("Are you sure you wants to delete ${empModelClass.name}.")
        builder.setIcon(android.R.drawable.ic_dialog_alert)

        //performing positive action
        builder.setPositiveButton("Yes") { dialogInterface, which ->

            //creating the instance of DatabaseHandler class
            val databaseHandler: DatabaseHandler = DatabaseHandler(this)
            //calling the deleteEmployee method of DatabaseHandler class to delete record
            val status = databaseHandler.deleteEmployee(EmpModelClass(empModelClass.id, "", ""))
            if (status > -1) {
                Toast.makeText(
                    applicationContext,
                    "Record deleted successfully.",
                    Toast.LENGTH_LONG
                ).show()

                setupListofDataIntoRecyclerView()
            }

            dialogInterface.dismiss() // Dialog will be dismissed
        }
        //performing negative action
        builder.setNegativeButton("No") { dialogInterface, which ->
            dialogInterface.dismiss() // Dialog will be dismissed
        }
        // Create the AlertDialog
        val alertDialog: AlertDialog = builder.create()
        // Set other dialog properties
        alertDialog.setCancelable(false) // Will not allow user to cancel after clicking on remaining screen area.
        alertDialog.show()  // show the dialog to UI
    }
Call the delete alert dialog method by clicking on the delete button from the list.
Assign the click event to the delete icon in the ItemAdapter.kt class. Add the below piece of code in the onBindViewHolder method of ItemAdapter.kt class.
        holder.ivDelete.setOnClickListener { view ->

            if (context is MainActivity) {
                context.deleteRecordAlertDialog(item)
            }
        }
Now, run the application and try to delete any record and see it works.
Output of the delete record:
Final code of MainActivity.kt class
class MainActivity : AppCompatActivity() {

    override fun onCreate(savedInstanceState: Bundle?) {
        super.onCreate(savedInstanceState)
        setContentView(R.layout.activity_main)
        setSupportActionBar(toolbar)

        btnAdd.setOnClickListener { view ->

            addRecord()
        }

        setupListofDataIntoRecyclerView()
    }

    /**
     * Function is used to show the list of inserted data.
     */
    private fun setupListofDataIntoRecyclerView() {

        if (getItemsList().size > 0) {

            rvItemsList.visibility = View.VISIBLE
            tvNoRecordsAvailable.visibility = View.GONE

            // Set the LayoutManager that this RecyclerView will use.
            rvItemsList.layoutManager = LinearLayoutManager(this)
            // Adapter class is initialized and list is passed in the param.
            val itemAdapter = ItemAdapter(this, getItemsList())
            // adapter instance is set to the recyclerview to inflate the items.
            rvItemsList.adapter = itemAdapter
        } else {

            rvItemsList.visibility = View.GONE
            tvNoRecordsAvailable.visibility = View.VISIBLE
        }
    }

    /**
     * Function is used to get the Items List from the database table.
     */
    private fun getItemsList(): ArrayList<EmpModelClass> {
        //creating the instance of DatabaseHandler class
        val databaseHandler: DatabaseHandler = DatabaseHandler(this)
        //calling the viewEmployee method of DatabaseHandler class to read the records
        val empList: ArrayList<EmpModelClass> = databaseHandler.viewEmployee()

        return empList
    }

    //Method for saving the employee records in database
    private fun addRecord() {
        val name = etName.text.toString()
        val email = etEmailId.text.toString()
        val databaseHandler: DatabaseHandler = DatabaseHandler(this)
        if (!name.isEmpty() && !email.isEmpty()) {
            val status =
                databaseHandler.addEmployee(EmpModelClass(0, name, email))
            if (status > -1) {
                Toast.makeText(applicationContext, "Record saved", Toast.LENGTH_LONG).show()
                etName.text.clear()
                etEmailId.text.clear()

                setupListofDataIntoRecyclerView()
            }
        } else {
            Toast.makeText(
                applicationContext,
                "Name or Email cannot be blank",
                Toast.LENGTH_LONG
            ).show()
        }
    }

    /**
     * Method is used to show the Custom Dialog.
     */
    fun updateRecordDialog(empModelClass: EmpModelClass) {
        val updateDialog = Dialog(this, R.style.Theme_Dialog)
        updateDialog.setCancelable(false)
        /*Set the screen content from a layout resource.
         The resource will be inflated, adding all top-level views to the screen.*/
        updateDialog.setContentView(R.layout.dialog_update)

        updateDialog.etUpdateName.setText(empModelClass.name)
        updateDialog.etUpdateEmailId.setText(empModelClass.email)

        updateDialog.tvUpdate.setOnClickListener(View.OnClickListener {

            val name = updateDialog.etUpdateName.text.toString()
            val email = updateDialog.etUpdateEmailId.text.toString()

            val databaseHandler: DatabaseHandler = DatabaseHandler(this)

            if (!name.isEmpty() && !email.isEmpty()) {
                val status =
                    databaseHandler.updateEmployee(EmpModelClass(empModelClass.id, name, email))
                if (status > -1) {
                    Toast.makeText(applicationContext, "Record Updated.", Toast.LENGTH_LONG).show()

                    setupListofDataIntoRecyclerView()

                    updateDialog.dismiss() // Dialog will be dismissed
                }
            } else {
                Toast.makeText(
                    applicationContext,
                    "Name or Email cannot be blank",
                    Toast.LENGTH_LONG
                ).show()
            }
        })
        updateDialog.tvCancel.setOnClickListener(View.OnClickListener {
            updateDialog.dismiss()
        })
        //Start the dialog and display it on screen.
        updateDialog.show()
    }

    /**
     * Method is used to show the Alert Dialog.
     */
    fun deleteRecordAlertDialog(empModelClass: EmpModelClass) {
        val builder = AlertDialog.Builder(this)
        //set title for alert dialog
        builder.setTitle("Delete Record")
        //set message for alert dialog
        builder.setMessage("Are you sure you wants to delete ${empModelClass.name}.")
        builder.setIcon(android.R.drawable.ic_dialog_alert)

        //performing positive action
        builder.setPositiveButton("Yes") { dialogInterface, which ->

            //creating the instance of DatabaseHandler class
            val databaseHandler: DatabaseHandler = DatabaseHandler(this)
            //calling the deleteEmployee method of DatabaseHandler class to delete record
            val status = databaseHandler.deleteEmployee(EmpModelClass(empModelClass.id, "", ""))
            if (status > -1) {
                Toast.makeText(
                    applicationContext,
                    "Record deleted successfully.",
                    Toast.LENGTH_LONG
                ).show()

                setupListofDataIntoRecyclerView()
            }

            dialogInterface.dismiss() // Dialog will be dismissed
        }
        //performing negative action
        builder.setNegativeButton("No") { dialogInterface, which ->
            dialogInterface.dismiss() // Dialog will be dismissed
        }
        // Create the AlertDialog
        val alertDialog: AlertDialog = builder.create()
        // Set other dialog properties
        alertDialog.setCancelable(false) // Will not allow user to cancel after clicking on remaining screen area.
        alertDialog.show()  // show the dialog to UI
    }
}
Above is the final code of MainActivity.kt class.
Final code of ItemAdapter.kt class:
class ItemAdapter(val context: Context, val items: ArrayList<EmpModelClass>) :
    RecyclerView.Adapter<ItemAdapter.ViewHolder>() {

    /**
     * Inflates the item views which is designed in the XML layout file
     *
     * create a new
     * {@link ViewHolder} and initializes some private fields to be used by RecyclerView.
     */
    override fun onCreateViewHolder(parent: ViewGroup, viewType: Int): ViewHolder {
        return ViewHolder(
            LayoutInflater.from(context).inflate(
                R.layout.items_row,
                parent,
                false
            )
        )
    }

    /**
     * Binds each item in the ArrayList to a view
     *
     * Called when RecyclerView needs a new {@link ViewHolder} of the given type to represent
     * an item.
     *
     * This new ViewHolder should be constructed with a new View that can represent the items
     * of the given type. You can either create a new View manually or inflate it from an XML
     * layout file.
     */
    override fun onBindViewHolder(holder: ViewHolder, position: Int) {

        val item = items.get(position)

        holder.tvName.text = item.name
        holder.tvEmail.text = item.email

        // Updating the background color according to the odd/even positions in list.
        if (position % 2 == 0) {
            holder.llMain.setBackgroundColor(
                ContextCompat.getColor(
                    context,
                    R.color.colorLightGray
                )
            )
        } else {
            holder.llMain.setBackgroundColor(ContextCompat.getColor(context, R.color.colorWhite))
        }

        holder.ivEdit.setOnClickListener { view ->

            if (context is MainActivity) {
                context.updateRecordDialog(item)
            }
        }

        holder.ivDelete.setOnClickListener { view ->

            if (context is MainActivity) {
                context.deleteRecordAlertDialog(item)
            }
        }
    }

    /**
     * Gets the number of items in the list
     */
    override fun getItemCount(): Int {
        return items.size
    }

    /**
     * A ViewHolder describes an item view and metadata about its place within the RecyclerView.
     */
    class ViewHolder(view: View) : RecyclerView.ViewHolder(view) {
        // Holds the TextView that will add each item to
        val llMain = view.llMain
        val tvName = view.tvName
        val tvEmail = view.tvEmail
        val ivEdit = view.ivEdit
        val ivDelete = view.ivDelete
    }
}
Above is the final code of ItemAdapter.kt class.
The form you have selected does not exist.
The form you have selected does not exist.
Summary
In this article, you learned about the Android SQLite database with different CRUD operations like Insert, Select, Update and Delete.