


Who is this Article For?
What’s in this Artice (out of sequence)
- Introduction
- What are APIs?
- What are Web APIs?
- What are REST APIs?
- What are URIs?
- Rest API Examples
- Setting Up the Workout Planning Project
- Workout Data Transfer Object Model
- Creating the Workout Application Service
- Workout Service Interface
- Creating the Workout Controller
- Injecting Service to Controller
- Actions
- Implementing the GetAll Action
- Getting Workouts by id
- Posting Workouts
- Deleting Workouts
- Accessing Workouts
- Asp.Net Web API Route Attributes
- HTTP
- Routing Exercise (Dealing with relationships in HTTP APIs)
- HTTP Methods
- HTTP Header
- HTTP Status Codes
- HTTP Status Code Classes
- HTTP Request Anatomy
- HTTP Response Anatomy
- Idempotent HTTP methods
- Safe HTTP methods
- Safe vs Idempotent Methods
- REST Architectural Style
- What is REST
- What are Endpoints
- What are Routes
- Uniform Resource Identifier (URI)
- Uniform Resource Locator (URL)
- Uniform Resource Name (URN)
- Types of REST APIs
- Rest Architectural Constraints
- Open API
- Open API vs Swagger
- Configuring Swagger
- Using Swagger UI
- Accessing API Using Curl
- Accessing the API Using Browser
What are APIs?
What are Web APIs?
What are REST APIs?
REST (Representational State Transfer) APIs, also known as RESTful APIs, REST APIs define a set of constraints to be used when creating web APIs. The constraints provide a common formal language for the developers of the APIs and the developers of the API’s client.
REST APIs provide access to publicly available or sensitive data that requires authentication. Due to their scalability, flexibility, and ease of use, REST APIs are widely used in various industries and applications such as social media, e-commerce, weather, maps, news, transportation, and many more.
Rest API Examples
There are many examples of REST APIs that are used in various industries and applications. These are a few examples:
- Social Media APIs: Many social media platforms, such as Facebook, Twitter, and Instagram, provide APIs that allow developers to access data from their platforms, such as user profiles, posts, and comments.
- E-commerce APIs: E-commerce platforms, such as Amazon and Shopify, provide APIs that allow developers to access data such as product information, customer information, and order history.
- Weather APIs: Weather services, such as OpenWeather and Weather Underground, provide APIs that allow developers to access current weather conditions and forecast data for locations around the world.
- Maps and Geolocation APIs: Services such as Google Maps and OpenStreetMap provide APIs that allow developers to access map data and geolocation information, such as the latitude and longitude of a specific location.
- Payment APIs: Payment processors such as Stripe and PayPal provide APIs that allow developers to integrate their platforms into websites and applications, allowing for easy and secure online payments.
- News APIs: News outlets such as BBC, CNN, and NY Times provide APIs that allow developers to access news articles and content from their platforms.
- Transportation APIs: Services such as Uber and Lyft provide APIs that allow developers to access data such as driver locations, ride prices, and estimated arrival times for transportation services.
- Music and Video APIs: Services such as Spotify and YouTube provide APIs that allow developers to access data such as song titles, artist information, and video content.
Setting Up the Workout Planning Project
Let’s create a new project using Dotnet’s web api project template. I’ll use Dotnet CLI for creating the project in this article, but you can use Visual Studio.
Create a new folder and name it WebApi and open the Terminal (or CMD or Powershell, depending on the OS you use), open the WebApi directory in that folder and create a new web API project by running the following command:
dotnet new webapi
Then create a new solution:
dotnet new sln --name Workout
And add the project to the solution:
dotnet sln add WebApi.csproj
Then open the solution in your IDE. I usually use Visual Studio Code.
Workout Data Transfer Object Model
The REST API allows users to do CRUD (Create, Read, Update, Delete) operations on workout plans. So we’ll create a Workout class with Id, `Name`, `Description`, and `Exercises` properties.
public class Workout
{
    public Guid Id { get; set; }
    public string Name { get; set; }
    public string Description { get; set; }
    public List<Exercise> Exercises { get; set; }
}
Each workout has a list of exercises, where each exercise describes the number of sets, repetitions per set, duration, and weight.
public class Exercise
{
    public Guid Id { get; set; }
    public string Name { get; set; }
    public int Sets { get; set; }
    public int Repetitions { get; set; }
    public int Weight { get; set; }
    public int Duration { get; set; }
}
Creating the Workout Application Service
Next, we need a class that reads and writes data (in memory for now). Create a new folder named `Services` in the web project. Then create a new class named `WorkoutService` and add it to the Services folder.
public class WorkoutService
{
    private readonly List<Workout> workouts;

    public WorkoutService()
    {
        workouts = new List<Workout>();
    }

    public Task<IEnumerable<Workout>> GetAll()
    {
        return Task.FromResult(workouts.AsEnumerable());
    }

    public Task<Workout?> GetById(Guid id)
    {
        return Task.FromResult(workouts.SingleOrDefault(w => w.Id == id));
    }

    public Task Create(Workout workout)
    {
        workouts.Add(workout);
        return Task.CompletedTask;
    }

    public Task Update(Workout updatedWorkout)
    {
        var oldWorkout = workouts.SingleOrDefault(w => w.Id == updatedWorkout.Id);
        if (oldWorkout == null)
        {
            throw new ArgumentException("Workout not found.");
        }
        workouts.Remove(oldWorkout);
        workouts.Add(updatedWorkout);
        return Task.CompletedTask;
    }

    public Task Delete(Guid id)
    {
        var existingWorkout = workouts.SingleOrDefault(w => w.Id == id);
        if (existingWorkout != null)
        {
            workouts.Remove(existingWorkout);
        }
        return Task.CompletedTask;
    }
}
`WorkoutService` has a private list of workouts. It also contains the following asynchronous methods:
- GetAll: Returns the list of all workouts.
- GetById: Finds a workout by its id and returns it.
- Create: Adds a new workout to the list.
- Update: Updates a workout in the list.
- Delete: Removes a workout from the list.
Workout Service Interface
The service currently stores the data in memory. You may want to publish your application to production, and in production, you want to use a database instead of storing data in memory. To respect object-oriented guidelines (OCP, DIP), let’s extract an interface from the public members of the WorkoutService class.
public interface IWorkoutService
{
    Task<IEnumerable<Workout>> GetAll();
    Task<Workout?> GetById(Guid id);
    Task Create(Workout workout);
    Task Update(Workout workout);
    Task Delete(Guid id);

}
Now the service can implement the interface.
public class WorkoutService : IWorkoutService
{
    ...
}
Plain C# so far 🙃. The next step is to expose the WorkoutService on the web. By the way, did you know that we offer a unique and powerful online course that boosts your C# career? Check it out here!
Creating the Workout Controller
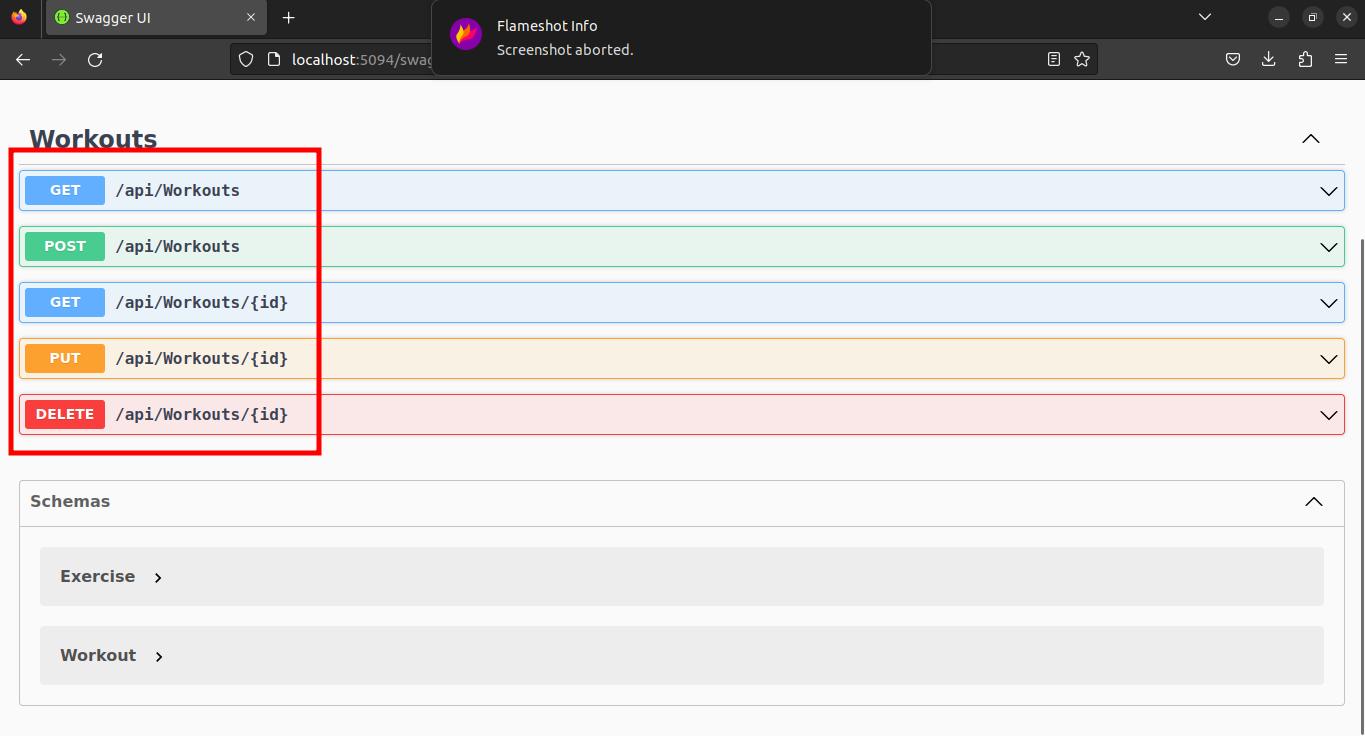
To allow users access the WorkoutSevice we should create a controller. Controllers are C# classes under the Controlers folder of your web API project. To create a new one, you can simply create a new class with the name WorkoutsControllerin the Controllers folder.
[Route("api/[controller]")]
[ApiController]
public class WorkoutsController : ControllerBase
{

}
- The `[ApiController]` attribute on top of the
WorkoutsControllerclass indicates that this class serves HTTP responses. ControllerBaseclass contains members the controller needs to respond toHTTPrequests, but unlikeControllerclass in the MVC framework, it doesn’t contain members that support views.- The `Route` attribute specifies the route for the controller. In this case, `api/Workouts` is the address of the controller.
[controller]is simply the placeholder for the controller’s name, allowing you to rename the controller without the need to update the route. You’ll understand it better once we run the app.
Injecting Service to Controller
The controller needs the service. Services should be passed to controllers’ constructors.
[Route("api/[controller]")]
[ApiController]
public class WorkoutsController : ControllerBase
{
    private readonly IWorkoutService workoutService;

    public WorkoutsController(IWorkoutService workoutService)
    {
        this.workoutService = workoutService;
    }
}
Controllers are instantiated by the framework. So we need to configure the framework to pass a singleton instance of the WorkoutService to all controller instances. So add the following line to your application’s startup (Program.cs) after `var builder = WebApplication.CreateBuilder(args);`.
// Add services to the container.
builder.Services.AddSingleton<IWorkoutService, WorkoutService>();
Actions
WorkoutsController exposes the WorkoutService‘s methods to web clients. So let’s add the service’s methods to the controller.
[Route("api/[controller]")]
[ApiController]
public class WorkoutsController : ControllerBase
{
    private readonly IWorkoutService workoutService;

    public WorkoutsController(IWorkoutService workoutService)
    => this.workoutService = workoutService;


    [HttpGet]
    public Task<ActionResult<IEnumerable<Workout>>> GetAll()
    {
        throw new NotImplementedException();
    }


    [HttpGet("{id}")]
    public Task<ActionResult<Workout>> GetById(Guid id)
    {
        throw new NotImplementedException();
    }


    [HttpPost]
    public Task<IActionResult> Create(Workout plan)
    {
        throw new NotImplementedException();
    }

    [HttpPut("{id}")]
    public Task<IActionResult> Update(Guid id, Workout workout)
    {
        throw new NotImplementedException();
    }

    [HttpDelete("{id}")]
    public Task<IActionResult> Delete(Guid id)
    {
        throw new NotImplementedException();
    }
}
The method names are identical to the service’s methods.
- GetAll: Returns the list of all workouts.
- GetById: Finds a workout by its id and returns it.
- Create: Adds a new workout to the list.
- Update: Updates a workout in the list.
- Delete: Removes a workout from the list.
However, their signatures are somewhat different because they may return different data than what the service returns in certain situations we’ll see later.
These methods are called actions. Actions are methods defined in controllers and responsible for executing web requests and generating the response for the requests. All actions of WorkoutsController return implementations of IActionResult asynchronously.
Actions are decorated with HTTP method attributes.
HTTP Methods
Dotnet web API framework uses HTTP (Hypertext Transfer Protocol) protocol. The HTTP protocol is designed for server-client communication of programs over the internet. And we use that to create web APIs in C#. We decorated the actions using the following HTTP method attributes (think of resources as data for now):
-
[HttpGet]: Should be used for the actions that retrieve a resource. -
[HttpPost]: For actions that create a resource. -
[HttpPut]: For actions that update a resource. -
[HttpDelete]: For actions that delete a resource.
And workout objects are resources in our example. There are also other HTTP methods you can use.
| Method | Description |
|---|---|
| GET | Retrieves a resource. |
| POST | Creates a resource. |
| PUT | Updates a resource. |
| DELETE | Deletes a resource. |
| HEAD | Retrieves the headers of a resource. |
| OPTIONS | Describes the communication options for the requested resource. |
| PATCH | Partially updates a resource. |
| CONNECT | Establishes a network connection. |
| TRACE | Echoes the request message back to the client. |
You can find more information about HTTP methods in HTTP/1.1 specification.
Implementing the GetAll Action
As said, HTTP get is used for getting data from the server.
    [HttpGet]
    public async Task<ActionResult<IEnumerable<Workout>>> GetAll()
    => Ok(await workoutService.GetAll());
We passed all workouts to the ControllerBase.Ok method and returned the result. The Ok method adds additional information to the workouts. It tells the client that the retrieval of workout plans was successful by setting the value of the response’s Statusheader to 200. That’s a part of the HTTP contract.
The status header of 200 tells the client that the request has succeeded, and the workout is included in the response.
HTTP Headers
HTTP headers are the meta information sent along with the HTTP request and response that provide additional context about the requested resource or data being sent.
For example, headers can include information such as the format of the data being sent, the length of the content, the type of content, the encoding used, and other details. They can also be used to specify authentication credentials or to set cookies.
Headers are key-value pairs sent in plain text as part of the HTTP request or response. They play an essential role in the functioning of the HTTP protocol. They can be used to provide additional information about the request or response, to control caching, to negotiate the format of the data being sent, and for other purposes.
Using Swagger UI
Run the application and open the address: http://localhost:5094/swagger in your browser.
5094 is the port the application listens on. The port of your application may be different.
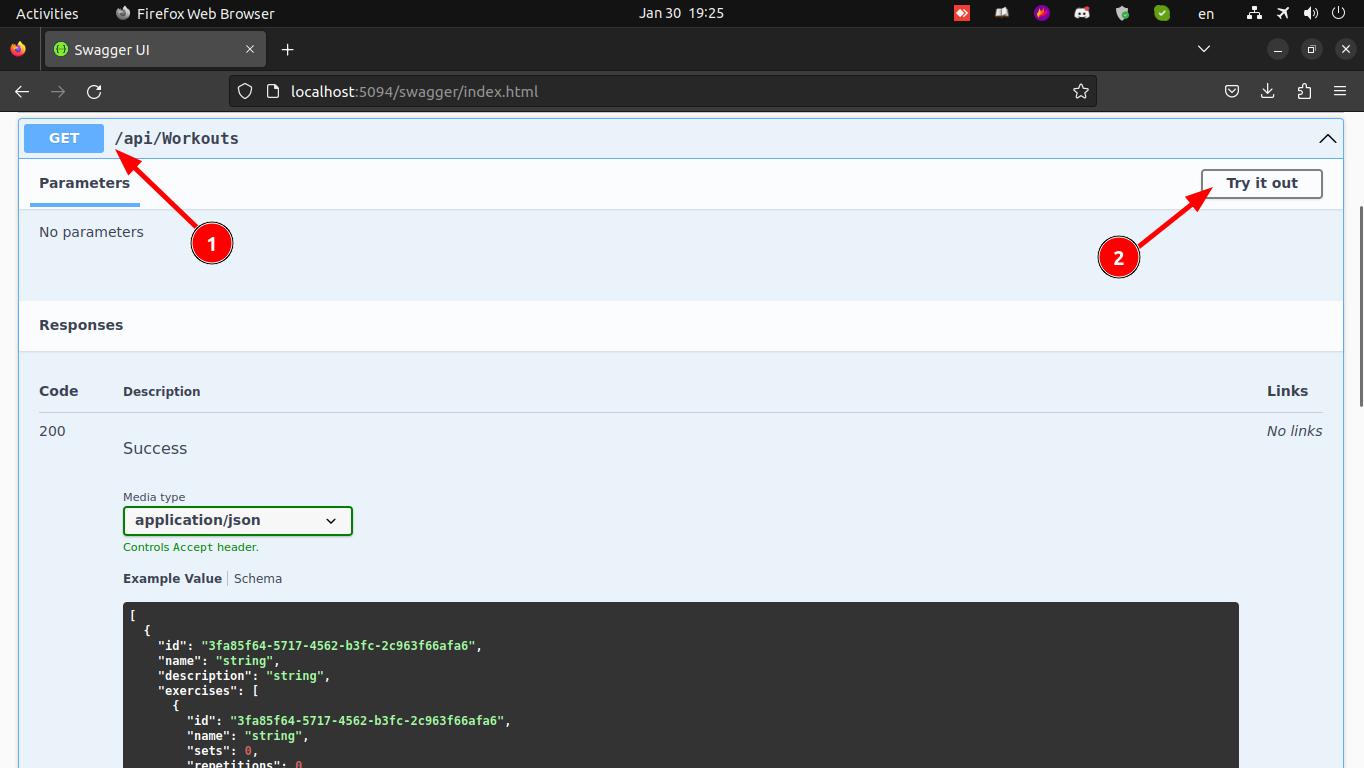
You must see a web page like the following.

This page is an interactive visual document for your API. This page is auto-generated from the API in the app. It’s called Swagger UI. We’ll discuss Swagger in more depth later. For now, let’s just use the Swagger UI.
Click the Get button, then the Try it Out:
Now you can test your web API. By clicking the execute button, you call the GetAllaction of your API.
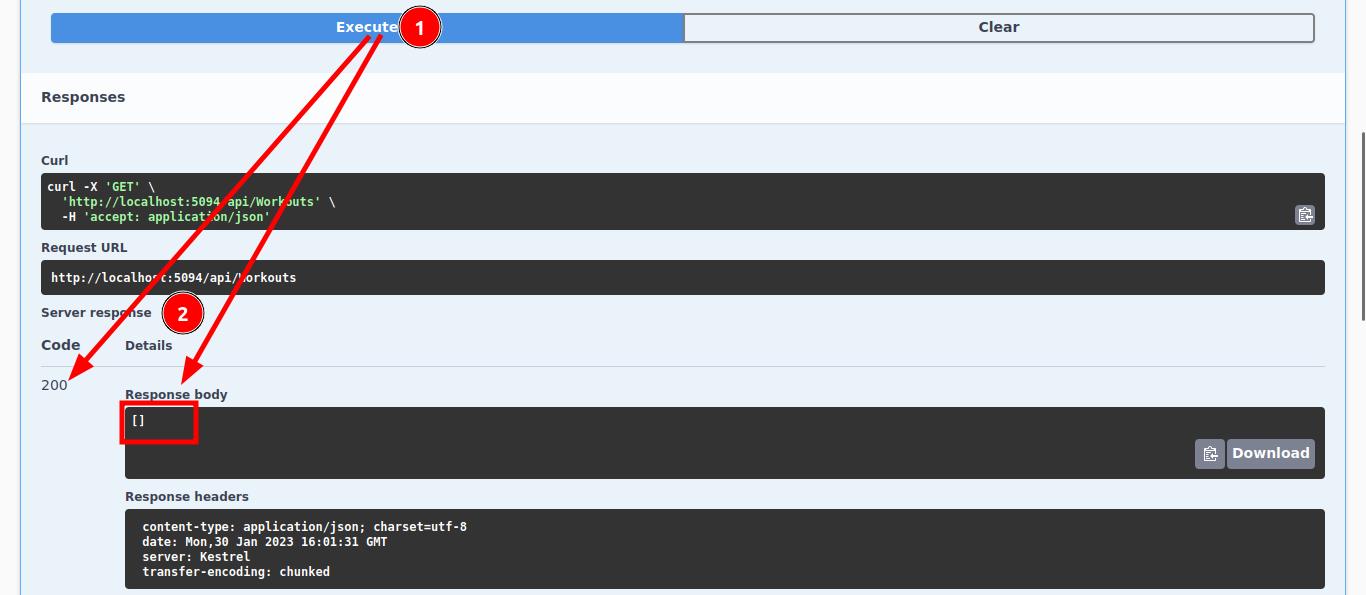
As you see, the result is an empty JSON array of workouts, and the response’s HTTP status code is 200 because we called the Ok method.
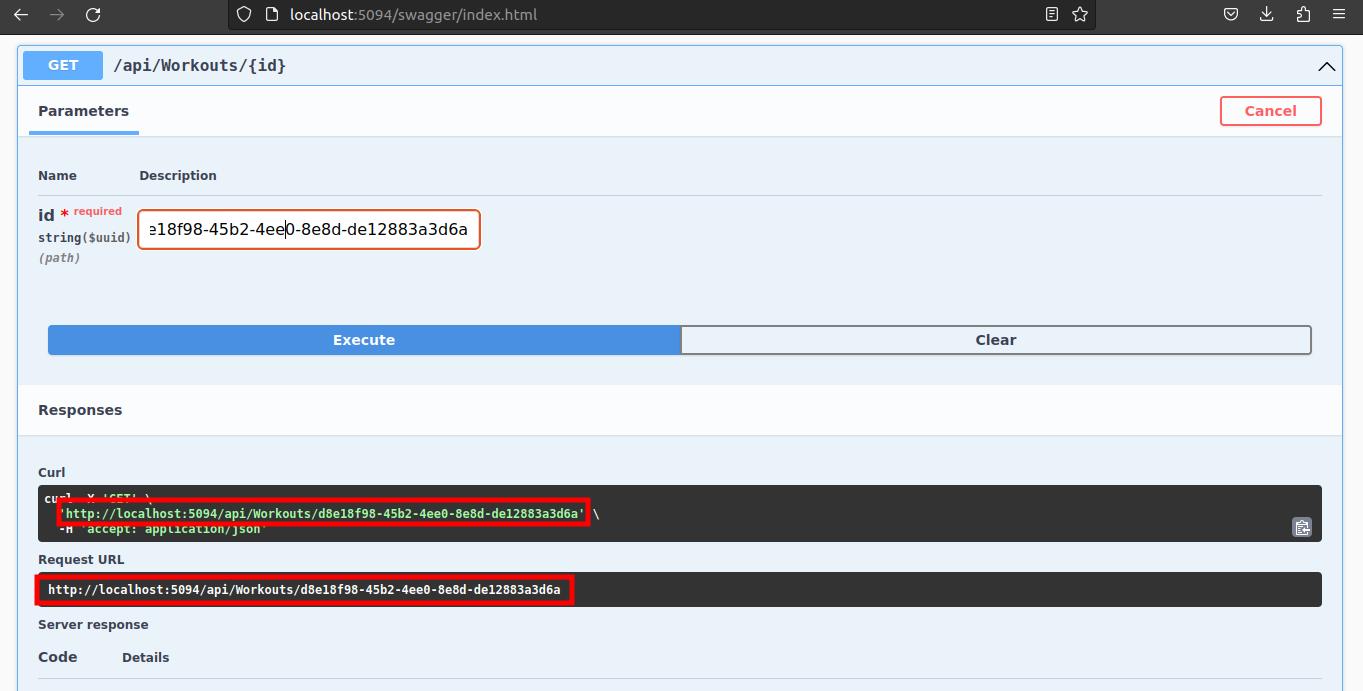
Accessing API Using Curl
Look at the Curlsection in the image above. If you have the curl software installed on your OS, you can access your API by copying the contents of the Curl section from Swagger UI and pasting it on the Terminal, CMD, or Powershell.

If you want to boost your C# career, check out our ASP.NET full-stack web development course that also covers test-driven development.
Accessing the API Using Browser
Accessing resources from your browser is only possible when using the HTTP Get method as long as no specific headers are required to be included in the request.
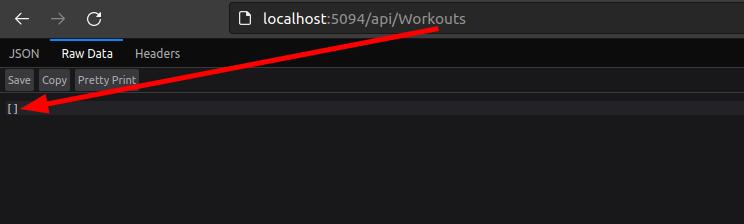
Look at the image again. There’s a Request Urlsection next to the Curl section. You can copy the `http://localhost:5094/api/Workouts` from the Request Url in the image above and paste it into your browser’s address bar to call the GetAll action.
You might wonder why should requesting the /api/Workout calls the GetAll method? That’s exactly what’s being discussed in the Routes section.
If you want to see some workouts, you can open the WorkoutService and add the following workout plans to the workout list in the service’s constructor.
public WorkoutService()
    {
        workouts = new List<Workout>{
            new Workout{
                Id = Guid.NewGuid(),
                Name = "Weekly Plan",
                Description = "Your starting point to build muscles.",
                Exercises = new (){
                    new(){
                        Id = Guid.NewGuid(),
                        Name = "Bench press",
                        Sets = 5,
                        Repetitions = 10,
                        Duration = 17
                    },
                    new(){
                        Id = Guid.NewGuid(),
                        Name = "Incline Dumbbell Fly",
                        Sets = 3,
                        Repetitions = 13,
                        Duration = 17
                    },
                }
            }
        };
    }
You can add more workouts. Try getting them from the server using Swagger UI, Curl, and Browser.
This is the result of running Curl:

See the list of workouts? Copy the Id because we’ll need it to access a single workout plan next.
Accessing a Single Workout
To get a single workout from the server, HTTP Get the following URL.
Copy the Id of a workout from the previous section and paste it as the required workout Id field:
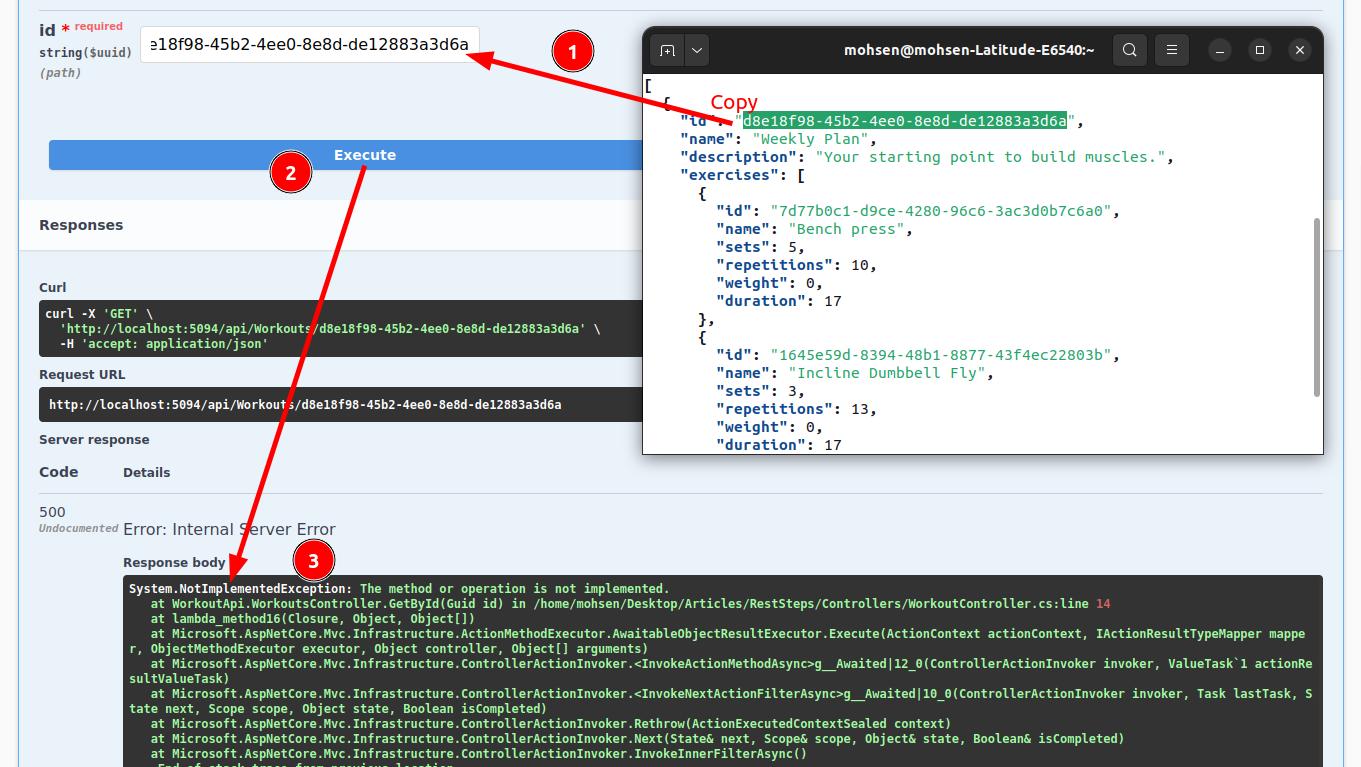
The result of sending the request to the server is NotImplementedException. As you remember, the `GetById` action throws the NotImplementedException. We will implement this action later. For now, let’s learn a couple of terms.
What are Endpoints

An endpoint in REST is a specific location that serves as the access point for a particular resource or set of resources. It is the entry point for incoming requests to a RESTful API and is responsible for returning the response to the client. The `WorkoutsController`’s actions are examples of REST endpoints in our application.
What are URIs
Endpoints are identified by URIs (Uniform Resource Identifiers). Here’s an example of a URI in our application.
- Endpoint URI:
http://www.example.com/api/workouts - Method:
GET - Purpose: Retrieve a list of all workout plans.
A URI might look like http://www.example.com/api/Workouts/123. It represents a workout with an ID of 123.
In REST architecture, URIs identify resources and the endpoints used to access them. URIs are designed to be simple, making it easy for developers to access and manipulate resources on the web. A URI represents a resource’s address and is typically constructed using a combination of letters, numbers, and special characters.
REST APIs use URIs to manage and manipulate resources on the web. A URI specifies the location of a resource and the method used to access it. REST URIs also identify endpoints used to access and manipulate those resources.
For example, a GET request to `http://example.com/api/Workouts/123` returns the contents of a workout, while a `POST` request to the same path might create a new resource.
What are Routes
Routes specify which URI pattern and HTTP method (such as GET, POST, PUT, DELETE) to call which endpoint. For example, the /api/Workout/{id} route defines a GET request to the URL: http://www.example.com/api/Workout/123 should be handled by the endpoint that finds a Workout plan by the Id passed in the URI (123), while a Delete Requesting the same URL calls the endpoint (`Delete` action) that deletes the workout plan with the id 123.
Routes provide a way to map URLs to actions, making it easier for clients to access resources and for developers to manage the API. They also provide a way to specify URL parameters and specify how the API should handle different HTTP methods. By using routes, you can create a clear and consistent API structure that makes it easier for clients to work with the API and for developers to manage and maintain the code.
In short, Routes define the endpoint URLs clients can use to access and manipulate resources.
Asp.Net Web API Route Attributes
The following image explains how routes map URIs to endpoints.

In ASP.NET web API, routing is done by adding route templates to the [Route("routeTemplate")] and [HttpMethod] attributes like [HttpGet("routeTemplate")]. The Route attribute is used to specify the route template for a particular action. The HttpGet attribute specifies the Get as the HTTP method for the action. It also accepts a route template appended to the controller’s route:
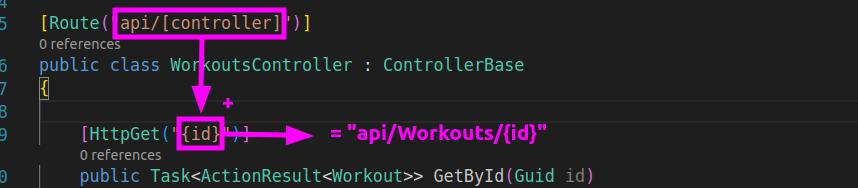
To create the route api/Workouts/{id}, you can alternatively remove the route attribute from the controller and pass the full route template to the `HttpGet` attribute of the action instead:
    [HttpGet("api/[controller]/{id}")]
    public Task<ActionResult<Workout>> GetById(Guid id)
Or pass the route template to the route attribute:
    [HttpGet, Route("api/[controller]/{id}")]
    public Task<ActionResult<Workout>> GetById(Guid id)
Needless to say that the route above is the equivalent for
    [HttpGet]
    [Route("api/Workouts/{id}")]
    public Task<ActionResult<Workout>> GetById(Guid id)
Or you can move the route attribute `[Route(“api/Workouts/{id}”)]` to the controller if all actions accept a parameter that should be passed as a part of the URL’s path.
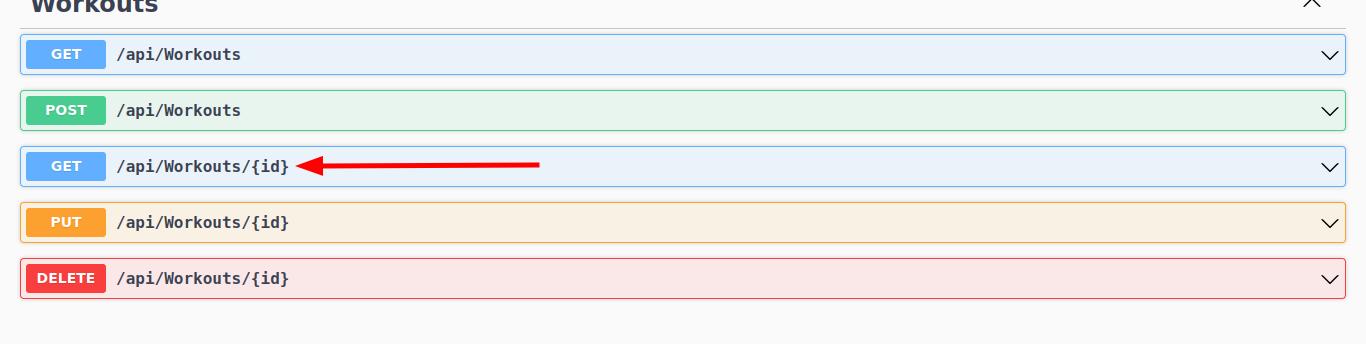
Notice that the same route template (like `api/Workouts/{id}`) can be applied to multiple actions as long as each action handles a different HTTP method. The `WorkoutsController`, for example, the route `api/Workouts/{id}` is applied to all of the following three actions:
- GetById
- Update
- Delete
But when the router component of the MVC framework receives a request with the path `api/Workouts/3fa85f64-5717-4562-b3fc-2c963f66afa6, it reads the HTTP method from the Request Method` header of the request and decides which action to pass the request to.
- It calls the
GetByIdendpoint if the method isGet. - It calls the
Updateendpoint if the method isPut. - It calls the
Deleteendpoint if the method isDelete.
Now you completely know how the requests are mapped to actions and why by opening the address `http://localhost:5094/api/Workouts` in your browser, the `WorkoutsController.GetAll()` endpoint is called.
If you want to boost your C# career, check out our ASP.NET full-stack web development course that also covers test-driven development.
Routing Exercise
As an exercise, add the following controller to the app, run it, and try it at run time using the Swagger UI, then implement it and try manipulating the route and see the effect at run time. Finally, you can add the actions for the following operations:
- GetAll: Getting all exercises of a workout plan.
- Create: Adding new exercises to a workout plan.
- Update: Updating an exercise.
- Delete: To remove an exercise from a workout plan.
[Route("api/Workouts/{workoutId}/[controller]")]
public class ExercisesController : ControllerBase
{
    [HttpGet("{exerciseId}")]
    public Task<ActionResult<Exercise>> GetById(Guid workoutId, Guid exerciseId)
    => throw new NotImplementedException();
}
Both
WorkoutsControllerand theExercisesControllercan update exercises. It’s possible to remove theExercisesproperty from theWorkoutclass and add aWorkoutIdfield to theExerciseclass to establish the relationship.This exercise teaches you to create web APIs that allow tackling complex object relationships.
HTTP Status Codes
HTTP status codes are used in REST APIs to communicate the status of a request between a client and a server. The codes provide a standardized way to indicate whether a request was successful and, if not, what kind of error occurred.
HTTP status codes are three-digit codes that are included in the response from the server to the client. The following table contains the most common status codes.
| Status Code | Description |
|---|---|
| 200 OK | The request was successful (We’ve seen an example of 200 Ok already). |
| 201 Created | The request was successful, and a resource was created. |
| 204 No Content | The request was successful, but there is no representation to return (i.e. the response is empty). |
| 400 Bad Request | The request could not be understood or was missing some required parameters. |
| 401 Unauthorized | Authentication failed, or the user did not have permission for the requested operation. |
| 403 Forbidden | Authentication succeeded, but the authenticated user does not have access to the requested resource. |
| 404 Not Found | The requested resource could not be found. |
| 500 Internal Server Error | An error occurred on the server. |
HTTP status codes provide a simple and effective way to communicate the status of a request, making it easier for clients to understand what happened and for servers to diagnose and resolve errors. By using standardized status codes, REST APIs can ensure that clients receive clear and consistent information about the status of their requests.
HTTP Status Code Classes
As said, endpoints return HTTP status codes to clients. HTTP status codes are grouped into five classes. The first digit indicates the class or category of the response. There are 5 classes of HTTP status codes.

- 1XX Informational: The ones that start by1 are informational. An informational response indicates that the server accepted the request and the client should continue the request.
- 2XX Success: The status codes, which start with 2, indicate success. This class of status codes indicates that the request was successful and that the server has returned the requested data. Examples include 200 OK and 201 Created. For example, 200 status codes in responses to HTTP GET requests mean the response is in the message body. So the client knows where to find the requested data.
- 3XX Redirection: The third category is redirection. They indicate that the client must take additional actions to complete the request.
- 4XX Client Error: The status codes, which start with 4, indicate that an error has happened, and the problem seems to be caused by the client. 400, for example, indicates a bad request which is not processable by the server. When a validation error occurs on the server side, for example, we usually return the 400 status code.
- 5XX Server Error: The fifth class errors are returned when the server fails to fulfill the request. 500, for example, should be returned when an internal server error occurs.
The class of HTTP status is a generally agreed-upon categorization of possible responses from web servers. They tell the client what category the response is in. The client then knows how to deal with the response based on the category.
By grouping the status codes into classes, it becomes easier for developers to understand the nature of a response and to take the appropriate action based on the status code. For example, a client receiving a 2xx status code can assume that the request was successful, while a client receiving a 4xx status code knows there was an error with the request.
You can learn more about HTTP status codes in the RFC2616.
HTTP Request Anatomy
We are familiar with URIs and HTTP headers already. It’s time to zoom out and take a look at the structure of HTTP requests. The anatomy of an HTTP request typically consists of the following components:
- Request line: The first line of the request specifies the HTTP method (e.g.
GET,POST,PUT,DELETE), the requested resource URI, and the HTTP version. - Headers: Key-value pairs that provide additional information about the request, such as the Accept type, the content type, and the Authorization credentials.
- Body: An optional section that contains data associated with the request, such as JSON or XML payload for POST or PUT requests.
Example:
POST /api/Workouts/123 HTTP/1.1

Accept: application/json
Authorization: Bearer xyz

{
    "id": "820d4ed5-19e5-4f79-983b-48de3435e8a0",
    "name": "Chest Workout Plan"
}
In the example above, the request line specifies that a POST request is being made to the /api/Workouts/123 resource using HTTP version 1.1. The headers provide additional information about the request, including the desired response format (application/json) and the authorization credentials. The body of the request contains a JSON payload with the data for the workout to be created.
HTTP Response Anatomy
The anatomy of an HTTP response typically consists of the following components:
- Status line: The first line of the response specifies the HTTP version, the status code, and a brief description of the status.
- Headers: Key-value pairs that provide additional information about the response, such as the content type, content length, and date.
- Body: An optional section that contains the data associated with the response, such as a JSON or XML payload.
Example:
HTTP/1.1 200 OK
Content-Type: application/json
Content-Length: 126

{
    "id": "820d4ed5-19e5-4f79-983b-48de3435e8a0",
    "name": "Biceps Workout Plan"
}
In the example above, the status line specifies that the response uses HTTP version 1.1 and returns a status code of 200 (OK), indicating that the request was successful. The headers provide additional information about the response, including the content type (application/json) and the content length. The response body contains a JSON payload with the requested data for the user.
Enough of terms and theories for now. Let’s continue building our workout plan APIs.
Posting Workouts
It’s finally time to implement the Create action. The method accepts a Workout plan object as the parameter. Since the HTTP method is POST, the workout must be contained in the request’s body as the payload. To read the workout from the request’s body, decorate the Workout parameter with the `[FromBody]` attribute.
public async Task<IActionResult> Create([FromBody] Workout plan)
You run the app and can try it in your Swagger UI or use the following Curl command.
curl -X 'POST' 'http://localhost:5094/api/Workouts'
  -H 'accept: */*'
  -H 'Content-Type: application/json'
  -d '{
        "id": "3fa85f64-5717-4562-b3fc-2c963f66afa0",
        "name": "Chest (Beginner)",
        "description": "A series of exercises to srengthen your chest.",
        "exercises": [
        {
            "id": "3fa85f64-5717-4562-b3fc-2c963f66afa2",
            "name": "Push up",
            "sets": 3,
            "repetitions": 10
        }
       ]
    }'
The curl command posts the JSON formatted workout plan as the body of the post request to the endpoint with the URI: http://localhost:5094/api/Workouts
Notice that two headers are passed with the request.
- Content-Type: application/json: Tells the server that the request’s body is formatted as JSON.
- accept: */*: The client informs the server that it accepts the response body in any format (JSON, XML, etc).
And this is the response:

Let’s implement the action.
    [HttpPost]
    public async Task<IActionResult> Create([FromBody] Workout plan)
    {
        plan.Id = Guid.NewGuid();
        await workoutService.Create(plan);
        return CreatedAtAction(nameof(GetById), new { id = plan.Id }, plan);
    }
Notice that this time, we returned called the `CreatedAtAction(…)` and returned the result.
`CreatedAtAction` returns a 201 (Created) HTTP status code along with a Location header indicating the location of the newly created resource. `CreatedAtAction` is typically used in the context of a POST request to create a new resource and returns the URI of the newly created resource in the Location header.
In this example, the CreateWorkout method uses CreatedAtAction to return a 201(Created) response with the location of the newly created resource in the Location header. The location is constructed using the GetById action and the ID of the new user. Consequently, the client will have the URI of the resource to get it later.
Status Codes and HTTP Methods
Each HTTP method may return a different response depending on how the request handling goes.
HTTP methods (e.g. GET, POST, PUT, DELETE, etc.) and HTTP status codes are related in that they work together to allow clients to interact with resources in a RESTful API. The HTTP method in a request indicates the desired action to be performed on a resource (e.g. retrieve information, create a new resource, update an existing resource, etc.). The HTTP status code returned in response to the request provides information about the outcome of the request, such as whether it was successful or if there was an error.
For example, a client might send a GET request to retrieve information about a user. If the request is successful, the server will return a 200 OK status code along with the requested information in the response body. If the requested user cannot be found, the server might return a 404 Not Found status code.
Similarly, if the client wants to create a new user, it would send a POST request to the server. If the user is successfully created, the server will return a 201 Created status code along with a Location header indicating the URI of the newly created resource.
The HTTP method indicates the desired action to be performed on a resource, while the HTTP status code provides information about the outcome of the request. Together, they allow clients to interact with resources in a standardized and meaningful way.
The following table shows which status codes to return for which method in which situation.
| Status Code | Description | REST API Operation |
|---|---|---|
| 200 | OK | GET, PUT, PATCH, HEAD, OPTIONS |
| 201 | Created | POST, PUT (when a new resource is created) |
| 202 | Accepted | DELETE, PUT, PATCH, POST, HEAD (the request has been accepted for processing, but the processing has not been completed) |
| 204 | No Content | DELETE, PUT, PATCH, POST, GET, HEAD, OPTIONS (success and no response is needed) |
| 206 | Partial Content | GET (when only a partial representation of a resource is returned) |
| 400 | Bad Request | All (when the server cannot process the request due to invalid syntax or invalid data provided) |
| 401 | Unauthorized | All (when the client is not authorized to access the resource) |
| 403 | Forbidden | All (when the client is not allowed to access the resource) |
| 404 | Not Found | All (when the requested resource cannot be found) |
| 405 | Method Not Allowed | All (when the client uses an HTTP method that is not supported by the server) |
| 409 | Conflict | PUT, POST, PATCH (when a conflict occurs due to a duplicate resource) |
| 422 | Unprocessable Entity | All (when the server cannot process the request due to semantic errors in the data provided) |
| 500 | Internal Server Error | All (when the server encounters an unexpected error) |
Posting Workouts
For updating the `Workout` resource, we must use the PUT HTTP method. The Update method accepts two parameters. One is mapped from the route, and the other from the body. So just like the `Create` action, let’s decorate the `Workout` parameter with the `[FromBody]` attribute.
    [HttpPut("{id}")]
    public async Task<IActionResult> Update(Guid id,[FromBody] Workout workout)
    {
        await workoutService.Update(workout);
        return NoContent();
    }
Let’s also look at the table and reply with the right status codes for different statuses we can find in the table.
    [HttpPut("{id}")]
    public async Task<IActionResult> Update(Guid id, [FromBody] Workout workout)
    {
        if (id != workout.Id)
        {
            return BadRequest();
        }

        try
        {
            await workoutService.Update(workout);
        }
        catch (ArgumentException ex) when (ex.Message.Contains("not found"))
        {
            return NotFound();
        }

        return NoContent();
    }
You can learn more about this type of exception handling in my catching exceptions article.
Now run the app, execute the Get /api/Workouts.
Copy the item from the JSON in the response body, and paste it as the body of a PUT request.

Then modify the JSON values (I updated the workout name to “Push Up” in this image), and copy the Id to the Id input to pass it as a route parameter. Finally, execute the request.

You should see the 204 No Content status code in the response. Now, look at the code again. Try executing requests that cause BadRequest and NotFound by changing the Id route parameter (The Id input in the image above).
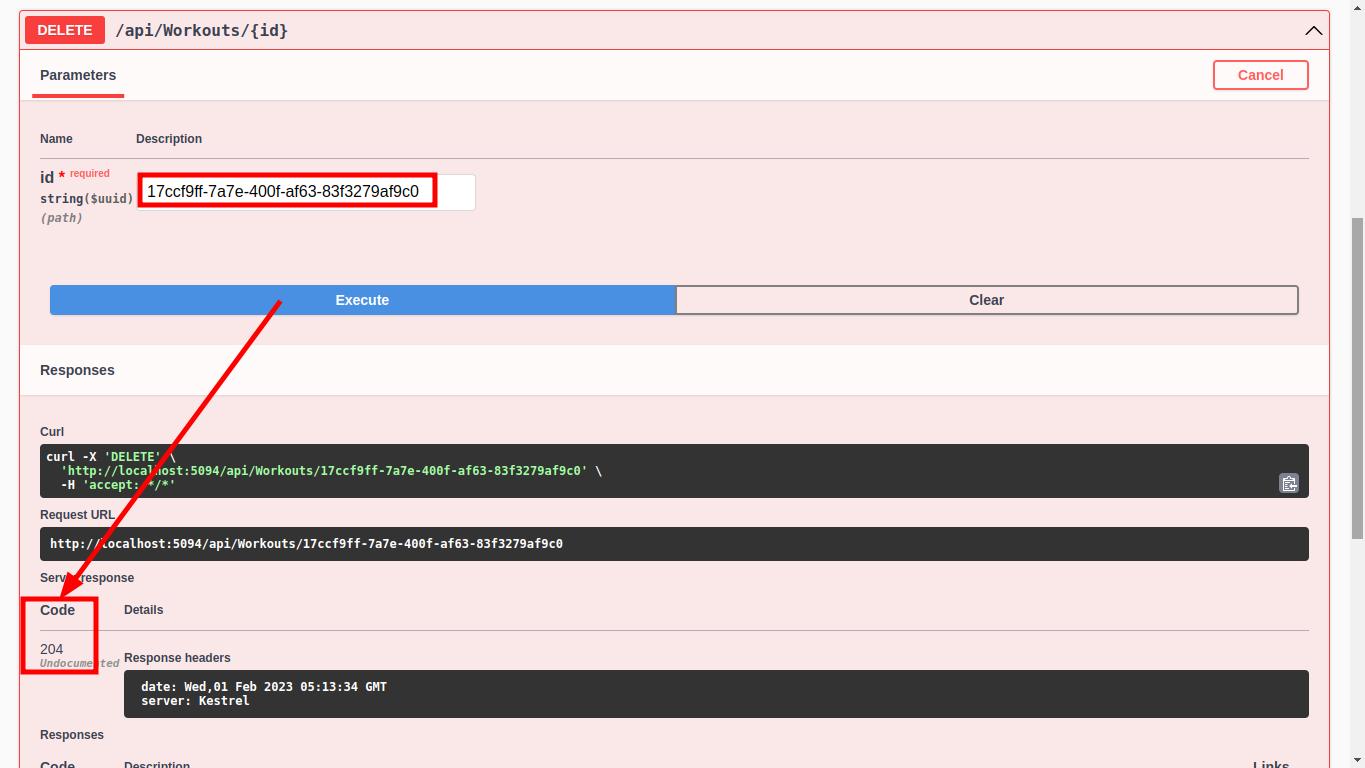
Deleting Workouts
As it’s apparent in the table, there are two possible status codes for the class 2XX HTTP codes.
- 202 Accepted: The request has been accepted for processing, but the processing has not been completed.
- 204 No Content: Success and no response is needed.
204 is the one we must use as we’re certain whether the deletion was successful before returning the response. The first option is proper for CQRS implementations where we put the command in a queue and listen for its success from another channel, for example.
    [HttpDelete("{id}")]
    public async Task<IActionResult> Delete(Guid id)
    {
        await workoutService.Delete(id);
        return NoContent();
    }
You already know how to test it using the Swagger UI. So go ahead.
Get all workouts;

Copy a workout id and paste it to the delete section.
Idempotent HTTP Methods
These methods can be called multiple times and have the same result. For example, no matter how many times a client sends the same PUT requests with the same data to an endpoint to update a resource, the resource remains as if you’ve sent the request once.
The following HTTP methods are considered idempotent:
- GET
- PUT
- PATCH
- DELETE
- HEAD
As an example, no matter how many times a client HTTP Deletes the/api/Workouts/123from the endpoint, it doesn’t update the state (doesn’t delete anything new) after its first execution.
These methods can be called multiple times and will have the same result, which means that repeated calls with the same data will not result in different outcomes. This makes idempotent methods useful for ensuring that a resource remains in a consistent state, even if the client’s network connection is lost or an error occurs during the request.
Safe HTTP methods
Safe HTTP methods never modify resources on the server. Consider them as read-only methods. They can be called multiple times without side effects.
The following HTTP methods are considered safe:
- GET
- HEAD
- OPTIONS
All safe methods are idempotent, but not the other way around. As an example, HTTP Getting the /api/Workoutsfrom the endpoint can never update the state of the server.
Safe vs Idempotent Methods
It is important to note that the HTTP methods should be used according to their intended purpose, as defined by the HTTP specification, to ensure the reliability and consistency of the API. Using an unsafe method when it should be, or vice versa, can result in unexpected behavior and confusion.
The side effects of more than one identical request with an idempotent method are the same as for a single request. However, Safe methods never modify the resource on the server side. Even for the first time. As said, all safe HTTP methods are idempotent, but not all idempotent methods are safe.
You can learn more about safe and idempotent methods in the RFC2616.
Getting Workouts by id
Getting workouts by its id is simple. It’s like getting all workouts, but it accepts an Id as the route parameter.
    [HttpGet("{id}")]
    public async Task<ActionResult<Workout>> GetById(Guid id)
    {
        var workout = await workoutService.GetById(id);
        if (workout == null)
        {
            return NotFound();
        }
        return workout;
    }
As it’s apparent from the table NotFound status must be returned when the requested resource cannot be found.
Now run the app and do the following:
- Get all workouts
- Copy the Id of a workout from the response
- Then open the `http://localhost:5094/api/Workouts/7717cb56-0335-4e43-be95-4950818c78cd` in your browser where `7717cb56-0335-4e43-be95-4950818c78cd` is the workout id you’ve copied.

You must see the workout JSON. Now test the 404 NotFound.
Let’s continue with some basics.
What is REST
Representational State Transfer (REST) is an architectural style for building web services that are based on the principles of the HTTP protocol and the URI (Uniform Resource Identifier) standard. REST is designed to work with the existing internet infrastructure, making it simple and easy to understand for developers.
- The term “Representational” refers to the fact that a RESTful web service provides a representation of a resource, such as a JSON, XML, Text, etc
- “State Transfer” refers to the fact that the representation of the resource changes as the state of the resource changes.
In REST, the client and server communicate through a network, typically the internet, using the HTTP protocol. The client requests the server, and the server responds to the requests. The client and server can be separate entities, meaning that the client does not need to know the internal structure of the server or how it processes the request. This allows for flexibility and scalability, as the client and server can be developed and deployed independently.
A REST API client requests a web server, which then responds with the requested information. The requests and responses are typically sent over the HTTP protocol, but we can also use HTTPS for added security.
The basic workflow of a REST API involves requesting a specific endpoint, URL, or URI (Uniform Resource Identifier) that represents a resource, such as a specific piece of data or functionality. The endpoint is typically accessed using one of the four main HTTP methods: GET, POST, PUT, and DELETE.
Overall, REST APIs use the existing HTTP protocol. It uses the standard HTTP methods and returns data in a standard format; it is platform-independent, meaning that it can be used with any programming language or technology to make HTTP requests and parse JSON or XML data.
Uniform Resource Identifier (URI)
As said, a Uniform Resource Identifier (URI) is a string of characters used to identify a name or a resource on the Internet. URIs can be split into the following two types:
- URLs (Uniform Resource Locators)
- URNs (Uniform Resource Names)
The URI standard provides a way to identify resources on the internet, whether it’s a webpage, a document, an image, a video, etc. URIs are used to identify resources in REST APIs and to access and manipulate resources over the internet using standard HTTP methods.
Uniform Resource Locator (URL)
A URL (Uniform Resource Locator) is a specific type of URI that is used to identify the location of a resource on the Internet, such as a webpage or an image. A URL typically includes the protocol (such as “http” or “https”), the domain name, and the path to the resource. For example, https://www.example.com/workouts/123 is a URL that identifies the location of a specific “workout plan” resource on a server.
Uniform Resource Name (URN)
A URN (Uniform Resource Name) is a specific type of URI used to identify a resource by its name rather than its location. A URN addresses a resource independently of its location, making it useful for situations where the resource may be moved or replicated. For example, “urn:isbn:978-0321127426” is a URN that identifies a specific book by its ISBN number.
Types of REST APIs
There are two main types of REST APIs: public and private.
- Public REST APIs are available to anyone and can be accessed without authentication. They often retrieve publicly available data, such as weather forecasts or stock prices.
- Private REST APIs require authentication and are typically used to access sensitive data or perform actions that require authorization.
Rest Architectural Constraints
REST API follows the principles of REST (Representational State Transfer) architecture. REST defines six constraints that specify its design and must be followed when building web services.
- Client-Server Architecture: In a REST API, the client is the application that requests the server, and the server is the application that responds to the request. The client and server communicate through a network, typically the internet, using the HTTP protocol.
- Statelessness: The server should not maintain any client state (like sessions) between requests. All information needed to service a request must be contained in the request itself.
- Uniform Interface: The API must have a standardized way of accessing and manipulating resources. REST APIs use a uniform interface, which consists of a set of methods, such as GET, POST, PUT, and DELETE, and a set of endpoints. Endpoints are the specific locations of the requested resources, such as
https://example.com/Workouts. The method specifies the action performed on the resource, such as retrieving or updating data. The purpose of the Uniform Interface is to decouple the client from the server, allowing for independent evolution of each component. It defines four key elements:- Identification of resources: Resources are identified using URIs, allowing for easy access and manipulation of resources on the web.
-
Manipulation of resources through representations: Resources can be manipulated using representations, such as JSON or XML, that can be transmitted over HTTP.
-
Self-descriptive messages: The format of the representations, such as the media type, must be specified in the HTTP headers, allowing the client and server to understand the format of the data being transmitted.
-
Hypermedia as the engine of application state (HATEOAS): Resources must contain links to other resources, allowing the client to discover and navigate the API. This makes it easier for clients to understand the structure of the API and interact with resources. (More on this can be a subject for a separate article)
- Cacheability: Clients should be able to cache responses, allowing for improved performance and reduced network usage.
- Layered System: The architecture should allow intermediary components, such as proxy servers, to be introduced between the client and server without affecting the communication between them.
- Code on Demand (optional): The server can provide executable code or scripts (like javascript codes) to be run by the client. This can be used to extend the functionality of the client.
RESTful constraints help developers to build flexible, scalable, and maintainable APIs for accessing and manipulating resources on the web.
Open API
OpenAPI is a specification for describing RESTful APIs. It provides a standard, language-agnostic format for defining the structure of APIs, including their endpoints, parameters, request/response bodies, and security definitions. The goal of OpenAPI is to make it easier for developers to understand and consume APIs, allowing them to build applications more efficiently.
With OpenAPI, developers can create a single definition for their API that can be used across their organization or shared with external partners and developers. This definition can generate documentation, code, test cases, and other artifacts. Additionally, tools such as API gateways and microservices frameworks can use OpenAPI definitions to automate various tasks, such as routing requests and generating code.
Open API vs Swagger
Swagger and OpenAPI are separate but related technologies. RESTful APIs can be described using the OpenAPI specification, which offers a standardized, language-independent method for doing so. It was developed to offer a method for describing APIs that is language-agnostic, machine-readable, and understandable by humans, making it simpler for developers to comprehend and use APIs.
The OpenAPI definition is implemented by a set of tools and technologies called Swagger. It comes with tools for creating, developing, and documenting RESTful APIs, including an intuitive online interface for designing APIs, a code generator for creating client libraries and server stubs, and a collection of libraries for runtime administration and validation.
In a nutshell, Swagger is a set of tools, while OpenAPI is the specification to implement that specification. Swagger and OpenAPI are not the same things, despite the fact that this is something that many people mistakenly believe.
Of the tools, we have already seen the auto-generated Swagger UI. To see the specification of your API in JSON format, run your app and navigate to `http://localhost:5229/swagger/v1/swagger.json`. This is what the UI gets generated based on.
If you want to boost your C# career, check out our powerful ASP.NET full-stack web development course that also Test-Driven development.
Configuring Swagger
We’re not going too deep about swagger in this article. But we’ll rather see an example of decorating actions and adding XML comments to them to improve the API spec. To make the XML comments affect the swagger, we must add some configurations to the project file and Program.cs.
Open <your project name>.csproj file and add the following:
  <PropertyGroup>
    <!--Include xml comments in swagger UI-->
    <GenerateDocumentationFile>true</GenerateDocumentationFile>
  </PropertyGroup>
Likewise, open your `Program.cs` file and add the following parameters to AddSwaggerGen.
        builder.Services.AddSwaggerGen(options =>
        {
            //To enable xml comments
            var xmlFilename = $"{Assembly.GetExecutingAssembly().GetName().Name}.xml";
            options.IncludeXmlComments(Path.Combine(AppContext.BaseDirectory, xmlFilename));
        });
Finally, add the following XML comments and decorations to your WorkoutController.Create action.
    /// <summary>
    /// Creates a workout.
    /// </summary>
    /// <param name="plan"></param>
    /// <returns>A newly created workout</returns>
    /// <remarks>
    /// Request Example:
    ///
    ///     POST /api/workout
    ///     {
    ///       "id": "3fa85f64-5717-4562-b3fc-2c963f66afa6",
    ///       "name": "string",
    ///       "description": "string",
    ///       "date": "2023-01-26T17:33:50.275Z",
    ///       "exercises": [
    ///         {
    ///           "id": "3fa85f64-5717-4562-b3fc-2c963f66afa6",
    ///           "name": "string",
    ///           "sets": 0,
    ///           "repetitions": 0,
    ///           "weight": 0,
    ///           "duration": 0
    ///         }
    ///       ]
    ///     }
    ///
    /// </remarks>
    /// <response code="201">Returns the newly created plan</response>
    /// <response code="400">If the posted plan is null</response>
    [HttpPost]
    [ProducesResponseType(StatusCodes.Status201Created)]
    [ProducesResponseType(StatusCodes.Status400BadRequest)]
    [ProducesDefaultResponseType]
    public async Task<IActionResult> Create(Workout plan)
    {
        plan.Id = Guid.NewGuid();
        await workoutService.Create(plan);
        return CreatedAtAction(nameof(GetById), new { id = plan.Id }, plan);
    }
Notice how adding the XML comments and the attributes affected the Swagger UI.
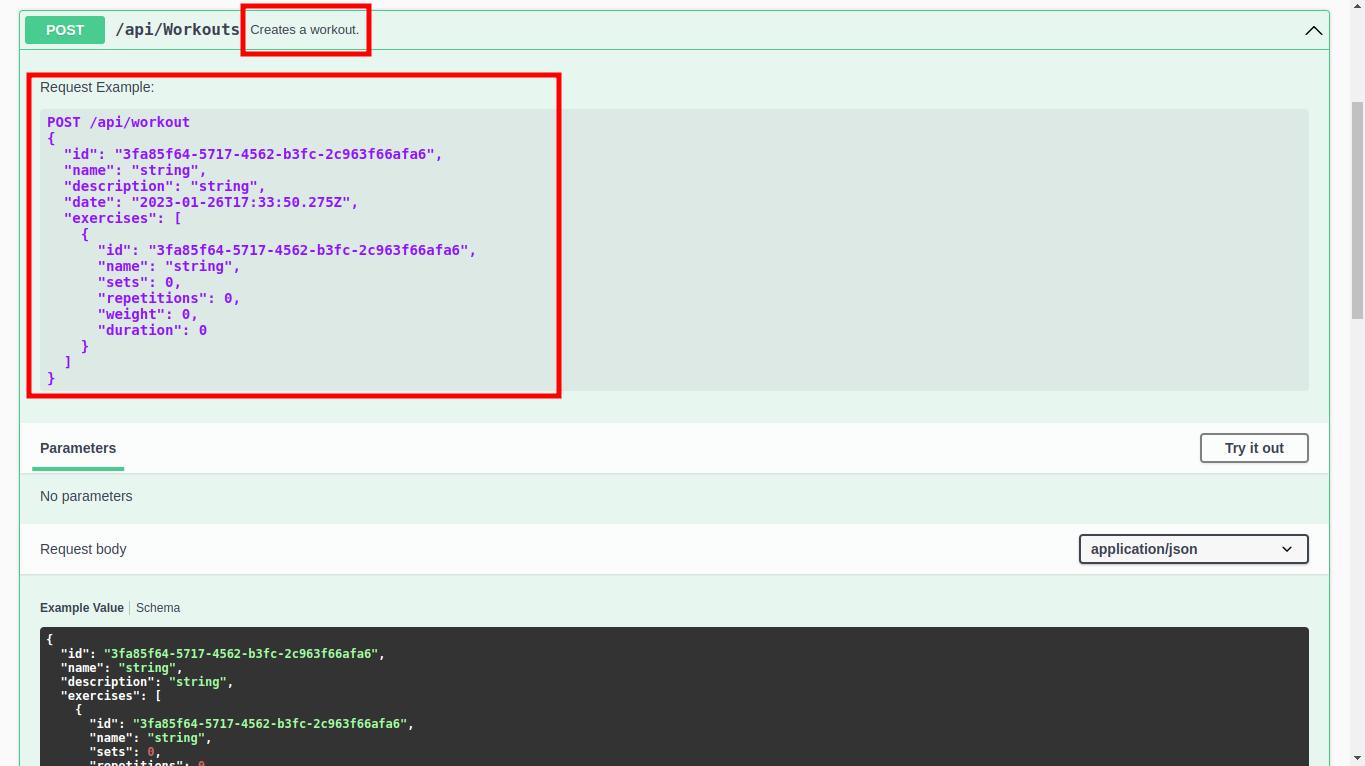
We also documented possible response status codes using the attributes and wrote the description for each in the XML comments.

You may also want to try removing/adding some of the comments and attributes; navigate to `http://localhost:5229/swagger/v1/swagger.json` and see how changes affect the swagger.
As an exercise, you can also decorate the rest of the actions using [ProducesResponseType] attributes to document the possible HTTP status codes each action may respond with.
You can the following lines to your project file (<your project name>.csproj file) to warn you to remember to document status codes for all actions.
  <PropertyGroup>
    <!--To disable warnings like: warning CS1591: Missing XML comment for publicly visible type or member `WorkoutController`-->
    <NoWarn>$(NoWarn);1591</NoWarn>

    <!--Warn about the missing `[ProducesResponseType]` attributes for HTTP status codes-->
    <IncludeOpenAPIAnalyzers>true</IncludeOpenAPIAnalyzers>
  </PropertyGroup>
Next, open your application’s startup file (usually the Program.cs file) again and search for this line:
app.UseSwaggerUI();
And replace it with this one.
app.UseSwaggerUI(options =>
{
    options.SwaggerEndpoint("/swagger/v1/swagger.json", "v1");
    options.RoutePrefix = string.Empty;
});
This configuration serves the Swagger UI at the application’s root route (`http://localhost:5229`) instead of `http://localhost:5229/swagger-ui`.
Finally, we want to update; and add more information to this part.

In your application’s startup, search for this line again: `builder.Services.AddSwaggerGen(` and update it like the following:
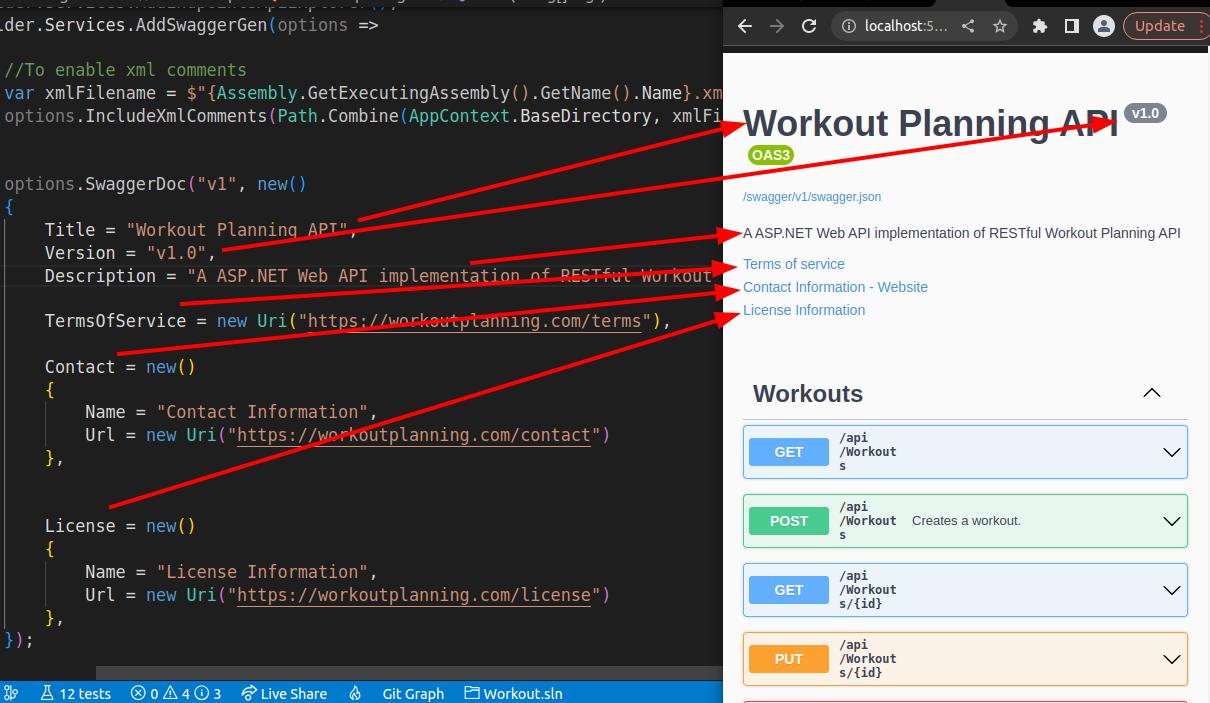
        builder.Services.AddSwaggerGen(options =>
        {
            //To enable xml comments
            var xmlFilename = $"{Assembly.GetExecutingAssembly().GetName().Name}.xml";
            options.IncludeXmlComments(Path.Combine(AppContext.BaseDirectory, xmlFilename));


            options.SwaggerDoc("v1", new()
            {
                Title = "Workout Planning API",
                Version = "v1.0",
                Description = "A ASP.NET Web API implementation of RESTful Workout Planning API",

                TermsOfService = new Uri("https://workoutplanning.com/terms"),

                Contact = new()
                {
                    Name = "Contact Information",
                    Url = new Uri("https://workoutplanning.com/contact")
                },


                License = new()
                {
                    Name = "License Information",
                    Url = new Uri("https://workoutplanning.com/license")
                },
            });

        });
Run the app and see how the new configuration updates the Swagger.
Finally, decorate your WorkoutController with the `[Produces(“application/json”)]` attribute.

Congrats on reading such a long article. The project, including the API tests, is available in this GitHub repository. Feel free to download it and use the code as a cheatsheet to remember what you learned in this article.
Conclusion: ASP.NET API Tutorial
Congrats! You have successfully created an entire ASP.NET RESTful API from scratch!
Surely there is more to discover in ASP.NET but those are the fundamentals. If you want to learn more, check out our ASP.NET MVC Guide here.
Oh, and if you feel overwhelmed with coding, check out our developer membership (seriously, it’s worth it!). We help you master coding fast and easily.