


ASP.NET MVC Tutorial
Hey and welcome to our ASP.NET MVC tutorial! So, you are interested in learning ASP.NET MVC?
Oh what a great choice! Now get yourself a tea or a coffee and let’s craft your first MVC application together.
If you prefer video over text, here is a YouTube video we have created to teach you ASP.NET MVC:
Before we get to the coding part let’s discover who this tutorial is for.
Our ASP.NET MVC tutorial here is for developers who are already familiar with C# and want to learn web application development.
ASP.NET MVC is a robust framework for building web applications, and it can be an excellent choice for building a CRUD recipe website. In this article, we’ll walk through the process of building a simple recipe website using ASP.NET MVC, starting with setting up a new project and ending with a functional website that allows users to add, edit, and delete recipes.
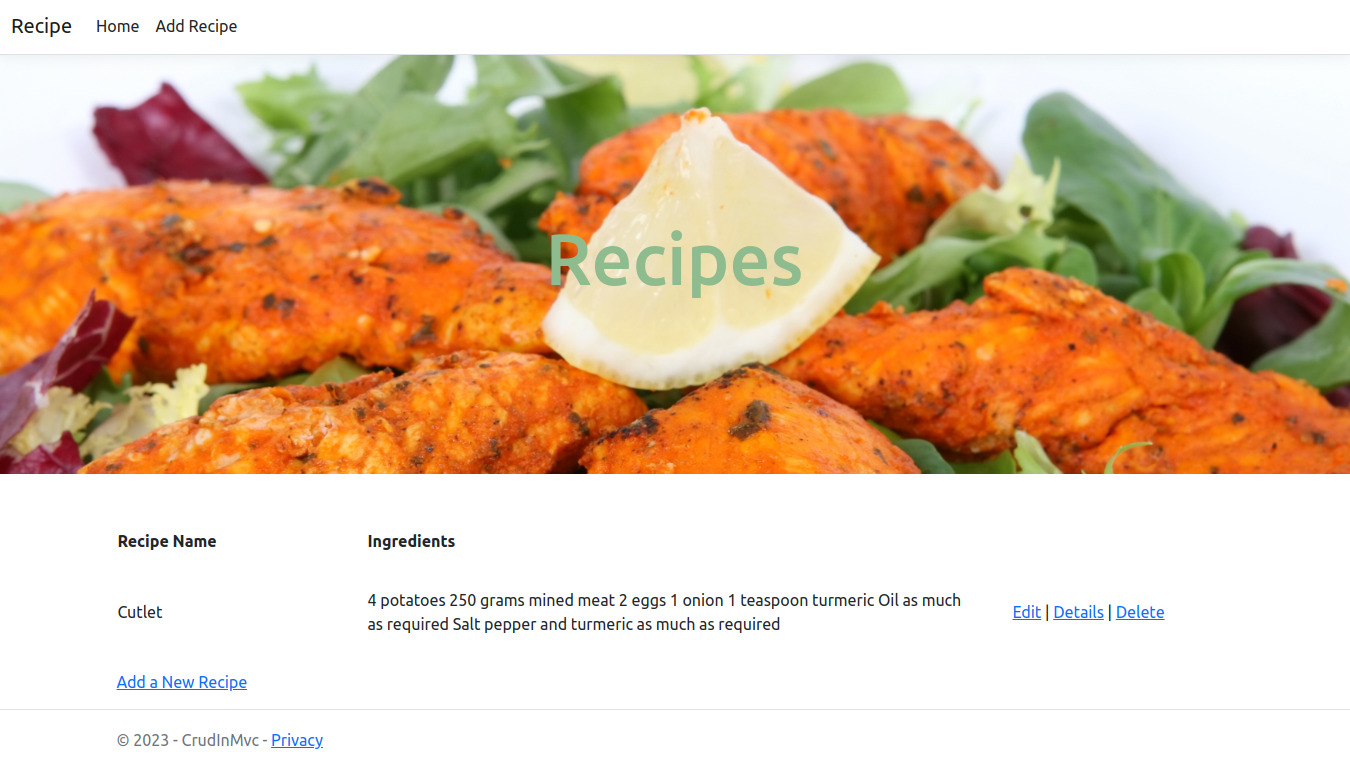
This image shows a page of the website we’ll be creating in this article.
We’ll create our Recipes application step-by-step:
- Step 1: Setting up a new ASP.NET MVC project
- Step 2: Creating the Recipe Model
- Step 3: Creating a List of Recipes
- Step 4: Creating the Recipe Controller
- Step 5: Reading Recipes List
- Step 6: Reading Recipe Details
- Step 7: Editing Recipes
- Step 8: Adding New Recipes
- Step 9: Removing Existing Recipes
- Step 10: Configuring the Default Route
- Step 11: Laying Out
Alongside the steps, we’ll walk you through the following:
- Adding new Controllers
- Adding New Actions
- Adding new Views
- Creating Forms
- Posting Data
- Validating Posted Models
The best way to use this article is to follow along and accomplish each step.
Ready to get started? Let’s dive right in!
Step 1: Setting up a new ASP.NET MVC project
The first step is opening Visual Studio and creating a new ASP.NET MVC project. Choose the “ASP.NET Web Application” template, and select the “MVC” option. This will create a new project with all the necessary files and folders.
Step 2: Creating the Recipe Model
The next step is to create a model for our recipes. In this example, we will create a simple Recipe class with properties for the recipe name, ingredients, and instructions. We will also add a property for the recipe’s ID. To create the Recipe model, create a new class called Recipe.cs and put it into the `Models` folder.
public class Recipe
{
    public Guid ID { get; set; }
    public string Name { get; set; }
    public string Ingredients { get; set; }
    public string Instructions { get; set; }
}
Step 3: Creating a List of Recipes
Next, we’ll create a new folder and name it: Data and the Recipes class to it.
public class Recipes
{
    readonly List<Recipe> recipes = new();

    public IEnumerable<Recipe> List()
    => recipes;

    public Recipe FindById(Guid recipeId)
    => recipes.Single(recipe => recipe.ID == recipeId);

    public void Add(Recipe recipe)
    => recipes.Add(recipe);

    public void Update(Recipe newRecipe)
    {
        var oldRecipe = recipes.Single(r => r.ID == newRecipe.ID);

        oldRecipe.Name = newRecipe.Name;
        oldRecipe.Ingredients = newRecipe.Ingredients;
        oldRecipe.Instructions = newRecipe.Instructions;
    }

    public void Remove(Guid recipeId)
    => recipes.Remove(FindById(recipeId));
}
`Recipes` is a simple class containing a list of Recipes and the methods for adding, removing, listing, and finding the recipes.
- The
Addmethod adds a new recipe to the list. - The
Removemethod removes a recipe from the list. - The
Updatemethod updates an existing recipe from the list. - The
Listmethod returns all recipes in the list. - The
FindByIdmethod finds a recipe by id and returns it as the name implies.
We’ve written nothing but Pure C# code so far. In the next steps, we’ll expose the code we wrote on the web. So that users can add, remove, update, list, or find recipes on the web. To do so, we need to create a controller.
Step 4: Creating the Recipe Controller
The next step is to create a controller that will handle the `Recipes` operations. In this example, we will create a controller called RecipeController. To create the controller, right-click on the Controllers folder in the project and select “Add” > “Controller”. Select the “MVC 5 Controller – Empty” option and name it RecipeController. Once the controller is created, we can add the actions for our `Recipes` operations.
public class RecipeController : Controller
{
    public ActionResult List()
    {
        throw new NotImplementedException();
    }

    public ActionResult FindById(Guid recipeId)
    {
        throw new NotImplementedException();
    }

    public ActionResult Add()
    {
        throw new NotImplementedException();
    }

    public ActionResult Update(Guid recipeId)
    {
        throw new NotImplementedException();
    }

    public ActionResult Remove(Guid recipeId)
    {
        throw new NotImplementedException();
    }
}
As you see, the methods we added to the controller have the same signature as the methods in the `Recipes` class except for their return type, which is ActionResult. These methods are so-called actions.
Actions execute a web request and generate the response for the requests. Actions are defined in controllers.
Step 5: Reading Recipes List
Implementing the List Action
Now that we have a controller and the action let’s implement the first one I would implement the list first.
public ActionResult List()
{
    var recipes = new Recipes().List();
    return View(recipes);
}
The implementation of the list action is that simple. It returns a view initialized with the recipes from the action. Returning a View from the list action in RecipeController tells the framework to look for a view with the name List in the Views/Recipe folder, and return it to the browser to show it to the user. But there’s nothing in that folder at the moment. We’ll add it next. Don’t worry if it’s a little complex; you’ll understand it better once you add the view and run the app.
Adding the List View
We need to add the views that will be displayed to the user. In this example, we will create views for listing all recipes, viewing a single recipe, creating a new recipe, and editing an existing recipe. For now, let’s add the View the List action returns. To create the views, right-click on the action in the controller and select “Add View”.
Now navigate to the Views/Recipe folder and open the List.cshtml file. A nice feature of cshtml files is that we can write a combination of C# and HTML in them, as the extension implies. So let’s write in the following code the view to show the list of recipes the action passes to the view.
@model IEnumerable<Recipe>

<table>
    <tr>
        <th style="width:300px">Recipe Name    </th>
        <th>Ingredients</th>
    </tr>

    @foreach (var recipe in Model)
    {
        <tr>
            <td>@recipe.Name</td>
            <td>@recipe.Ingredients</td>
        </tr>
    }
</table>
Look at the combination of C# and `HTML`. C# codes start with the `@`. Let’s zoom out and dig deeper.
On top, the @model IEnumerable<Recipe> represents the model the List action passes to the View() it returns:
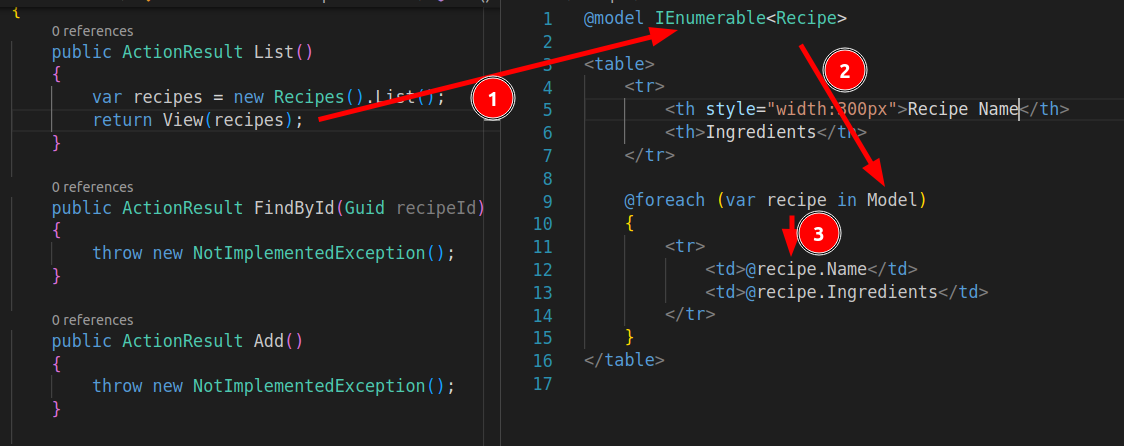
Doing so enables us to access the list of recipes the action passes to the view from the Modelobject. Consequently, we can simply loop over the recipes and add a table row (`<tr>…</tr>`) for each recipe in the list. See how interesting the combination of C# and HTML can be?
Let’s run the app and navigate to localhost:<your app's port>/recipe/list

It views an empty recipe list. Look at the address. The so-called route is /recipe/list where recipe is the controller and the list is the action’s name.
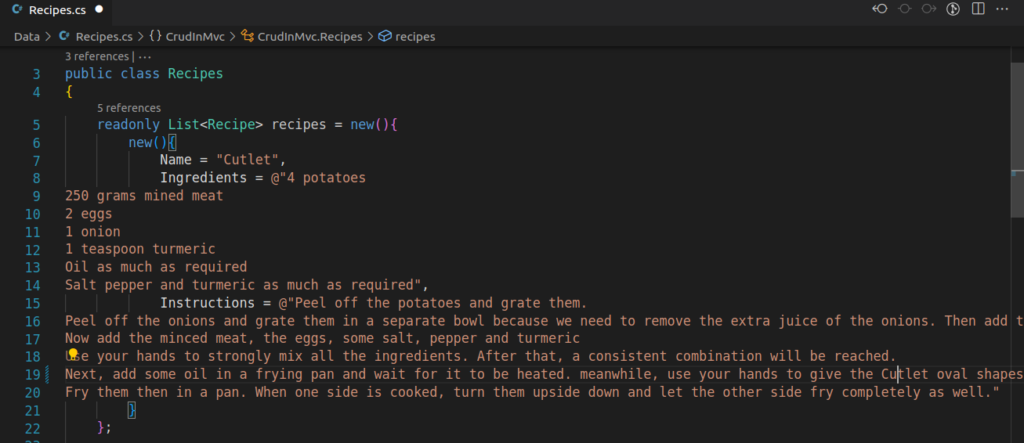
Let’s initialize the recipe list with a recipe to see how it displays the data. I’ll borrow a recipe from here and add it to the recipe list in the Recipes class.
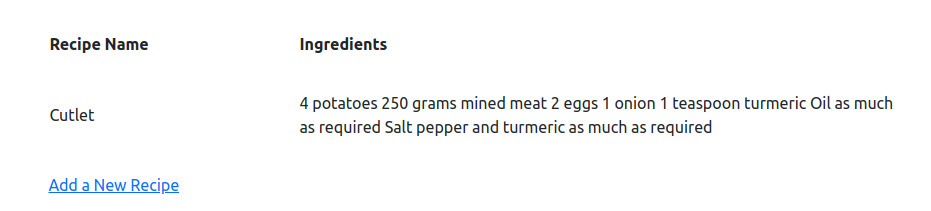
Let’s run the app again and navigate to the /recipe/list path to see the following:
Awesome! But I can’t see the recipe instructions in the list. To see the instructions, users should see the recipe details page, which we haven’t implemented yet. Let’s rename the FindById action to Details and add a link to the Details action for each recipe:
    @foreach (var recipe in Model)
    {
        <tr>
            <td>@recipe.Name</td>
            <td>@recipe.Ingredients</td>
            <td>
                <a asp-action="Details" asp-route-id="@recipe.ID">Details</a>
            </td>
        </tr>
    }
If you click the Details link at run-time; it throws the NotImplementedException. Because we’re throwing it in the `Details` action’s body:
    public ActionResult Details(Guid id)
    {
        throw new NotImplementedException();
    }
Notice the
as-route-idattribue of theatag in the view We set it to `@recipe.ID`:<a asp-action="Details" asp-route-id="@recipe.ID">Details</a>The `@recipe.ID` is passed as the
idparameter of theDetailsaction.
Step 6: Reading Recipe Details
Implementing the Details Action
Let’s implement the Details (formerly-named FindById) action by replacing the NotImplementedException with the following:
    public ActionResult Details(Guid id)
    {
        var recipe = new Recipes().FindById(id);
        return View(recipe);
    }
Running it throws the following exception:
InvalidOperationException: The view 'Details' was not found. The following locations were searched:
/Views/Recipe/Details.cshtml
/Views/Shared/Details.cshtml
Adding the Details View
Reading the exceptions helps you understand how the framework works. Exceptions guide you through solving the problem. In this case, it tells me that Details.cshtml file must be in the Views/Reciple/ folder. So I’ll add the file and write the following code in it.
@model Recipe

<h2>@Model.Name</h2>

<div>
    <h3>Ingredients:</h3>
    <p>@Model.Ingredients</p>
</div>

<div>
    <h3>Instructions:</h3>
    <p>@Model.Instructions</p>
</div>

<a asp-action="Edit" asp-route-id="@Model.ID">Edit</a> |
<a asp-action="List">Back to List</a>
And you’re already familiar with the paradigm, aren’t you?

Step 7: Editing Recipes
Implementing the Edit Action (Get Edit Data)
We also added the link to the Edit action from the Details view. But we don’t have an Edit action. so I’ll rename the Update action to Edit
    public ActionResult Edit(Guid id)
    {
        throw new NotImplementedException();
    }
Like what we did for the Details action, we’ll implement the Edit action.
    public ActionResult Edit(Guid id)
    {
        var recipe = new Recipes().FindById(id);
        return View(recipe);
    }
Implementing the Edit View
Add the Edit.cshtml:
@model Recipe

<h2>Edit Recipe</h2>

<form method="post" asp-controller="Recipe" asp-action="Edit">
    <div class="form-group">
        <label asp-for="Name"></label>
        <input asp-for="Name" class="form-control" />
        <span asp-validation-for="Name"></span>
    </div>
    <div class="form-group">
        <label asp-for="Ingredients"></label>
        <textarea asp-for="Ingredients" class="form-control"></textarea>
        <span asp-validation-for="Ingredients"></span>
    </div>
    <div class="form-group">
        <label asp-for="Instructions"></label>
        <textarea asp-for="Instructions" class="form-control"></textarea>
        <span asp-validation-for="Instructions"></span>
    </div>
    <input type="hidden" asp-for="ID" />
    <input type="submit" value="Update Recipe" class="btn btn-primary" />
    <a asp-action="List">Cancel</a>
</form>
What’s new in this view is the <form></form> tag that contains the inputs. The form element has an asp-controller and asp-action attributes. In the form, we have an input element of the submit type. The asp-controller is set to Recipe , and the `asp-action` is set to Edit. If the user clicks the submit button (submit input) the browser posts the input values to the Edit action of the Recipe controller. However, if I click the Submit button now, it reloads the page without applying the edits.
Posting Form Data
Form submission doesn’t update the data because we need to add another overload for the Edit method. The Edit action that returns the view differs from the one that accepts form posts. So Let’s add the following action to the controller.
    [HttpPost]
    public IActionResult Edit(Recipe editedRecipe)
    {
        throw new NotImplementedException();
    }
Notice the HttpPost attribute on top of the method. This overload also accepts a parameter of the type Recipe. The editedRecipe parameter is bound to the form inputs the client posts. The `asp-for` attributes on the input tags tell the MVC framework’s default model binder which property the inputs should be bound to. In our example, `asp-for=”Name”` sets the value of the Name input to the `editedRecipe.Name`.
So I can read the name input’s value like the following once the form is posted to the server:
    [HttpPost]
    public IActionResult Edit(Recipe editedRecipe)
    {
        var inputtedName = editedRecipe.Name;
    }
Before implementing the Edit action, let’s refactor the controller to accept the recipes from its constructor instead of instantiating it in every action.
Configuring the IoC
public class RecipeController : Controller
{
    private readonly Recipes recipes;

    public RecipeController(Recipes recipes)
    {
        this.recipes = recipes;
    }

    public ActionResult List()
    {
        var recipesList = recipes.List();
        return View(recipesList);
    }

    public ActionResult Details(Guid id)
    {
        var recipe = recipes.FindById(id);
        return View(recipe);
    }

    public ActionResult Edit(Guid id)
    {
        var recipe = recipes.FindById(id);
        return View(recipe);
    }
    ...
}
So now I should configure the IoC container to instantiate the Recipes class and inject it into the controller object constructors. So I add the following line before `var app = builder.Build();`.
builder.Services.AddSingleton<Recipes>();
Implementing the Edit Action (Post Data)
As you can tell, implementing the edit action is so simple.
    [HttpPost]
    public IActionResult Edit(Recipe editedRecipe)
    {
        recipes.Update(editedRecipe);
        return RedirectToAction(nameof(List));
    }
The second line redirects the user to the List action. Because our users want to see the recipes list every time they edit a recipe.
We’ve implemented the list in memory, so if you stop the application, the changes are lost.
Validation
What if a user leaves the `Recipe`’s name empty? That’s obviously unacceptable. How to avoid it? We’ll use the Dotnet’s built-in DataAnnotations library. I’ll open the Recipe model and decorate the properties I want to validate:
public class Recipe
{
    public Guid ID { get; set; }

    [Required(ErrorMessage = "Please enter a name for the recipe.")]
    [StringLength(255, ErrorMessage = "The recipe name must be less than 255 characters.")]
    public string Name { get; set; }

    [Required(ErrorMessage = "Please enter the ingredients for the recipe.")]
    public string Ingredients { get; set; }

    [Required(ErrorMessage = "Please enter the instructions for the recipe.")]
    public string Instructions { get; set; }
}
Then add the validation logic to the Edit action:
    [HttpPost]
    public IActionResult Edit(Recipe editedRecipe)
    {
        if (ModelState.IsValid)
        {
            recipes.Update(editedRecipe);
            return RedirectToAction(nameof(List));
        }
        return View(editedRecipe);
    }
If the editedRecipe (the model) is valid, then do the update and redirect the user to the recipe list, otherwise reload the Edit view on the user’s browser with the editedRecipe model (which contains the validation messages.
So if I run the app, open the edit page, clear the recipe’s ingredients, and post the form, I’ll see the following result:

It displays the error message. How does it display it? Look at the `<span asp-validation-for=”Instructions”></span>` tag on the Edit.cshtml view. As discussed earlier, the `editedRecipe` model the action returns contains the validation messages, and because we’ve set the `asp-validation-for=”Instructions”` to the span, the framework displays the error message on the span when the action returns models with invalid Instructions. The same is true for the other properties. Run the app and play post the form with invalid sorts of data to see the effect if you’re following along.
Step 7: Adding New Recipes
Congratulations on your preference. Implementing the add recipe functionality is straightforward.
Implementing the Add (Get) Action
Let’s initialize the future Add view with a new recipe:
    public ActionResult Add()
    {
        var newRecipe = new Recipe() { ID = Guid.NewGuid() };
        return View(newRecipe);
    }
We set an Id for the new Recipe object.
Implementing the Add View
The Add view looks just like the Edit view with tiny differences, you should notice.
@model Recipe

<h2>Add Recipe</h2>

<form method="post" asp-controller="Recipe" asp-action="Add">
    <div class="form-group">
        <label asp-for="Name"></label>
        <input asp-for="Name" class="form-control" />
        <span asp-validation-for="Name"></span>
    </div>
    <div class="form-group">
        <label asp-for="Ingredients"></label>
        <textarea asp-for="Ingredients" class="form-control"></textarea>
        <span asp-validation-for="Ingredients"></span>
    </div>
    <div class="form-group">
        <label asp-for="Instructions"></label>
        <textarea asp-for="Instructions" class="form-control"></textarea>
        <span asp-validation-for="Instructions"></span>
    </div>
    <input type="submit" value="Add Recipe" class="btn btn-primary" />
    <a asp-action="List">Cancel</a>
</form>
Now I should be able to see the Add page by typing this URL on my browser’s address bar at run time:
http://localhost:<your app's port>/Recipe/Add
Let’s also append an anchor to the end of the List view to allow users to navigate to the Add page right from the List.
<a asp-action="Add">Add a New Recipe</a>
Implementing the Add (Post) Action
The `Add` post action also looks like the `Edit ` post action:
    [HttpPost]
    public IActionResult Add(Recipe newRecipe)
    {
        if (ModelState.IsValid)
        {
            recipes.Add(newRecipe);
            return RedirectToAction(nameof(List));
        }
        return View(newRecipe);
    }
If you are following along, run the app and play with it as much as possible, navigate the code base and try to understand it better.
Step 8: Removing Existing Recipes
Let’s add Edit and Delete link to each item in our recipe list view.
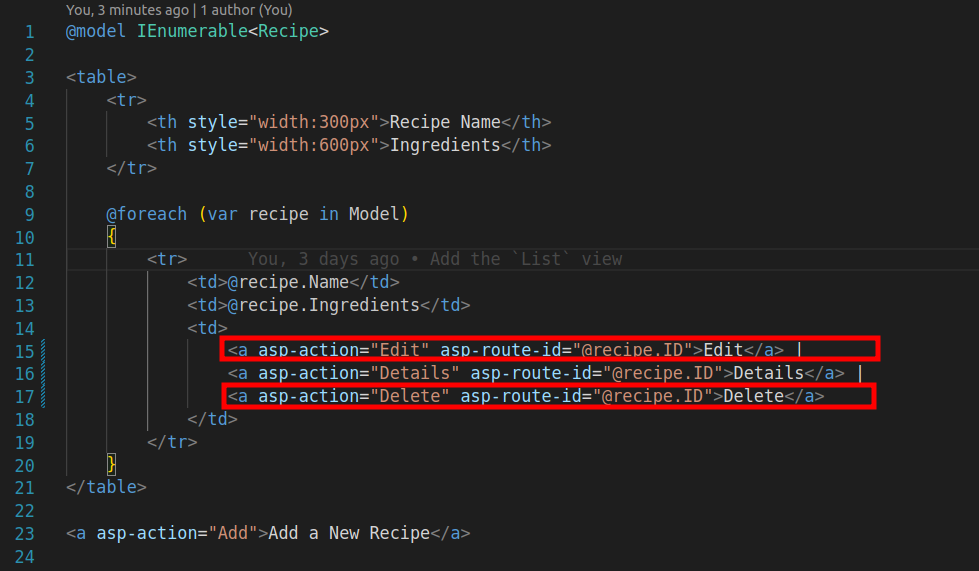
Then I’ll rename the Remove action to Delete.
    public ActionResult Delete(Guid recipeId)
    {
        throw new NotImplementedException();
    }
As you can tell, clicking the Delete link of a Recipe in the list throws the `NotImplementedException`. Let’s implement it.
    public ActionResult Delete(Guid recipeId)
    {
        recipes.Remove(recipeId);
        return RedirectToAction(nameof(List));
    }
Step 10: Configuring the Default Route
Let’s open the Program.cs file (it may be slightly different depending on the version of the application template):
using CrudInMvc;

var builder = WebApplication.CreateBuilder(args);

// Add services to the container.
builder.Services.AddControllersWithViews();

builder.Services.AddSingleton<Recipes>();

var app = builder.Build();

// Configure the HTTP request pipeline.
if (!app.Environment.IsDevelopment())
{
    app.UseExceptionHandler("/Home/Error");
    // The default HSTS value is 30 days. You may want to change this for production scenarios, see https://aka.ms/aspnetcore-hsts.
    app.UseHsts();
}

app.UseHttpsRedirection();
app.UseStaticFiles();

app.UseRouting();

app.UseAuthorization();

app.MapControllerRoute(
    name: "default",
    pattern: "{controller=Home}/{action=Index}/{id?}");

app.Run();
The line before app.Run(), maps routes (the URL users request, after localhost:<you're app's port>) to the corresponding controllers and actions. By default, it tells the framework to redirect to `http://localhost<your app’s port>/Home/Index` if the user opens the http://localhost:<your apps port>. The default route is /Home/Index/ with an optional id. The `”{controller=Home}/{action=Index}/{id?}”` string is called a route template.
If I open thehttp://localhost:<your apps port>I’ll get 404 (not found) at the moment. However, If I change the template to the following:
app.MapControllerRoute(
    name: "default",
    pattern: "{controller=Recipe}/{action=List}/{id?}");
Then It redirects users to the /Recipe/List by default, whenever they open the /route.
Step 11: Laying Out
For the user interface, we created multiple views. We didn’t create html, body or head tags. You can find all those tags as well as the nav bar on top and other elements in the Views/Shared/Layout.cshtml. The MVC framework wraps the Layout view around the other views we created. Look at the following lines in your `Layout` view:
    <div class="container">
        <main role="main" class="pb-3">
            @RenderBody()
        </main>
    </div>
The `@RenderBody()` function renders the views actions return there. Consequently, in our example, the `@RenderBody()` is replaced with the Views/Recipes/List.cshtml when the List action returns it. The Layout view allows you to design the general layout of your MVC applications.
For example, I want to add a header to all pages. Rather than editing each view individually, I will add the following div element to the header element in the Layout view.
<header>
    ...
    <div class="header">
        <h1>Recipes</h1>
    </div>
</header>
I set a header CSS class to the new div.
But we don’t have a CSS class yet. I’ll add it to the Views/Shared/Layout.cshtml.css:
.header {
  padding: 161px;
  color: darkseagreen;
  text-align: center;
  background-image: url(images/header.jpg);
  background-size: 100%;
  height: 419px;
  margin-bottom: 54px;
}

.header h1 {
  font-size: 4.5rem;
}
I added the header image to the `wwwroot/images/header.jpg`. So it can be accessed at the `images/header.jpg` path when I run the app.
The framework exposes all files under the `wwwroot`.
Conclusion
Congratulations! You have reached the end of our ASP.NET MVC tutorial 🎉
There’s a lot more to say about the ASP.NET MVC. It’s a feature-rich framework with many tips and tricks to help you create robust web applications. If you’re interested in learning more, join our powerful ASP.NET full-stack web development course that also covers test-driven development and C# software architecture. Building a CRUD recipe website using ASP.NET MVC is a relatively simple process. By following the steps outlined in this article, you can create a functional recipe website that allows users to add, edit, and delete recipes. With the power of ASP.