


ASP.NET Core JWT Tutorial
Welcome to our detailed ASP.NET Core JWT Tutorial! We’ll be implementing a simple authentication system you can follow along and see the mechanics in detail.
Topics
- What is JWT
- What is Authentication
- Authentication vs Authorization
- The Problem
- The Solution
- What is JWT?
- Simplest Possible Implementation
- JWT Structure
- The Header
- The Payload
- The Signature
- Protecting APIs
- Configuring Authentication Services
- Configuring Swagger
- Using the Identity Service at Run-Time
- The Mechanics
- The Secret
- Passing Claims to Parties
- Conclusion
I know you are hear to start implementing your JWT authentication but let’s just get clear again what JWT is.
What is JWT?
What is Authentication?
Authentication checks if a user, device, or system is really who they say they are. This usually means asking for a username and password or other details. These are then checked against a list of approved entities to decide if they should get access. The main aim is to stop unauthorized access and make sure only approved entities can see sensitive information or change data.
Authentication vs Authorization
As mentioned before, Authentication checks who a user or system is by confirming their login details, like username and password, to make sure they’re valid. It aims to identify the user.
Authorization decides if a user can access certain resources based on their identity and what they’re allowed to do. It checks a user’s rights to see if they can view a page or change information in a database.
In essence, authentication verifies who someone is, and authorization gives them permission based on their identity. Both are key for a strong security system, ensuring only the right users get access to specific resources.
The Problem
Think about logging into a website with your username and password to see protected information. One method is to send your login details to the website’s server each time you ask for something, like through headers or cookies. However, sending usernames and passwords openly is risky and doing it with every request can cause many security problems.
- Man-in-the-middle attacks: Sending the user name and password in plain text over an unencrypted network makes it vulnerable to man-in-the-middle attacks, where a third party can intercept and steal them.
- Stored credentials: If the username and password are stored on the client side, malicious actors can steal them.
- Password reuse: If a user’s password is stolen, the attacker can use it to access multiple systems if the same password is used across multiple accounts.
The Solution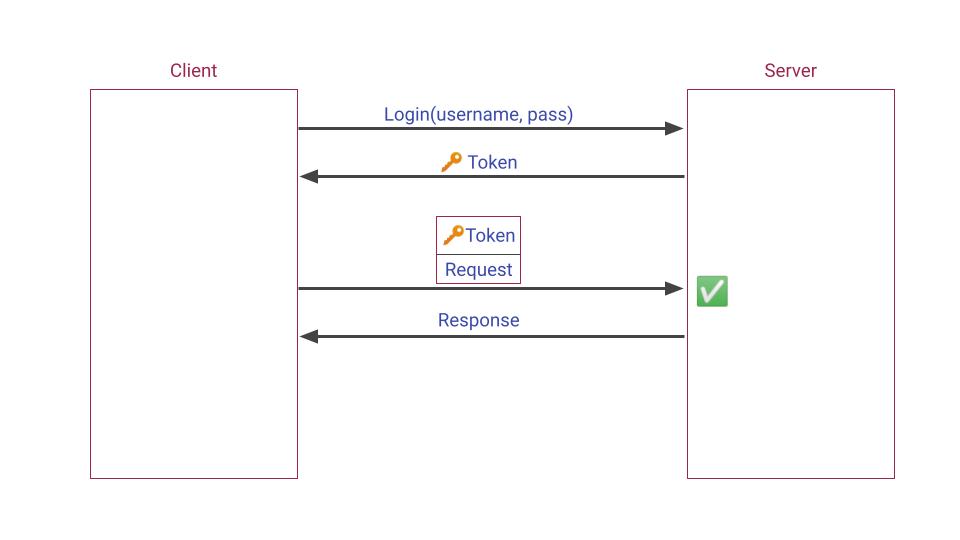
When you log into a system, you include your username and password in the request’s body and use HTTPS to encrypt the data. This way, your sensitive information stays hidden, even if someone intercepts the data. After logging in, the server gives you a token as a response.
You keep this token and add it to the Authorization header for future requests. The server checks this token when you want to access protected areas. Tokens have an expiration time, and once they expire, you get a new one. Expired tokens can’t be used, reducing the chance of misuse by anyone who might have stolen them. This approach lessens the risk of attacks.
Here are some advantages of expiring tokens:
- Security: An expired token can no longer be used to access protected resources, reducing the risk of unauthorized access.
- Time-Bound Access: JWT tokens can be used to grant time-bound access to resources. The token becomes invalid after a certain period by setting an expiration time, ensuring that the user’s access is limited to a specific time frame.
- Revoking Access: The server can revoke a user’s access by invalidating the token before its expiration time. This can be done, for example, if the user’s permissions change or their account is deleted.
In this article, we’ll use JSON Web Token (JWT) standard RFC 7519 method for generating and validating tokens. JWTs are encrypted and signed. JWT also eliminates the need for storing credentials on the client side, making it a more secure method for transmitting the information.
What is JWT?
JWT, or JSON Web Token, is a compact and URL-safe way to represent information shared between two parties. It’s often used for authorization, allowing a client, like a web browser or mobile app, to securely access an API as the user. A JWT typically holds user details such as name and email, in JSON format, signed with a secret key. These details are known as claims.
To access a protected resource, clients send a request with the JWT to the server. The server checks the JWT’s signature to ensure it’s authentic. If valid, the requested resource is sent back to the client. JWTs offer a straightforward and secure method for handling user authentication and authorization without maintaining a server-side session.
Here’s how it works:
- The client sends a request with the user’s login details (username and password) to the server.
- After verifying the credentials, the server creates a JWT with the user’s claims and a signature, then sends this JWT back to the client.
- The client uses this JWT in future requests as an authorization token.
- When the server receives a request with a JWT, it checks the signature to ensure the token is still valid.
- The server then reads the claims from the JWT to decide if the user can access the requested resources.
- If the user has the right permissions, the server provides access to the resources.
This process verifies the user’s identity and ensures they can only access what they’re allowed to. Next, we’ll look into implementing this in ASP.NET core.
Simplest Possible Implementation
Let’s create a new web API application with the name IdentityService and add a new controller named AuthenticationControllerto it.
public class AuthenticationController : ControllerBase
{
    [HttpPost]
    public IActionResult Login([FromBody] LoginDto dto)
    {
        throw new NotImplementedException();
    }
}
The LoginDto carries the user’s username and password:
public record LoginDto(string Username, string Password);
The login action checks the username and password usually by comparing them with values in a database, but for now, let’s hardcode this part.
    [HttpPost]
    public IActionResult Login([FromBody] LoginDto dto)
    {
        if (dto.Username != "Mohsen" || dto.Password != "123456")
            return Unauthorized();

        throw new NotImplementedException();
    }
It rejects the request if the username and password don’t match, and if they do, it should return a JWT to the client.
So, install the Microsoft.AspNetCore.Authentication.JwtBearer package and implement the rest of the
    [HttpPost]
    public IActionResult Login([FromBody] LoginDto dto)
    {
        if (dto.Username != "Mohsen" || dto.Password != "123456") return Unauthorized();

        const string secretKey = "Shared secret key";
        var signingKey = new SymmetricSecurityKey(Encoding.UTF8.GetBytes(secretKey));

        var jwt = new JwtSecurityToken(
            signingCredentials: new SigningCredentials(signingKey, SecurityAlgorithms.HmacSha256)
        );

        var token = new JwtSecurityTokenHandler().WriteToken(jwt);

        // Return the JWT to the client
        return Ok(new { token });
    }
Now, let’s run the app to see the result. When I post the right username and password to the endpoint, it sends the following JWT back:

It’s worth noting that it sends back an Unauthorized (401) HTTP code if the username and password wouldn’t match.
JWT Structure
A JSON Web Token consists of three parts.
- Header
- Payload
- Signature
Let’s demystify the token our login endpoint just returned.

The header, Payload, and Signature are separated by dots in a JWT token.
eyJhbGciOiJIUzI1NiIsInR5cCI6IkpXVCJ9.e30.KmR8KUapsbB8MLv7mzVOrrggD2e5hPhcL-KDMprb9Eg
Let’s see why it’s called a "JSON" token.
The Header
The Header and Payload are both base64Url encoded. To simply decode the header, open your browser’s developer tools, open the console tab, and decode the header using Javascript’s atob function:
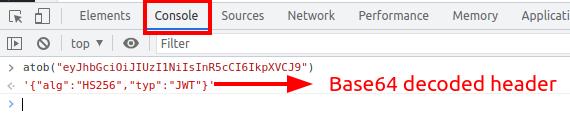
The result is the header JSON.❤️ As you see, the header consists of two fields. alg and typ. alg is set to the algorithm we used to sign the credentials in the Login action to sign the credentials (I’ll discuss signing credentials later). And typ is set to the token’s type, which is JWT.
The Payload
Let’s also decode the token’s Payload (`e30`) using the atob function. The result is an empty JSON.
{}
The Payload usually contains a set of so-called Claims. Claims are information about the user (or the entity in broader terms). We’ll learn more about claims later on.
The Signature
As opposed to the header and payload, the token’s signature isn’t a base64Url-encoded string. It’s a concatenation of the token’s first two parts, encrypted using the algorithm specified in the header and the secret key we used in the `Login` action.
HMACSHA256(
  "eyJhbGciOiJIUzI1NiIsInR5cCI6IkpXVCJ9.e30",
  "Shared secret key")
In fact, the signature is used to verify that the header and payload are signed by a party that knows the secret key. No worries, we’ll see how to configure web applications to verify the signature using the shared key soon.
We’re using a simple algorithm in our example. The token alternatively also be encrypted using public/private key algorithms so that when a user logs in, the login endpoint signs the header and payload using the private key. In this scenario, only the parties that have the private key can sign the token. Others can only verify the signature using the public key.
Protecting APIs
Let’s see how the user can use the token after logging in.
Create another web API project, and name it `ProtectedWebApp`. You can do the rest in the same app, but the mechanics of the system will be educationally more transparent to create separate apps. One is the API (the web app you want to create), and the other as the authentication provider, which manages login and tokens.
In the end, you’ll notice that the only state the two services share is the security key. And that’s the most essential part of what you should learn.
Next, add the [Authorize] attribute to the `WeatherForecastController.Get` action.
    [Authorize]
    [HttpGet(Name = "GetWeatherForecast")]
    public IEnumerable<WeatherForecast> Get()
    {
        return Enumerable.Range(1, 5).Select(index => new WeatherForecast
        {
            Date = DateOnly.FromDateTime(DateTime.Now.AddDays(index)),
            TemperatureC = Random.Shared.Next(-20, 55),
            Summary = Summaries[Random.Shared.Next(Summaries.Length)]
        })
        .ToArray();
    }
If you run the new application now, you won’t be able to access this action anymore. Because only authorized users are allowed to access actions that are decorated using the [Authorize] attribute. Calling the endpoint throws the `InvalidOperationException` exception now because we did protect the endpoint, but we didn’t configure the project to apply the authorization.
What’s missing is to check the token as the request arrives on the server and see if the signature matches the header and payload. We could write the code to encrypt the header and payload using the key and compare the result to ensure that the token is generated by an authority who has the key (our IdentityService API), but we don’t need to do that manually.
Configuring Authentication Services
TheMicrosoft.AspNetCore.Authentication.JwtBearer package provides that functionality out of the box. So add the package to your ProtectedWebApp project.
Then, open the Program.cs file and add the following before the line: `var app = builder.Build();`.
builder.Services.AddAuthentication()
.AddJwtBearer("JwtBearer", jwtBearerOptions =>
{

});
The code above adds the JWT authentication services to the app. Let’s tell them how to validate the tokens arrive as requests’ `Authorization` headers.
builder.Services.AddAuthentication()
.AddJwtBearer("JwtBearer", jwtBearerOptions =>
{
    jwtBearerOptions.TokenValidationParameters = new TokenValidationParameters
    {
        ValidateIssuerSigningKey = true,
        IssuerSigningKey = new SymmetricSecurityKey(Encoding.UTF8.GetBytes("Shared secret key")),
        ValidateIssuer = false,
        ValidateAudience = false,
        ValidateLifetime = false,
    };
});
We configured the authentication services to do nothing but ensure that the signature of the token matches the body and the header.
Next, add the Authentication middleware before the Authorization middleware.
app.UseAuthentication();
app.UseAuthorization();
Make sure that the Authorization middleware (`app.UseAuthorization()`)is there too.
The
Authorizationmiddleware should be added before any middleware that may require authorization.
As a new request arrives on the server before passing it to the action with the [Authorize]attribute, authentication middleware uses authentication services to check if a valid token is contained in the request’s Authorize header. If it is, the request is passed to the action, otherwise an Unauthorized (401) HTTP response code is returned to the client.
I’ll explain the system’s mechanics in more detail once we run the app.
Configuring Swagger
Our simple authentication system works already, but as the last step before running the apps, it would be nice to enable the Swagger UI to deal with authentication.
Simply configure the SwaggerGen services as follows:
    option.AddSecurityDefinition("Bearer", new OpenApiSecurityScheme
    {
        In = ParameterLocation.Header,
        Description = "Enter a valid JSON web token here",
        Name = "Authorization",
        Type = SecuritySchemeType.Http,
        BearerFormat = "JWT",
        Scheme = "Bearer"
    });
    option.AddSecurityRequirement(new OpenApiSecurityRequirement
    {
        {
            new OpenApiSecurityScheme
            {
                Reference = new OpenApiReference
                {
                    Type=ReferenceType.SecurityScheme,
                    Id="Bearer"
                }
            },
            Array.Empty<string>()
        }
    });
Using the Identity Service at Run-Time
To see how the configuration above affects the Swagger UI, let’s run the `ProtectedWebApp` project.

Notice that If you try getting the weather forecast you receive 401 Unauthorized HTTP response code.
Now, while the Protected Web API service is running, continue with the following steps:
- Run the
IdentityServiceproject simultaneously. - Open its Swagger UI.
- And post your username and password to its
Loginendpoint.

Next, Copy the token from the response body. (`eyJhbGciOiJIUzI1NiIsInR5cCI6IkpXVCJ9.e30.qdVN9-IhzN9yg-8wzN0LY8FJsnyS7VO-hyidoIaMhJc`)
And continue with the following steps:
- Switch to the Protected Web API tab in your browser
- Click the
Authorizebutton - And paste the token into the input:
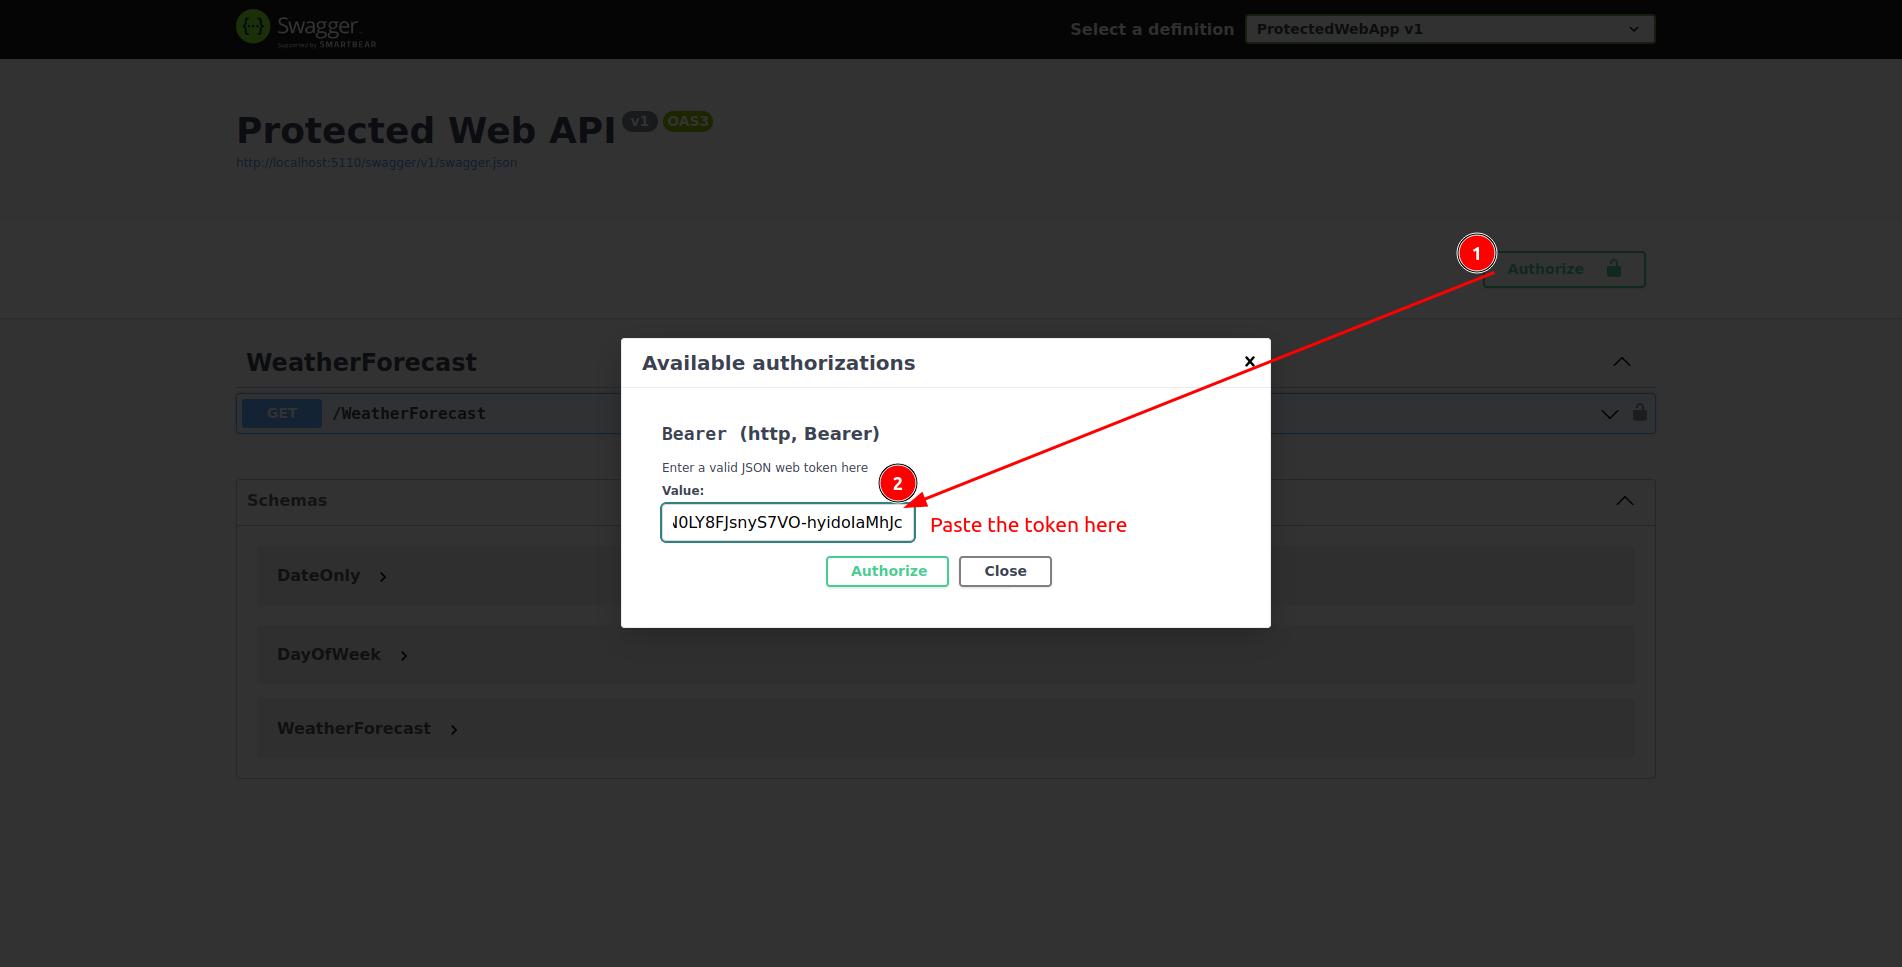
Then,
- Click the authorize button under the input
- Close the modal
- And try getting the weather forecast.

Since we’ve logged in, it succeeds. Let’s see what happens if we don’t log in. Follow the following steps to log out.
- Click the
Authorizebutton again. - Click the
Logoutbutton. - And close the modal.

Now try getting the weather forecast again and you should see the Unauthorized (201) HTTP code in the response.

The Mechanics
We implemented a basic authentication system. It’s time to zoom back and review how the authentication system we implemented so far works.

By adding Authorize attribute on top of the get weather forecast action, we restricted the endpoint (Get Weather Forecast action) to only be accessible by the authorized users.
In the Program.cs file of the same project (ProtectedWebApp) we specify what we mean by authorized users. By setting token validation parameters, we configure the authentication middleware to only allow users who have tokens with the right signature to access the API. This is how the ProtectedWebApp protects its resources.
And you already know where the tokens come from. Users (entities) get their tokens from IdentityService by passing their username and password. IdentityService is a separate project. It’s responsibility is to check if the username and password is right or not. and it generates and returns a token when they are.

The Secret
What if the entity passes a wrong token? Can she be authenticated? It’s worth to run the app and change a character of the token you receive from the Identity Server and try accessing the weather forecast endpoint using it. It doesn’t work as you can tell. But why? How does it know that we’ve modified the token? As I said, there’s something that’s shared between the two servives (IdentityService and ProtectedWebApp). The secret key.

The Login endpoint encrypts tokens’ headers and payloads using this key and adds the result to the payload as the signature. The authorization middleware of ProtectedWebApp checks if the token is encrypted using the right key. Since the only one who knows of the key is the IdentityService, the middlewares trust the token and allow the user to access the protected action.
Now, try changing the key at the IdentityService and you should no more be able to access the protected endpoint.
Passing Claims to Parties
As said, a JWT token can carry additional information about the user in form of key-value pairs. They can for example contain the user’s name.
To see how claims can be passed using JWT between the two services, take the following steps:
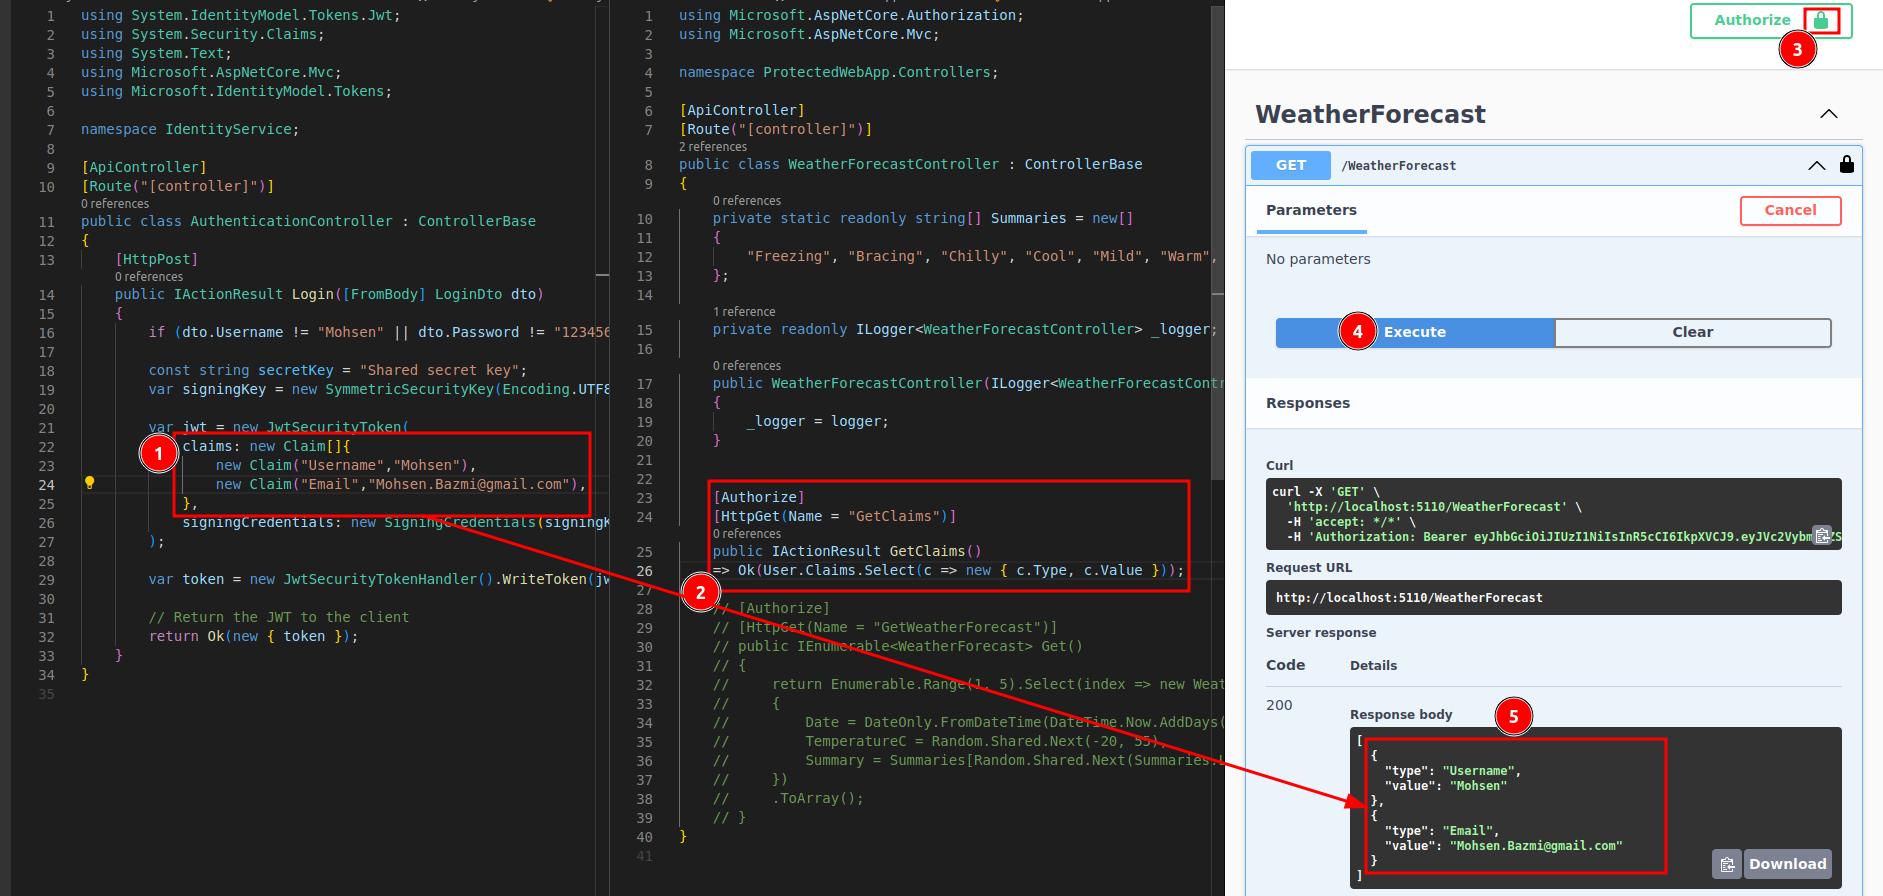
- Add some claims to JWT the
Loginendpoint returns. (just hard code them away). - In the
ProtectedWebApp- Comment the `GetWeatherForecast` action
- Add the
GetClaimsaction. - Select the claims from the
Userproperty ofControllerBaseand return them.
- Authorize yourself
- Call the login endpoint to get a token
- Copy the token and paste it into the authorization modal
- Execute a request to the
GetClaimsendpoint. - And you should see the claims you added.
Conclusion: ASP.NET Core JWT Tutorial
Congrats! You have just finished our ASP.NET Core JWT Tutorial!
In this guide, we introduced JWT in ASP.NET to help you get started. JWT is a powerful tool that can do much more. It lets you use tokens to check who is who. You can also add extra details, called claims, for users. These details help set rules on what users can do. To sum it up, JWT is a widely accepted method (RFC 7519) for safely sharing info between parties. It packs all the details into a small, secure format.
Oh, and if you feel overwhelmed with coding, check out our developer membership (seriously, it’s worth it!). We help you master coding fast and easily.