
You might be wondering how the Agora.io Voice Changer Android Application works, seems awesome and tricky at the same time right?
Before we dive right in, let’s explain some terms you’ll see often in this tutorial. The terms can be found on this link
The Agora.IO Voice Changer
In this tutorial, we will be building a simple Voice Changing Android Application.
You will learn how to use Agora.io SDK to handle voice changing.

Creating A New Compose Project
Github Link: https://github.com/tutorialseu/Voice-Changer-App/tree/build_ui
To get started, we will be creating a new Empty Compose Activity Project.

After the project is created successfully, open MainActivity.kt and remove the Greeting Function and the references to it in onCreate and DefaultPreview. So that we now have the below codes in the file.
MainActivity.Kt
class MainActivity : ComponentActivity() {
override fun onCreate(savedInstanceState: Bundle?) {
super.onCreate(savedInstanceState)
setContent {
VoiceChangerTheme {
// A surface container using the 'background' color from the theme
Surface(
modifier = Modifier.fillMaxSize(),
color = MaterialTheme.colors.background
) {
}
}
}
}
}
//Todo 4: Create MainView composable function
@Composable
fun MainView(){
}
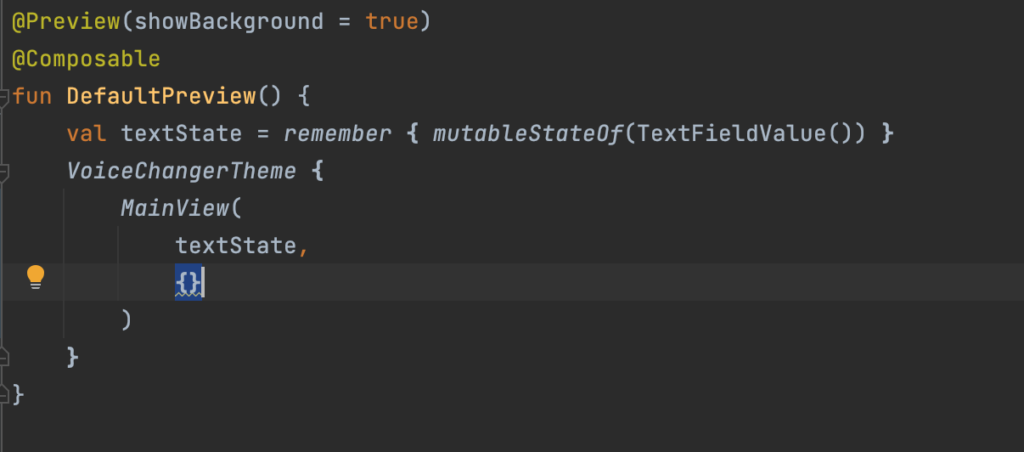
@Preview(showBackground = true)
@Composable
fun DefaultPreview() {
VoiceChangerTheme {
}
}
We have also added a new composable MainView
Building The User Interface.
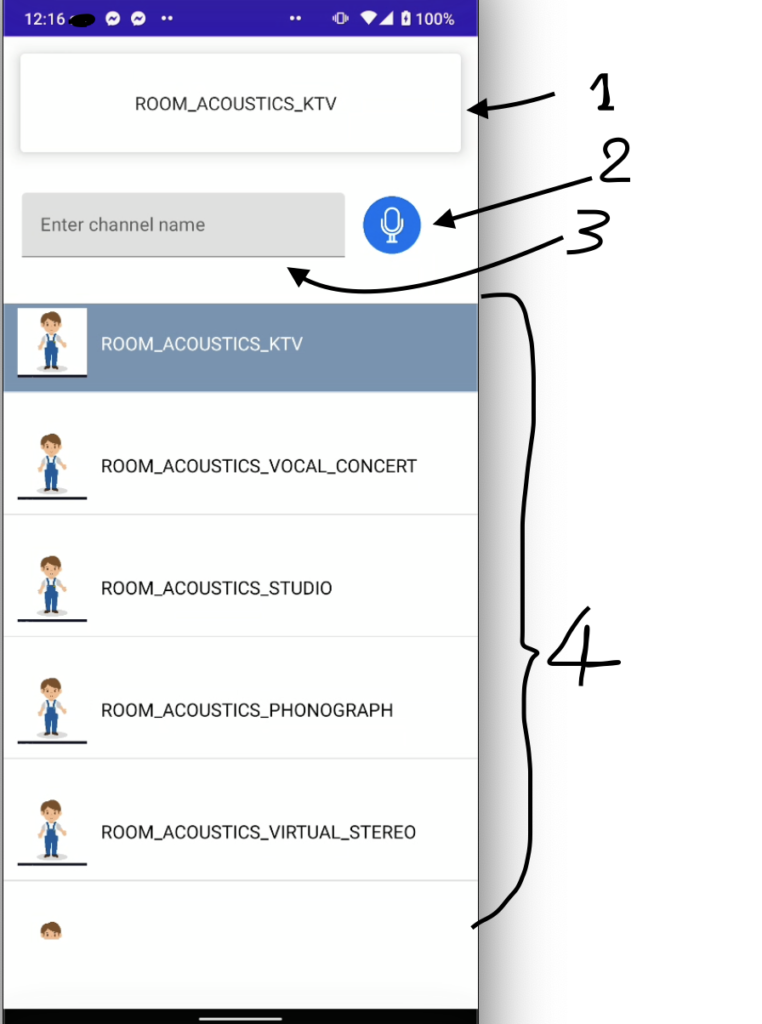
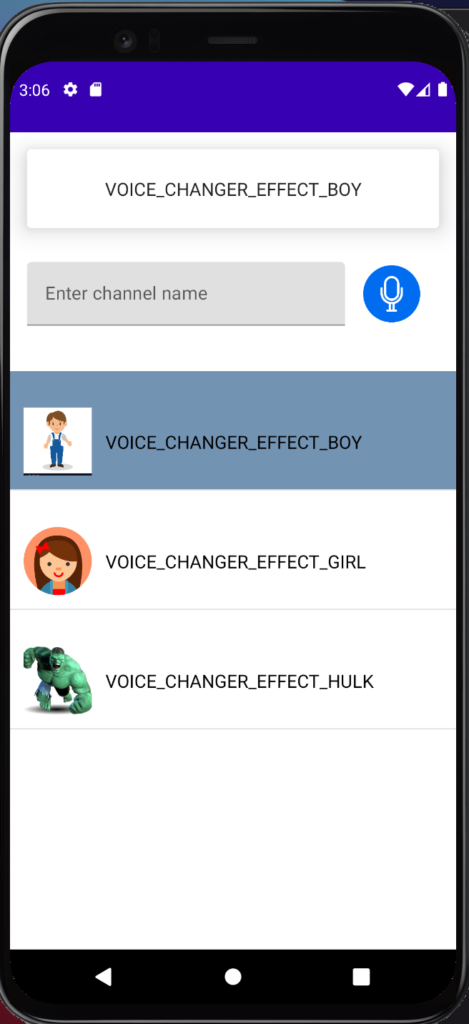
The User interface will be a very simple one, using the screenshot above,
- is a card view hosting a TextView that will show the selected voice effect,
- is a button that will enable users to join and leave a channel,
- is where the user will enter channel name to join,
- is a list of voice effects.
To begin, we will call MainView function within DefaultPreview function and setContent, MainActivity will now look like so
class MainActivity : ComponentActivity() {
    override fun onCreate(savedInstanceState: Bundle?) {
        super.onCreate(savedInstanceState)
        setContent {
            VoiceChangerTheme {
                // A surface container using the 'background' color from the theme
                Surface(
                    modifier = Modifier.fillMaxSize(),
                    color = MaterialTheme.colors.background
                ) {
                    MainView()
                }
            }
        }
    }
}

@Composable
fun MainView(){

}

@Preview(showBackground = true)
@Composable
fun DefaultPreview() {
    VoiceChangerTheme {
        MainView()
    }
}
In MainView composable we will add a Column layout to align all elements vertically on the screen
Column(
    modifier = Modifier
        .fillMaxSize()
        .padding(bottom = 60.dp),
    verticalArrangement = Arrangement.Top
){
}
Using the Modifier, we set the Column to fillMaxSize which includes the vertical and horizontal axis with a bottom padding of 60dp. We also align the elements vertically to the bottom using verticalArrangement.
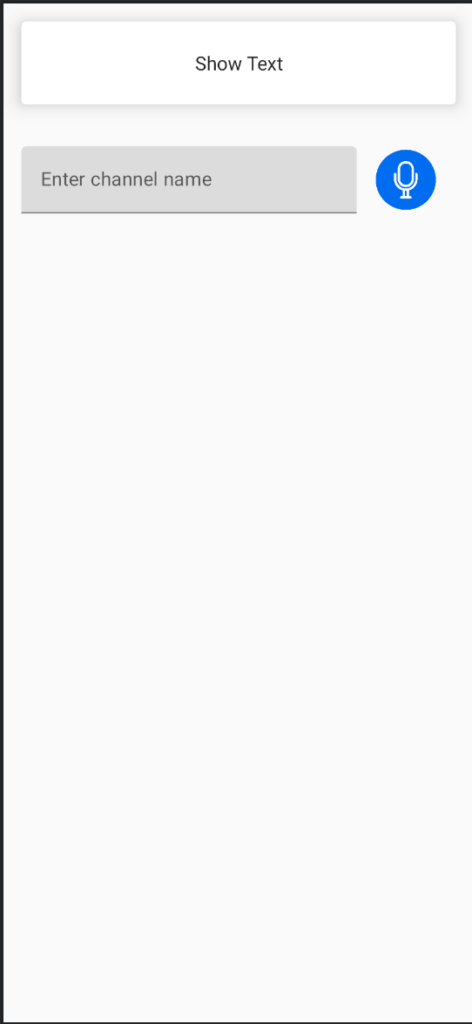
Designing UI number 1 from the screenshot
Card(
            Modifier
                .fillMaxWidth()
                .padding(15.dp),
            elevation = 10.dp
        ) {

            Text(
                text = "Show Text",
                modifier = Modifier
                    .padding(24.dp),
                textAlign = TextAlign.Center
            )
        }
Within on Column block in MainView, Add a Card to get the Card view, using Modifier to set the Card to fillMaxWidth to fill both horizontal and vertical sides of the screen. Add padding of 15dp to give space around the Card. Add elevation of 10dp to give the elevated shadow around to Card. Within the Card block, Add a Text with a default text “Show Text”, add padding of 24dp, and textAlign to align the text to the center.
MainView function will now look like this
@Composable
fun MainView(){

    Column(
        Modifier
            .fillMaxSize()
            .padding(
                bottom = 60.dp
            ),
        verticalArrangement = Arrangement.Top
    ) {

        Card(
            Modifier
                .fillMaxWidth()
                .padding(15.dp),
            elevation = 10.dp
        ) {

            Text(
                text = "Show Text",
                modifier = Modifier
                    .padding(24.dp),
                textAlign = TextAlign.Center
            )
        }
    }
}
Designing UI numbers 2 and 3 from the screenshot
Let’s start by designing number 3, which is a TextField.
Create a composable function TextFieldView
@Composable
fun TextFieldView(
) {
}
Within the TextFieldView block, add a TextField, within the TextField label block, add a Text with default text “Enter channel name”
TextField(
        value = "",
        label = {
            Text(
                text = "Enter channel name",
            )
        },
        onValueChange = { },

        )
Since we know that we will be calling the TextFieldView function in MainView, we need to create a TextFieldValue MutableState parameter in TextFieldView constructor, and set it to the TextField value and onValueChange lambda function
Complete TextFieldView composable function will look like below
@Composable
fun TextFieldView(
    textState: MutableState<TextFieldValue>
) {
    TextField(
        value = textState.value,
        label = {
            Text(
                text = "Enter channel name",
            )
        },
        onValueChange = { textState.value = it},

        )
}
Call the function in MainView below the Card, Also create the TextFieldValue MutableState parameter to MainView, once that is done, we should have an error in DefaultPreview and setContent where we called the MainView, to fix these errors, we also create an instance of TextFieldValue MutableState and call it inside MainView.
Our current full code:
class MainActivity : ComponentActivity() {

    override fun onCreate(savedInstanceState: Bundle?) {
        super.onCreate(savedInstanceState)
        setContent {
            val textState = remember { mutableStateOf(TextFieldValue()) }

            VoiceChangerTheme {
                // A surface container using the 'background' color from the theme
                Surface(
                    modifier = Modifier.fillMaxSize(),
                    color = MaterialTheme.colors.background
                ) {
                    MainView(textState)
                }
            }
        }
    }
}

@Composable
fun MainView(
    textState: MutableState<TextFieldValue>
){

    Column(
        Modifier
            .fillMaxSize()
            .padding(
                bottom = 60.dp
            ),
        verticalArrangement = Arrangement.Top
    ) {

        Card(
            Modifier
                .fillMaxWidth()
                .padding(15.dp),
            elevation = 10.dp
        ) {

            Text(
                text = "Show Text",
                modifier = Modifier
                    .padding(24.dp),
                textAlign = TextAlign.Center
            )
        }

        TextFieldView(textState)
    }
}

@Composable
fun TextFieldView(
    textState: MutableState<TextFieldValue>
) {
    TextField(
        value = textState.value,
        label = {
            Text(
                text = "Enter channel name",
            )
        },
        onValueChange = { textState.value = it},

        )
}

@Preview(showBackground = true)
@Composable
fun DefaultPreview() {
    val textState = remember { mutableStateOf(TextFieldValue()) }
    VoiceChangerTheme {
        MainView(textState)
    }
}
Our current design
![]()
To complete numbers 2 and 3 from the screenshot, we need to add TextFieldView and an Image in a Row.
First, we create a Row
Row() {

        }
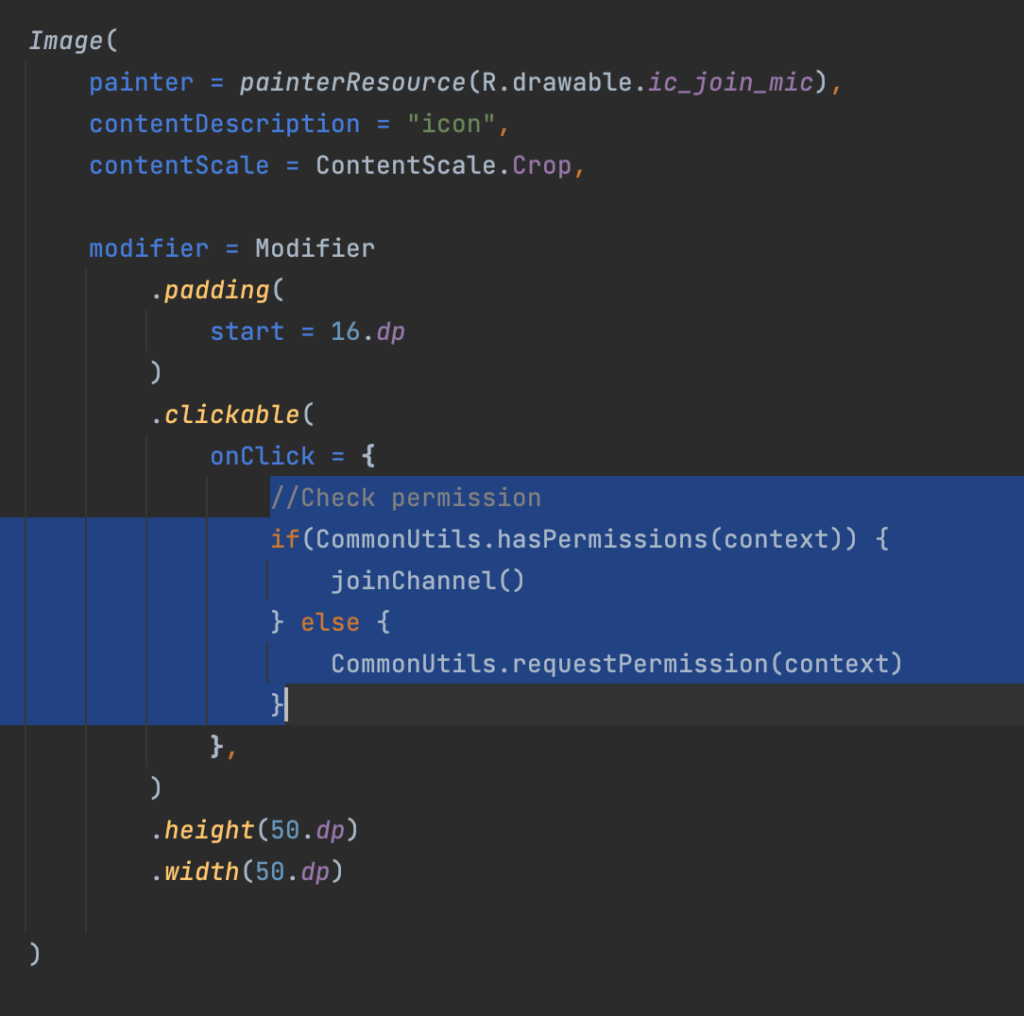
Then add wrapContentWidth, padding top 20dp, start 15dp and verticalAlignment Modifiers, move TextFieldView function inside Row block, Add an Image after TextFieldView, giving default height and width 50dp, contentScale to Crop, contentDescription, padding start 16dp and clickable modifier, since we are using a custom image icon, we use painter, then add ic_join_mic image to drawable resource, images can be download from this link https://drive.google.com/drive/folders/1G3uK7GI1TasHSdLgzC2q5EgCgkYbdM3H?usp=sharing
Row(
     Modifier
      .wrapContentWidth()
      .padding(
          top = 20.dp,
          start = 15.dp
          ),
       verticalAlignment = Alignment.CenterVertically,
        ) {

            TextFieldView(textState)

            Image(
                painter = painterResource(R.drawable.ic_join_mic),
                contentDescription = "icon",
                contentScale = ContentScale.Crop,

                modifier = Modifier
                    .padding(
                        start = 16.dp
                    )
                    .clickable(
                        onClick = {},
                    )
                    .height(50.dp)
                    .width(50.dp)

            )

        }
Our current design now looks like this
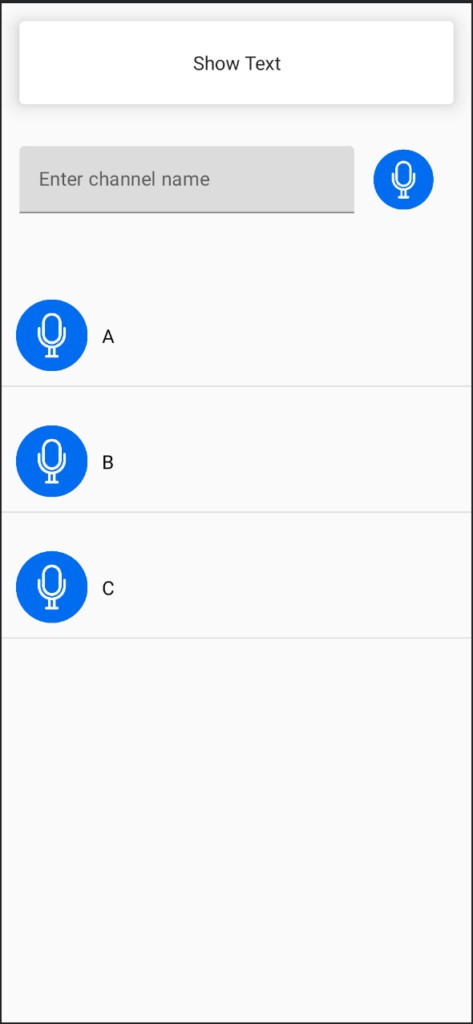
Designing UI number 4 from the screenshot
Below UI 2 and 3(TextField and Mic icon) Row, we will create a LazyColumn
LazyColumn(
            state = scrollState,
            modifier = Modifier.padding(top = 40.dp),
        ){
            items(list.size){ index ->

                Row(
                    modifier =  Modifier
                        .clickable(onClick = { })
                        .fillMaxWidth()
                        .padding(top = 20.dp),
                    verticalAlignment = Alignment.CenterVertically
                ) {

                    Image(
                        painter = painterResource(R.drawable.ic_join_mic),
                        contentDescription = "icon",
                        contentScale = ContentScale.Crop,
                        modifier = Modifier
                            .padding(
                                12.dp
                            )
                            .height(60.dp)
                            .width(60.dp)

                    )
                    Text(
                        color = Color.Black,
                        text = list[index]
                    )

                }
                Divider()
            }
        }
Create LazyColumn, LazyColumn needs a scrollState, so we create
val scrollState = *rememberLazyListState*() inside MainView block, then use the variablescrollState for LazyColumn state, we also create a default list
val list = *listOf*("A","B","C") inside MainView block. *give space at the top of the view
Within LazyColumn block we create Items(){}, use items.size to get the list of items
Create an items inside LazyColumn block, use items.size to get the list of
*items
LazyColumn(
       state = scrollState,
       modifier = Modifier.padding(top = 40.dp),
     ){
		items(list.size){ index ->

	}
}
Within items(list.size) block, create Row to hold Image and Text horizontally for Voice Effect icon and title, define Modifiers clickable, fillMaxWidth, padding 20dp and verticalAlignment
LazyColumn(
            state = scrollState,
            modifier = Modifier.padding(top = 40.dp),
        ){
            items(list.size){ index ->
                Row(
                    modifier =  Modifier
                        .clickable(onClick = { })
                        .fillMaxWidth()
                        .padding(top = 20.dp),
                    verticalAlignment = Alignment.CenterVertically
                ) {
                    Image(
                        painter = painterResource(R.drawable.ic_join_mic),
                        contentDescription = "icon",
                        contentScale = ContentScale.Crop,
                        modifier = Modifier
                            .padding(
                                12.dp
                            )
                            .height(60.dp)
                            .width(60.dp)

                    )
                    Text(
                        color = Color.Black,
                        text = list[index]
                    )

                }
                Divider()
            }
        }
Inside Row block, add Image, give it a default image ic_join_mic, contentDescription, contentScale Crop, Modifiers(padding 12dp, height and width 60dp), then below Image, add Text and use the default list created above to populate the title by calling list[index] and give the text black color, finally, add a divider(the line that separates each item).*
Full Code right now for the Voice Changer
class MainActivity : ComponentActivity() {

    override fun onCreate(savedInstanceState: Bundle?) {
        super.onCreate(savedInstanceState)
        setContent {
            val textState = remember { mutableStateOf(TextFieldValue()) }

            VoiceChangerTheme {
                // A surface container using the 'background' color from the theme
                Surface(
                    modifier = Modifier.fillMaxSize(),
                    color = MaterialTheme.colors.background
                ) {
                    MainView(
                        textState
                    )
                }
            }
        }
    }
}

@Composable
fun MainView(
    textState: MutableState<TextFieldValue>
) {

    val scrollState = rememberLazyListState()

    val list = listOf("A","B","C")

    Column(
        Modifier
            .fillMaxSize()
            .padding(
                bottom = 60.dp
            ),
        verticalArrangement = Arrangement.Top
    ) {
        Card(
            Modifier
                .fillMaxWidth()
                .padding(15.dp),
            elevation = 10.dp
        ) {

            Text(
                text = "Show Text",
                modifier = Modifier
                    .padding(24.dp),
                textAlign = TextAlign.Center
            )
        }


        Row(
            Modifier
                .wrapContentWidth()
                .padding(
                    top = 20.dp,
                    start = 15.dp
                ),
            verticalAlignment = Alignment.CenterVertically,
        ) {
            TextField(textState)

            Image(
                painter = painterResource(R.drawable.ic_join_mic),
                contentDescription = "icon",
                contentScale = ContentScale.Crop,

                modifier = Modifier
                    .padding(
                        start = 16.dp
                    )
                    .clickable(
                        onClick = {},
                    )
                    .height(50.dp)
                    .width(50.dp)

            )

        }

        LazyColumn(
            state = scrollState,
            modifier = Modifier.padding(top = 40.dp),
        ){

            items(list.size){ index ->
                Row(
                    modifier =  Modifier
                        .clickable(onClick = { })
                        .fillMaxWidth()
                        .padding(top = 20.dp),
                    verticalAlignment = Alignment.CenterVertically
                ) {
                    Image(
                        painter = painterResource(R.drawable.ic_join_mic),
                        contentDescription = "icon",
                        contentScale = ContentScale.Crop,
                        modifier = Modifier
                            .padding(
                                12.dp
                            )
                            .height(60.dp)
                            .width(60.dp)

                    )

                    Text(
                        color = Color.Black,
                        text = list[index]
                    )

                }

                Divider()
            }
        }

    }
}

@Composable
fun TextField(
    textState: MutableState<TextFieldValue>
) {

    TextField(
        value = textState.value,
        label = {
            Text(
                text = "Enter channel name",
            )
        },
        onValueChange = { textState.value = it },

        )
}

@Preview(showBackground = true)
@Composable
fun DefaultPreview() {
    val textState = remember { mutableStateOf(TextFieldValue()) }
    VoiceChangerTheme {
        MainView(textState)
    }
}
Design
Now that we have our UI ready, we will go ahead to set up Agora SDK
Setup Agora SDK
Adding Agora.IO Voice Changer dependency
To use the Agora.io voice effect, we need to add a dependency that will give us access to the Voice Effect.
The dependency can be found on the Agora.io documentation page, we can follow the Project setup process, but we already have some things set up for us by Android Studio, so we’ll jump to the. necessary ones.

//AgoraIO SDK dependency
implementation 'io.agora.rtc:full-sdk:3.6.2'
This particular dependency gives us all access to all Agora features, not just the Voice Effect. They are other ways we can get the Agora SDK to our project, but having to try out all other methods, I found out that this is the easier way to go. So now head to your Android Studio and navigate to app/build.gradle file.

Inside the build.gradle file, add the dependency and click on sync to download everything that comes with the dependency. Once the dependency has synced successfully, it means we are good to proceed.
So let us go AndroidManifest.xml file to add some needed permissions, Manifest file can be located on /app/Manifests/AndroidManifest.xml directory of your project.
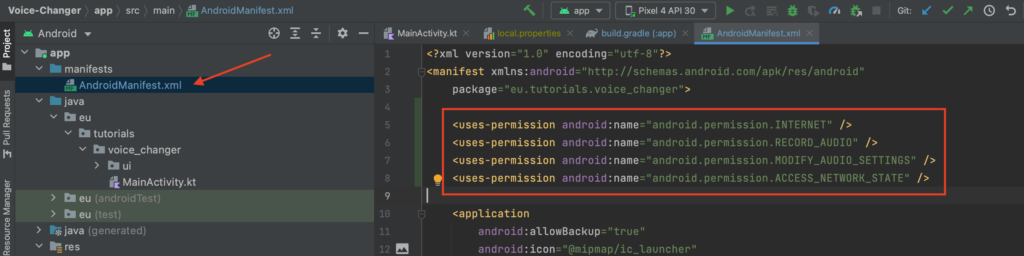
We need permission for internet, for recording, and audio
<uses-permission android:name="android.permission.INTERNET" />
<uses-permission android:name="android.permission.RECORD_AUDIO" />
<uses-permission android:name="android.permission.MODIFY_AUDIO_SETTINGS" />
<uses-permission android:name="android.permission.ACCESS_NETWORK_STATE" />
Now lets create functions that will help us request and check for this permissions on our device.
So we go to were we have our MainActivity.kt and create CommonUtils object,
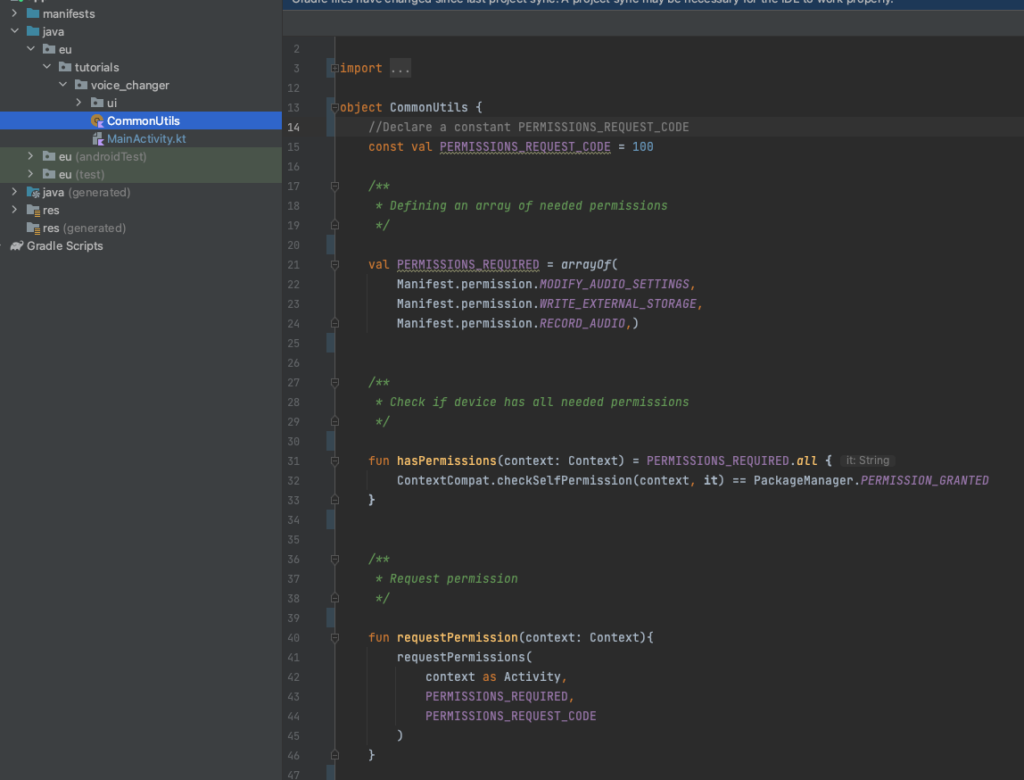
Within the CommonUtils block, we first create our request code in the CommonUtils object
const val PERMISSIONS_REQUEST_CODE = 10 then define an array of required permissions we want to check for
val PERMISSIONS_REQUIRED =arrayOf(
    Manifest.permission.MODIFY_AUDIO_SETTINGS,
    Manifest.permission.WRITE_EXTERNAL_STORAGE,
    Manifest.permission.RECORD_AUDIO,)
Then we create a requestPermission function that’ll help us request for permissions from our device.
fun requestPermission(context: Context){
    ActivityCompat.requestPermissions(
        context as Activity,
        PERMISSIONS_REQUIRED,
				PERMISSIONS_REQUEST_CODE
    )
}
Then create hasPermissions function to check if our needed permissions has ben ranted
fun hasPermissions(context: Context) = PERMISSIONS_REQUIRED.all {
       ContextCompat.checkSelfPermission(context, it) == PackageManager.PERMISSION_GRANTED
    }
Now let’s add the core Agora functionalities
Getting our first edited audio
Github link to the final app: https://github.com/tutorialseu/Voice-Changer-App/tree/get_our_first_edited_audio
You can download the project with a complete UI here: https://github.com/tutorialseu/Voice-Changer-App/tree/build_ui If you want to learn more about how the UI was built, read this article: https://www.notion.so/Creating-A-New-Compose-Project-ed0857a10a054241baa616da6d4a73d9
On our app, we already have our design with a dummy audio list, an input field, an image button to join the channel, and a text that’ll display our selected Voice Effect, so let’s see how we can join a call and change the voice.
First, we need to join a channel, so let’s implement a function to join a channel.
To make our code clean, let’s create a utils class called RtcEngineUtils to handle our joinChannel and setAudioEffect functions.
Within RtcEngineUtils constructor, initialize RtcEngine and Context, which will be needed later.
class RtcEngineUtils(private val engine: RtcEngine, private val context: Context) {
}
Then create joinChannel function, the joinChannel will carry a String parameter channelId in its constructor.
fun joinChannel(channelId: String) {}
Using the engine that was initialized in the class constructor, call joinChannel method
engine.joinChannel(accessToken, channelId, "Extra Optional Data", 0, mediaOption)
The joined joinChannel method needs some parameters such as accessToken, channelId, optionalIfo, optionalUid, and mediaOption. Now let’s get those parameters.
AccessToken:
https://agora.io is a platform that allows users to use its SDK to build Live, interactive voice and video for real-time engagement. We will be engaging with the Voice part of the SDK.
To get started, you can log in to Agora if you have an account already, or click on Get Started, then enter your email and accept TNC, then follow the Sign-up process to create an account.
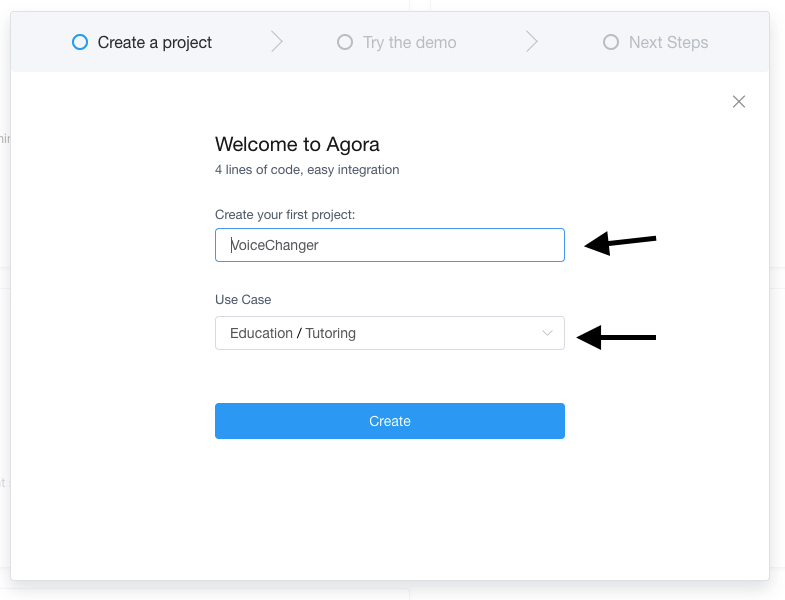
After creating an account, you’ll be asked to create a project, simply enter the desired name for your project and select Use Case, then create a project, next step you will be asked to try a demo call(we’ll skip that), click on Next button, next step, click on Documentation (you can also add card)

You can then click on the X icon to close the dialog and go to Dashboard.
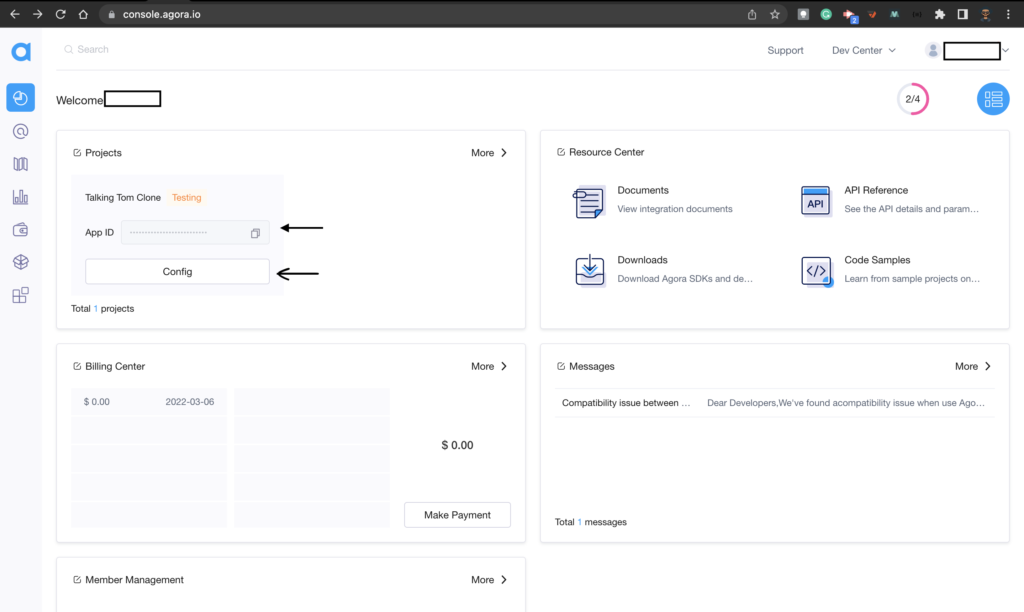
On the dashboard you’ll find your App ID, which we will need later, you’ll also need to generate a token, to generate token click on Config,

then click on Generate temp RTC token,
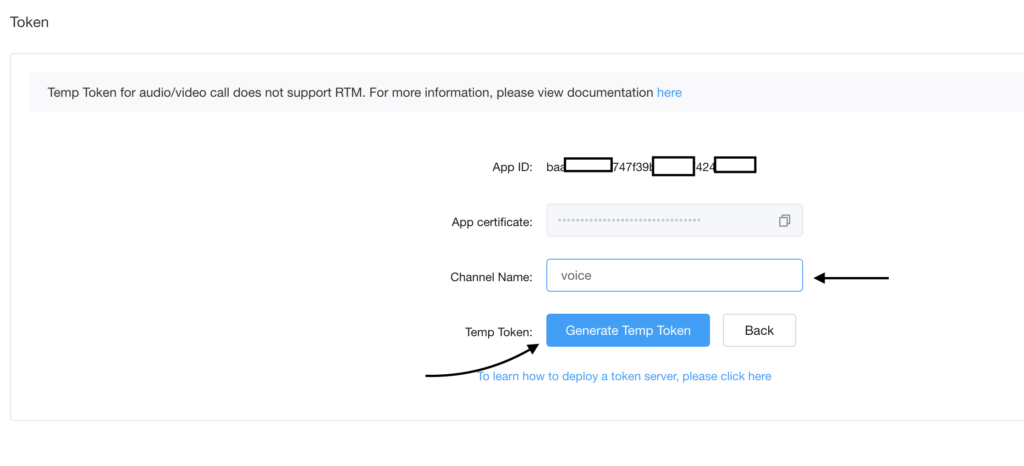
enter the channel name, channel name could be any name you like, here we are using voice, then click on Generate Temp Token to get the token.
Now let’s go over to the android studio and start writing some codes
Once you’ve got the token, you can simply add it to your strings.xml for test purposes

var accessToken: String? = context.getString(R.string.agora_access_token)
ChannelId:
The channel Id will be gotten from the input of the user on the input field provided on the design and it has to match the channel name used when creating Token.
MediaOption
We will get our mediaOption from ChannelMediaOptions() method provided to us by the SDK,
The ChannelMediaOptions() gives us access to about four options but we’re interested in the autoSubscribeAudio option. so we can just create an Immutable variable mediaOption and assign ChannelMediaOptions() to it, then get the options from there.
val mediaOption = ChannelMediaOptions()
mediaOption.autoSubscribeAudio = true
OptionalInfo and OptionalUid
You can assign any desired text to OptionalIfo, we will use "Extra Optional Data" and assign a default value of 0 for our OptionalUid
Now we have gotten all we need to populate joinChannel required parameters.
Before we start with the next feature, let’s look at what RtcEngine does: https://docs.google.com/presentation/d/1JzWLqyGlRP5yl7nfjUmRADOK6kCeTrJeRFP72tLb3OQ/edit#slide=id.g11d57d77427_0_42
Slide 10
RtcEngineUtils full code
class RtcEngineUtils(private val engine: RtcEngine, private val context: Context) {
    private val TAG = RtcEngineUtils::class.java.simpleName

    fun joinChannel(channelId: String) {
        /** Sets the channel profile of the Agora RtcEngine.
         * CHANNEL_PROFILE_COMMUNICATION(0): (Default) The Communication profile.
         * Use this profile in one-on-one calls or group calls, where all users can talk freely.
         * CHANNEL_PROFILE_LIVE_BROADCASTING(1): The Live-Broadcast profile. Users in a live-broadcast
         * channel have a role as either broadcaster or audience. A broadcaster can both send and receive streams;
         * an audience can only receive streams. */
        engine.setChannelProfile(Constants.CHANNEL_PROFILE_LIVE_BROADCASTING)
        /**In the demo, the default is to enter as the anchor. */
        engine.setClientRole(IRtcEngineEventHandler.ClientRole.CLIENT_ROLE_BROADCASTER)
        /**Please configure accessToken in the string_config file.
          */
        var accessToken: String? = context.getString(R.string.agora_access_token)

        /** Allows a user to join a channel.
         * if you do not specify the uid, we will generate the uid for you */
        val mediaOption = ChannelMediaOptions()
        mediaOption.autoSubscribeAudio = true

        val res = engine.joinChannel(accessToken, channelId, "Extra Optional Data", 0, mediaOption)
        if (res != 0) {
            Log.e(TAG, RtcEngine.getErrorDescription(Math.abs(res)))
            return
        }

    }
}
Let’s go to MainView function on MainActivity and implement it on our UI.
On MainView constructor let’s create a lambda function for joinChannel
joinChannel: () -> Unit ,

then in the Image clickable function in the Row block where we have the Textfield, call the joinChannel() function.
Image(
    painter =painterResource(R.drawable.ic_join_mic),
    contentDescription = "icon",
    contentScale = ContentScale.Crop,

    modifier = Modifier
        .padding(
            start = 16.dp
)
        .clickable(
            onClick ={
                joinChannel()
			},
        )
        .height(50.dp)
        .width(50.dp)

)
Now we’ll be having errors in two places, on MainView in DefaultPreview function and MainView in setContent block, in DefaultPreview we can just add a lambda argument {}
Then in setContent block, let’s implement the joinChannel callback function in the MainView.
Beofore we implement the joinChannel callback, let’s first declare and initialize RtcEngine and RtcEngineUtils
Initialize RtcEngineUtils
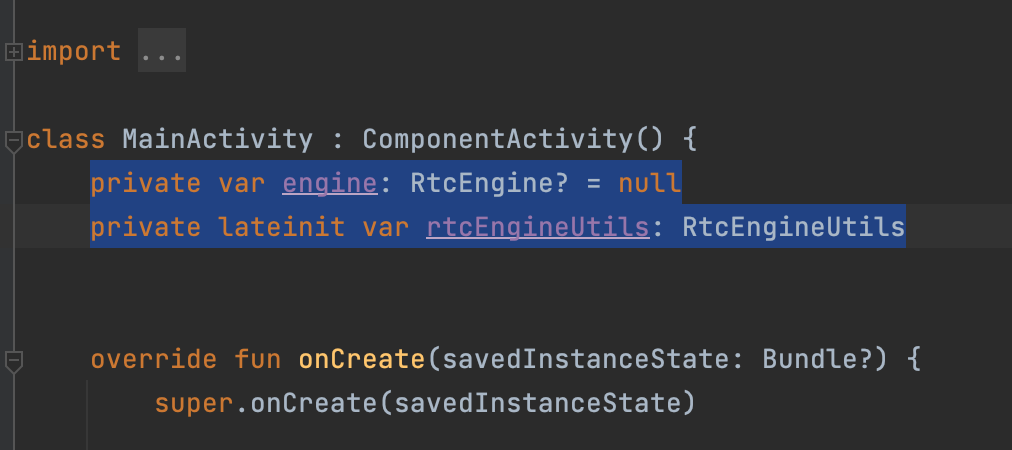
First we declare RtcEngineUtils and RtcEngine in MainActivity block before on onCreate
private var engine: RtcEngine? = null private lateinit var rtcEngineUtils: RtcEngineUtils
Then create a function to handle the initialization with a try-catch block in case we have an error we can be able to detect it.
private fun initialiseEngine() {
        try {


        } catch (e: Exception) {
            e.printStackTrace()
        }

    }
Initialize RtcEngineUtils
In the try block let’s initialise RtcEngineUtils, which requires two parameters which are engine and context
rtcEngineUtils = RtcEngineUtils(engine!!, this.applicationContext)
private fun initialiseEngine() {
        try {

            rtcEngineUtils = RtcEngineUtils(engine!!, this.applicationContext)

        } catch (e: Exception) {
            e.printStackTrace()
        }

    }
Initialize RtcEngine
engine = RtcEngine.create(this.*applicationContext*, appId, cEngine)
private fun initialiseEngine() {
        try {
            engine = RtcEngine.create(this.applicationContext, appId, rtcHandler)
            rtcEngineUtils = RtcEngineUtils(engine!!, this.applicationContext)

        } catch (e: Exception) {
            e.printStackTrace()
        }

    }
To initialize engine, we call RtcEngine.create which requires context, appId and IRtcEngineEventHandler
Context:
We can get it using this.*applicationContext*
AppId:
AppId can be gotten from the Agora Dashboard

Click on the red highlighted icon to copy the ID and add it to your strings.xml for testing,
<string name="agora_app_id" translatable="false">baaff38e97c747f39b767787424be07b</string>

then declare an immutable variable appId and assign the appId from the string resource to it in the initialiseEngine() try block
val appId = getString(R.string.agora_app_id)
private fun initialiseEngine() {
        try {

            val appId = getString(R.string.agora_app_id)

            engine = RtcEngine.create(this.applicationContext, appId, rtcHandler)
            rtcEngineUtils = RtcEngineUtils(engine!!, this.applicationContext)

        } catch (e: Exception) {
            e.printStackTrace()
        }

    }
IRtcEngineEventHandler:
RtcEngineEventHandler class will basically handle reports from the Agora SDK so we know what happens at each point of action we trigger.
Let’s create a RtcEngineEventHandler class and extend IRtcEngineEventHandler abstract class which is from the SDK
class RtcEngineEventHandler() : IRtcChannelEventHandler(){

}
Then press the shortcut keys Contol + O (on Mac and Windows) to override needed methods, the methods we need to override are :
1. onWarning
2. onError
3. onLeaveChannel
4. onJoinChannelSuccess
5. onUserJoined
class RtcEngineEventHandler(): IRtcEngineEventHandler() {

    override fun onWarning(warn: Int) {

    }

    override fun onError(err: Int) {

    }

    override fun onLeaveChannel(stats: RtcStats) {
        super.onLeaveChannel(stats)

    }

    override fun onJoinChannelSuccess(channel: String, uid: Int, elapsed: Int) {

    }

    override fun onRemoteAudioStateChanged(uid: Int, state: Int, reason: Int, elapsed: Int) {
        super.onRemoteAudioStateChanged(uid, state, reason, elapsed)

    }


    override fun onUserJoined(uid: Int, elapsed: Int) {
        super.onUserJoined(uid, elapsed)

    }

}
Right now we don’t need to implement them.
After creating RtcEngineEventHandler and overriding all needed methods, let’s declare the method on MainActivity class and complete Engine initialization.
val rtcHandler = RtcEngineEventHandler()
Once you have gotten all the needed parameters, we can now initialize the engine
engine = RtcEngine.create(this.*applicationContext*, appId, rtcHandler )
then you can pass the engine into RtcEngineUtils
rtcEngineUtils = RtcEngineUtils(engine!!, this.*applicationContext*)
private fun initialiseEngine() {
        try {

            val appId = getString(R.string.agora_app_id)
            val rtcHandler = RtcEngineEventHandler()
            engine = RtcEngine.create(this.applicationContext, appId, rtcHandler)
            rtcEngineUtils = RtcEngineUtils(engine!!, this.applicationContext)

        } catch (e: Exception) {
            e.printStackTrace()
        }

    }
Now the initialization is complete
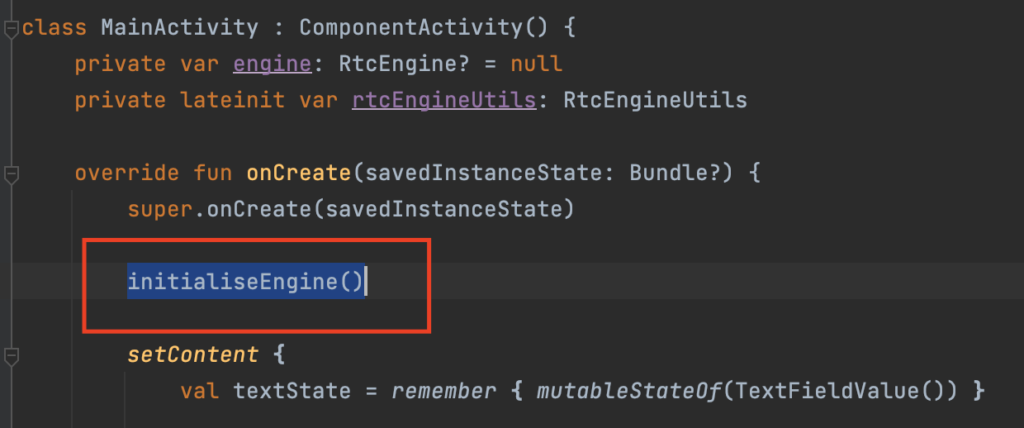
Let’s call the function inside onCreate before setContent
initialiseEngine()
Inside the joinChannel callback block, using rtcEngineUtils call the joinChannel function we created in RtcEngineUtils class and assign the value from the Textfield to it textState.value.text.trim()
MainView(
    joinChannel ={
				rtcEngineUtils.joinChannel(textState.value.text.trim())
		},
)
We can now run our code, enter channel name, click on the mic image beside text input field to join channel, but It won’t work yet because we need to give permissions to read our Audio and others.
Check Permissions
We had created a function that’ll help us perform permissions check
Now let us go to where we have the button to join a channel and check for permission
Now let us go to where we have the button to join a channel and check for permission
if (CommonUtils.hasPermissions(context)) {
    joinChannel()
} else {
    CommonUtils.requestPermission(context)
}
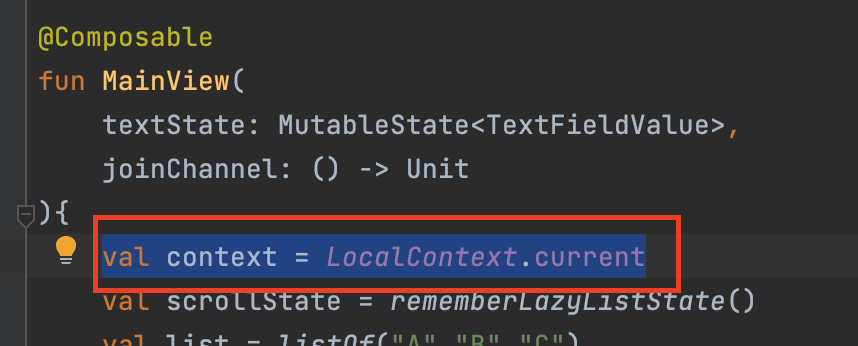
The hasPermissions and requestPermission requires a context, so we create an immutable context variable and assign LocalContext.current to it at the top of MainView composable function block.
val context = *LocalContext.current
Now run the app, and click on the join channel image, you should see a scree like this
![]()
accept permissions, enter channel name and join channel, our app works, but the voice is not changing.
You can test the app by joining a channel with someone, or using the web testing platform
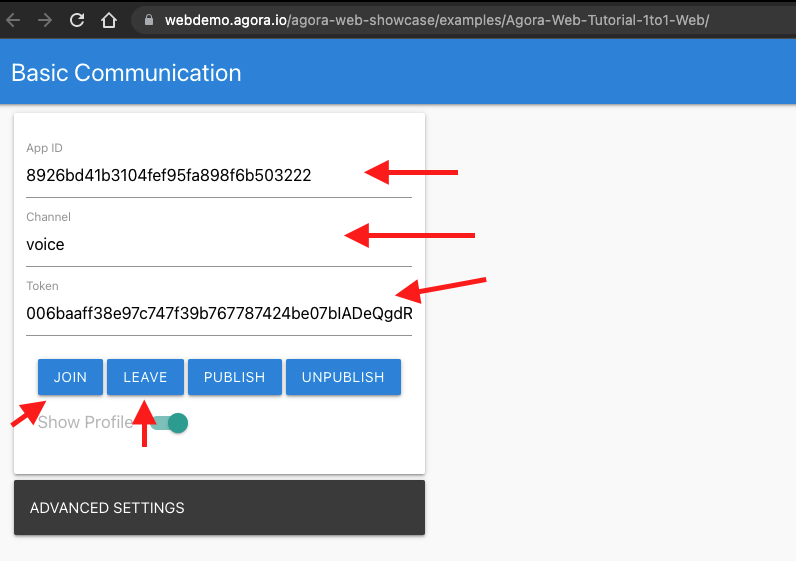
The web testing platform is really helpful if you don’t have someone to test with, you can enter your App ID, Channel name, and Token, then click on the JOIN button to join and the LEAVE button to leave.
Implement Voice Changing
To be able to change the voice, we will just add a line of code in our joinChannel function
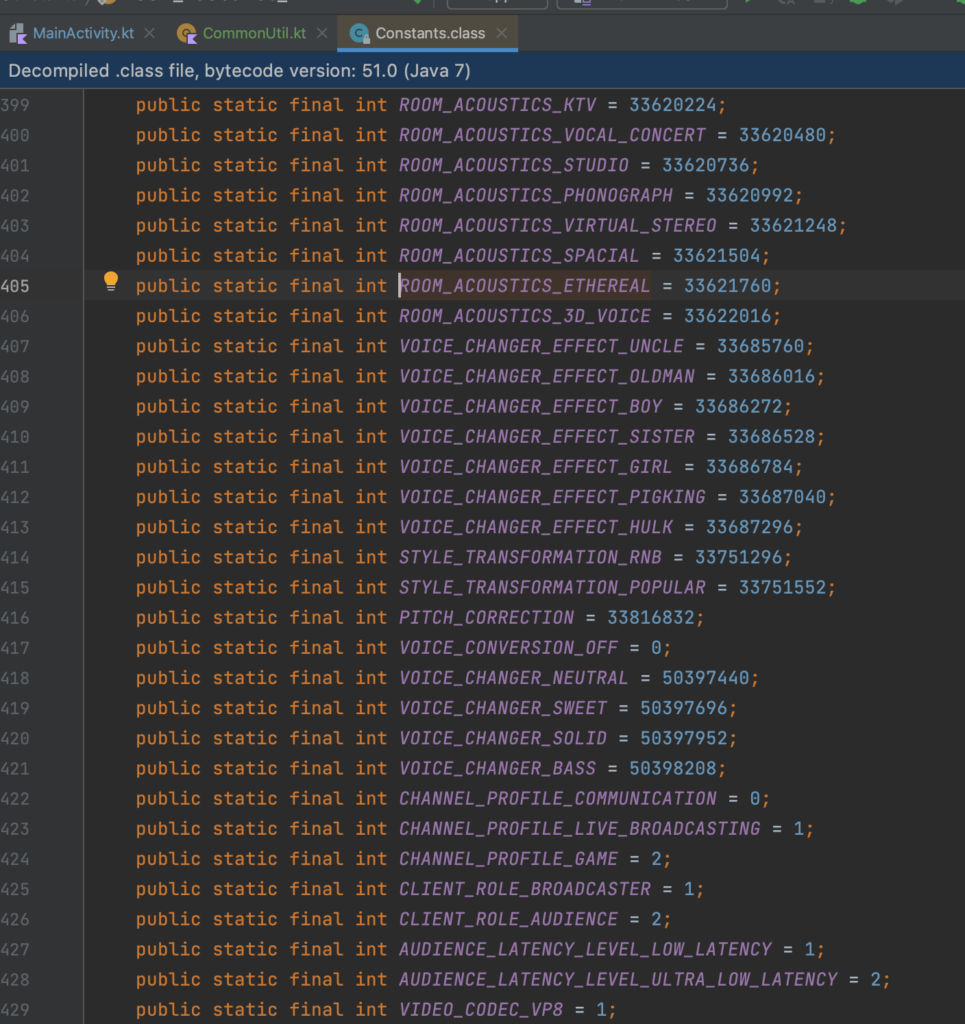
engine.setAudioEffectPreset(Constants.VOICE_CHANGER_EFFECT_HULK)

here we use the engine parameter to access setAudioEffectPreset which accepts an int,
using the Constants which is from the SDK we can access many voice effects, here we choose VOICE_CHANGER_EFFECT_HULK
press and hold the Command key(control key on Windows) and click on the Constant to see its value and other values
Our JoinChannel full code
fun joinChannel(channelId: String) {
/** Sets the channel profile of the Agora RtcEngine.
     *  */
engine.setChannelProfile(Constants.CHANNEL_PROFILE_LIVE_BROADCASTING)
/**In the demo, the default is to enter as the anchor. */
engine.setClientRole(IRtcEngineEventHandler.ClientRole.CLIENT_ROLE_BROADCASTER)
/**Please configure accessToken in the string_config file.
     * */
var accessToken: String? = context.getString(R.string.agora_access_token)

    engine.setAudioProfile(
        Constants.AUDIO_PROFILE_MUSIC_HIGH_QUALITY_STEREO,
        Constants.AUDIO_SCENARIO_GAME_STREAMING
)
/** Allows a user to join a channel.
     * if you do not specify the uid, we will generate the uid for you */
val mediaOption = ChannelMediaOptions()
    mediaOption.autoSubscribeAudio = true

    val res = engine.joinChannel(accessToken, channelId, "Extra Optional Data", 0, mediaOption)
    if (res != 0) {
        Log.e(TAG, RtcEngine.getErrorDescription(Math.abs(res)))
        return
    }
    engine.setAudioEffectPreset(Constants.VOICE_CHANGER_EFFECT_HULK)

}
Run App
Now we can run our app and enter the channel name and click on the mic icon to join the channel, go to the web test platform, click on join, say something and hear the voice effect
Make Voice changing dynamic
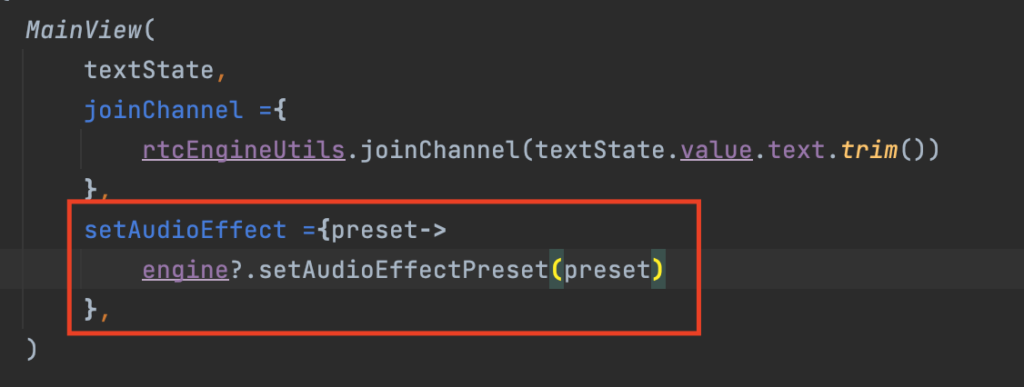
Now to be able to change the voice, we need to make the list of voice effects clickable and assign the selected effect to the setAudioEffectPreset function.
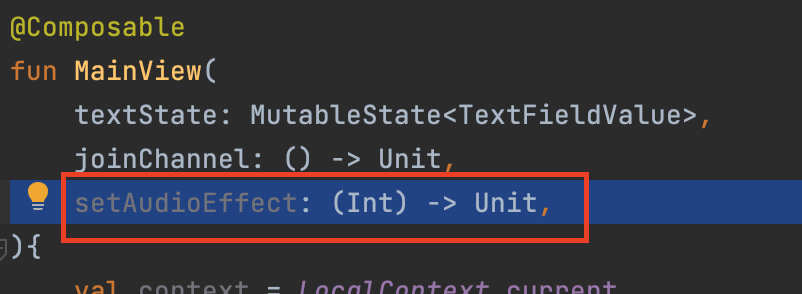
First, we create an Int lambda function setAudioEffect: (Int) -> Unit, on MainView composable construction,
then call the function on the Row clickable function in Items of LazyColumn.
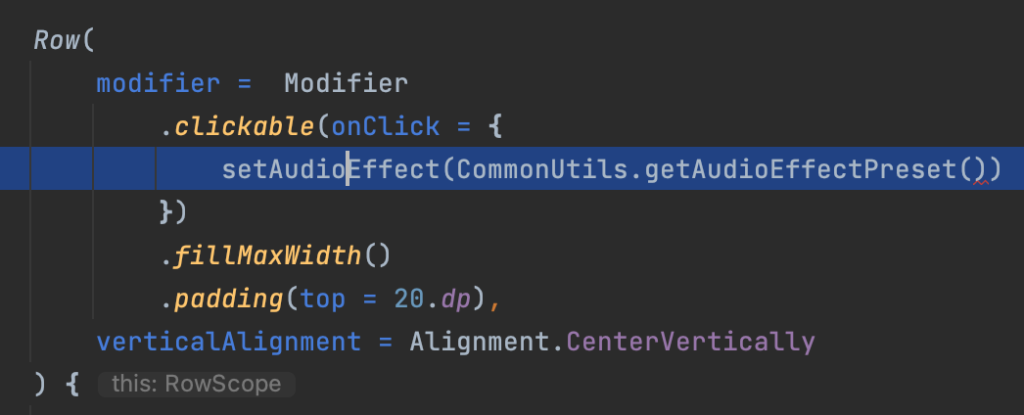
setAudioEffect()

it requires an Int parameter, so let’s created a function getAudioEffectPreset in CommonUtils
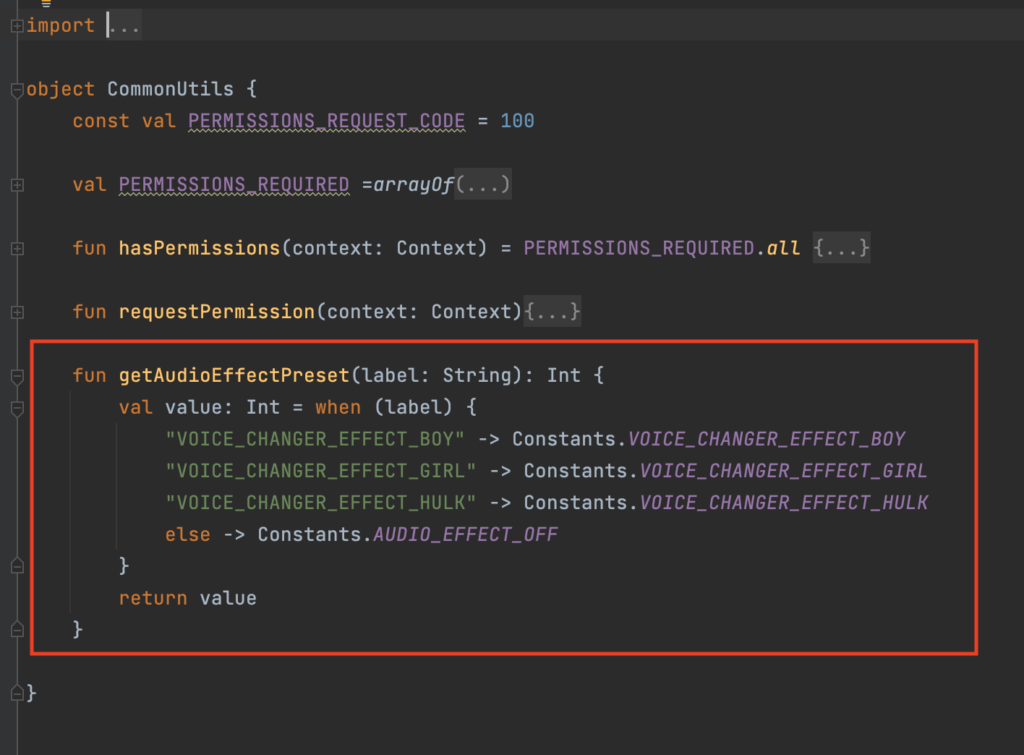
fun getAudioEffectPreset(label: String): Int {
    val value: Int = when (label) {
        "VOICE_CHANGER_EFFECT_BOY" -> Constants.VOICE_CHANGER_EFFECT_BOY
				"VOICE_CHANGER_EFFECT_GIRL" -> Constants.VOICE_CHANGER_EFFECT_GIRL
				"VOICE_CHANGER_EFFECT_HULK" -> Constants.VOICE_CHANGER_EFFECT_HULK
			else -> Constants.AUDIO_EFFECT_OFF
		}
    return value
}
getAudioEffectPreset takes in a string input and extends an Int to get the Preset values.
Now we can call the getAudioEffectPreset function in the setAudioEffect
Now we need to pass the list of audio effects into the getAudioEffectPreset()
So let’s create AudioEffectItem data class and the list.

The data class has two parameters, icon, and title
Using the AudioEffectItem we can create a simple audioEffectList
The images can be downloaded and added to drawable resource file from this link https://drive.google.com/drive/folders/1G3uK7GI1TasHSdLgzC2q5EgCgkYbdM3H?usp=sharing
data class AudioEffectItem(var icon: Int, var title: String,)

var audioEffectList = listOf(
    AudioEffectItem(R.drawable.ic_boy, "VOICE_CHANGER_EFFECT_BOY"),
    AudioEffectItem(R.drawable.ic_girl, "VOICE_CHANGER_EFFECT_GIRL"),
    AudioEffectItem(R.drawable.ic_hulk, "VOICE_CHANGER_EFFECT_HULK"),
)
We can now go back to MainView composable function in MainActivity, and replace list.size in items of LazyColumn with audioEffectList.size then*audioEffectList[index].title* in setAudioEffect(CommonUtils.getAudioEffectPreset(*audioEffectList[index].title*)) ,
replace the Image resource with *audioEffectList*[index].icon text with audioEffectList[].title
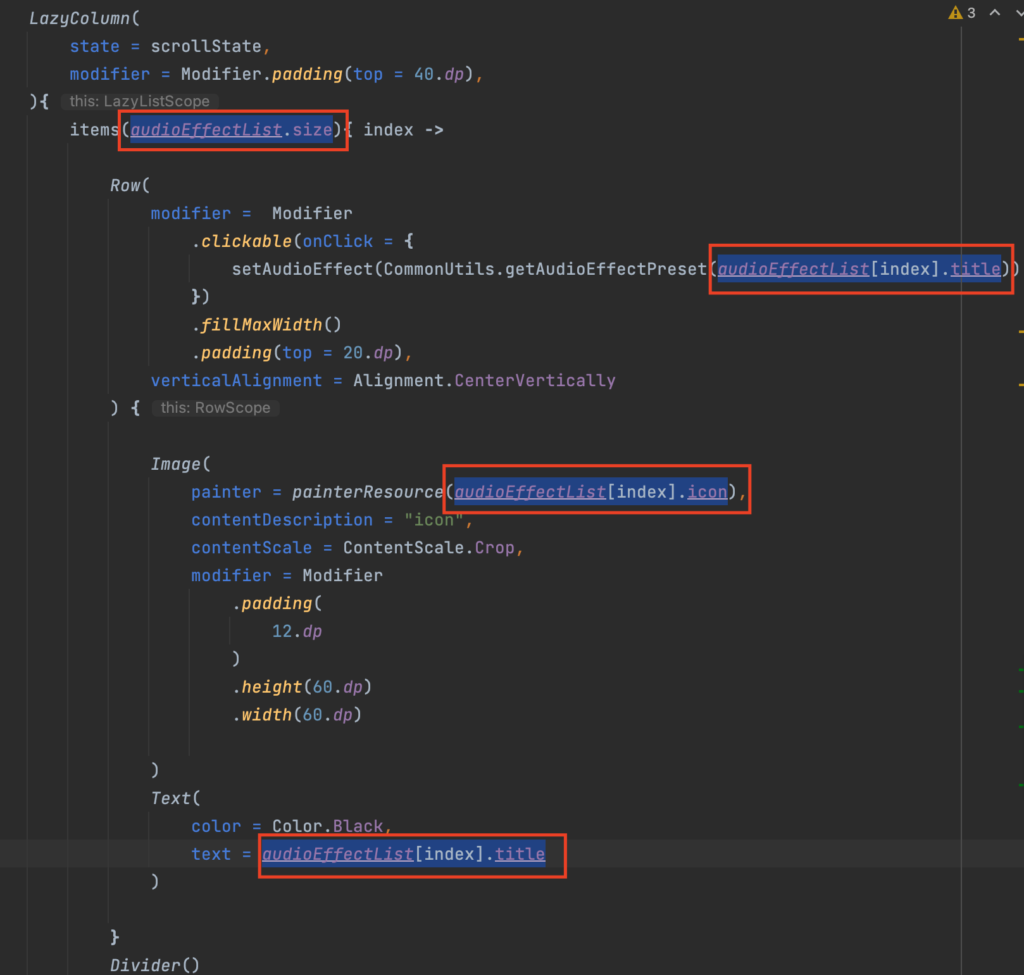
The audioEffectList[index].title and audioEffectList[index].icon are from AudioEffectItem data class we created, to get list of voice effects.
Finally, let’s implement the setAudioEffect callback on MainView in setContent block.
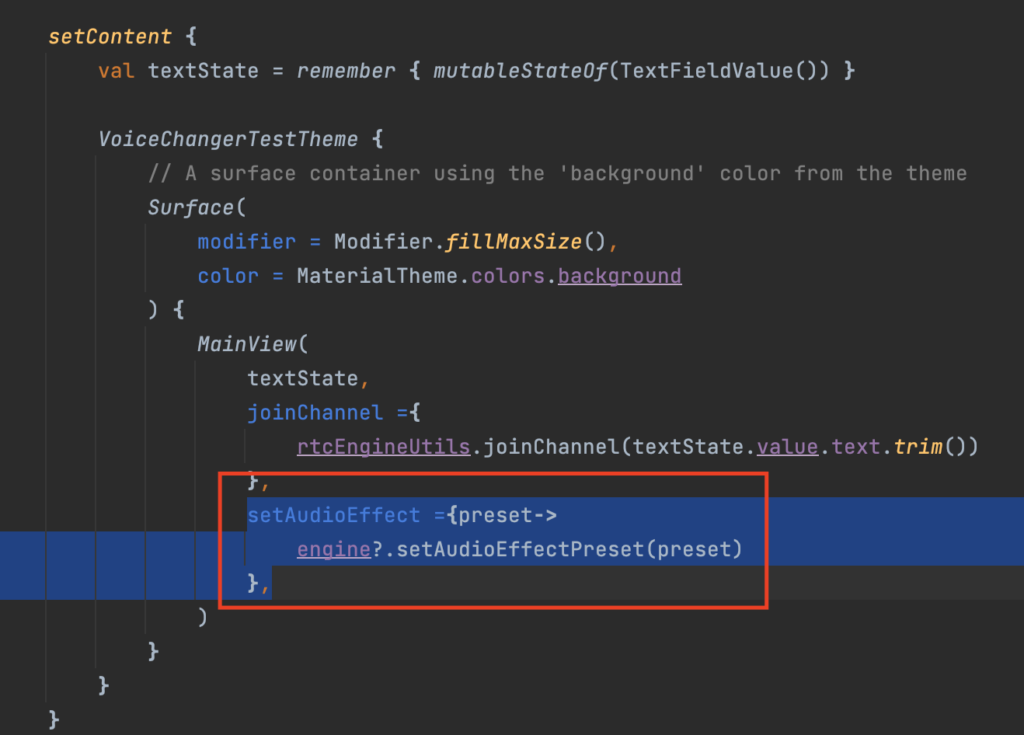
setAudioEffect ={preset->
engine?.setAudioEffectPreset(preset)
},
We simply use engine to get setAudioEffectPreset and assign the selected preset voice to it.
Our app now looks like this

Now we have two thing to do and we are done,
- Make the list items clickable to change the voice
- Show the selected item on the textview were we have “Show text”
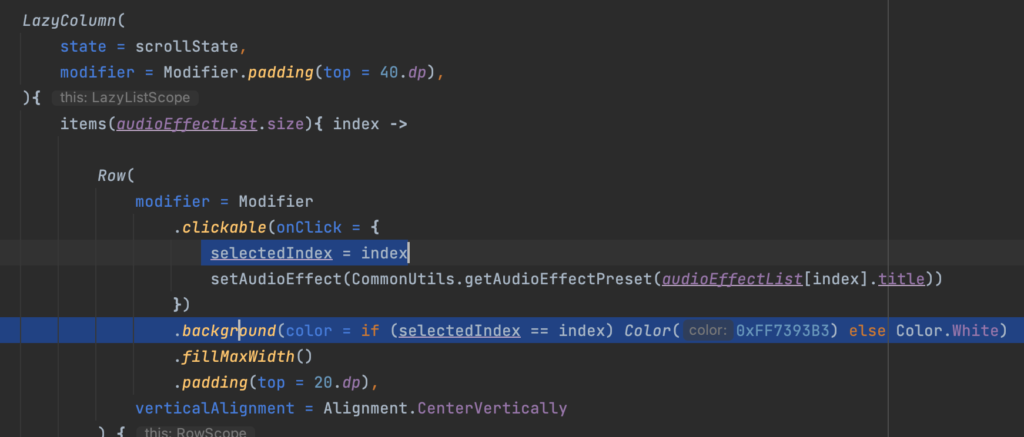
Making the list items clickable to change the voice
To observe the items that is being clicked, let’s add an instance of selectedIndex mutableStateOf Int var selectedIndex by remember { mutableStateOf(0) } on top of MainView composable block, then call selectedIndex in the Row clickable function in LazyColumn times and assign the index to it

We can use the selectedIndex to change selected background color .background(color = if (selectedIndex == index) Color(0xFF7393B3) else Color.White)
Run app and see what changed

Show the selected item on the textview were we have “Show text”
To show the selected voice effect on the text, we simply replace the default text with
audioEffectList*[selectedIndex].title

Last thing to do, go the joinChannel function and comment out or remove
engine.setAudioEffectPreset(Constants.VOICE_CHANGER_EFFECT_HULK) as it is no more useful because setAudioEffect now does what it was doing
We can now run our code and test.
MainView in setContent now looks like so
MainView(
    //call textState parameter in MainView,
    textState,
    joinChannel ={
			rtcEngineUtils.joinChannel(textState.value.text.trim())
		},

    setAudioEffect ={preset->
				engine?.setAudioEffectPreset(preset)
			},
	)
MainActivity full code we have now:
package eu.tutorials.voice_changer

import android.os.Bundle
import android.util.Log
import androidx.activity.ComponentActivity
import androidx.activity.compose.setContent
import androidx.compose.foundation.Image
import androidx.compose.foundation.background
import androidx.compose.foundation.clickable
import androidx.compose.foundation.layout.*
import androidx.compose.foundation.lazy.LazyColumn
import androidx.compose.foundation.lazy.rememberLazyListState
import androidx.compose.material.*
import androidx.compose.runtime.*
import androidx.compose.ui.Alignment
import androidx.compose.ui.Modifier
import androidx.compose.ui.graphics.Color
import androidx.compose.ui.layout.ContentScale
import androidx.compose.ui.platform.LocalContext
import androidx.compose.ui.res.painterResource
import androidx.compose.ui.text.input.TextFieldValue
import androidx.compose.ui.text.style.TextAlign
import androidx.compose.ui.tooling.preview.Preview
import androidx.compose.ui.unit.dp
import eu.tutorials.voice_changer.ui.theme.VoiceChangerTheme
import io.agora.rtc.Constants
import io.agora.rtc.RtcEngine

class MainActivity : ComponentActivity() {
    private var engine: RtcEngine? = null
    private lateinit var rtcEngineUtils: RtcEngineUtils

    override fun onCreate(savedInstanceState: Bundle?) {
        super.onCreate(savedInstanceState)

        //Initializing RtcEngine
        initialiseEngine()

        setContent {
            //Create a TextFieldValue MutableState instance,
            val textState = remember { mutableStateOf(TextFieldValue()) }

            VoiceChangerTheme {
                // A surface container using the 'background' color from the theme
                Surface(
                    modifier = Modifier.fillMaxSize(),
                    color = MaterialTheme.colors.background
                ) {
                    //Remove call to Greeting Function
                    //Greeting("Android")
                    //Add call to MainView function on DefaultPreview
                    MainView(
                        //call textState parameter in MainView,
                        textState,
                        joinChannel = {
                            rtcEngineUtils.joinChannel(textState.value.text.trim())
                        },

                        setAudioEffect = { preset ->
                            engine?.setAudioEffectPreset(preset)
                        },
                    )
                }
            }
        }
    }

    private fun initialiseEngine() {
        try {

            val appId = getString(R.string.agora_app_id)
            val rtcHandler = RtcEngineEventHandler(setMessage = {
                Log.d("MainActivity", "rtcHandler setMessage: $it")
            }, setHasJoined = {
                Log.d("MainActivity", "Show setHasJoined value: $it")
            })

            engine = RtcEngine.create(this.applicationContext, appId, rtcHandler )
            rtcEngineUtils = RtcEngineUtils(engine!!, this.applicationContext)

        } catch (e: Exception) {
            e.printStackTrace()
        }

    }
}

//Create MainView composable function
@Composable
fun MainView(
    /**
     * Create a TextFieldValue MutableState parameter to MainView,
     */
    textState: MutableState<TextFieldValue>,
    /**
     * Create joinChannel lambda function,
     */
    joinChannel: () -> Unit,
    /**
     * Create setAudioEffect int lambda function,
     */
    setAudioEffect: (Int) -> Unit,
) {

    //Creates a LazyListState that is remembered across compositions and use if on the
    //  LazyColumn state.
    val scrollState = rememberLazyListState()
    val context = LocalContext.current
    var selectedIndex by remember { mutableStateOf(0) }

    /** Add a Column as the parent layout to align children elements
     *    vertically on the screen. Using the Modifier set the Column to fillMaxsize that is
     *    fill both horizontal and vertical sides of the screen. align the children to the bottom
     *    vertically using verticalArrangement
     * */
    Column(
        Modifier
            .fillMaxSize()
            .padding(
                bottom = 60.dp
            ),
        verticalArrangement = Arrangement.Top
    ) {
        /** Add a Card to get the Card view, using Modifier to set the Card to fillMaxWidth
         *      that is fill both horizontal and vertical sides of the screen.
         *      added padding of 15dp to give space around the Card.
         *      Add elevation of 10dp to give the elevated shadow around to Card
         */
        Card(
            Modifier
                .fillMaxWidth()
                .padding(15.dp),
            elevation = 10.dp
        ) {
            /**
             * Add a Text with a default text "Show Text",
             *      add a padding of 24dp and textAlign to align the text to center
             */
            Text(
                text = audioEffectList[selectedIndex].title,
                modifier = Modifier
                    .padding(24.dp),
                textAlign = TextAlign.Center
            )
        }

        /**
         * Call the TextField function
         */
        //TextField(textState)
        //Add Row with wrapContentWidth, padding top 20dp, start 15dp  and verticalAlignment Modifiers
        Row(
            Modifier
                .wrapContentWidth()
                .padding(
                    top = 20.dp,
                    start = 15.dp
                ),
            verticalAlignment = Alignment.CenterVertically,
        ) {
            //Move TextField function inside Row block
            TextField(textState)

            /**TAdd an Image, giving default height and width 50dp, contentScale to Crop,
             *   contentDescription, padding start 16dp and clickable modifier,
             *   since we are using a custom image icon, we will use painter, then add ic_join_mic image to
             *   drawable resource
             */

            Image(
                painter = painterResource(R.drawable.ic_join_mic),
                contentDescription = "icon",
                contentScale = ContentScale.Crop,

                modifier = Modifier
                    .padding(
                        start = 16.dp
                    )
                    .clickable(
                        onClick = {
                            // Check permission
                            if (CommonUtil.hasPermissions(context)) {
                                joinChannel()
                            } else {
                                CommonUtil.requestPermission(context)
                            }
                        },
                    )
                    .height(50.dp)
                    .width(50.dp)

            )

        }

        /**
         * Create LazyColumn, it needs a scrollState, we add padding top 40dp modifier to
         *      give space at the top of the view
         */
        LazyColumn(
            state = scrollState,
            modifier = Modifier.padding(top = 40.dp),
        ){
            /**Create an items inside LazyColumn block, use items.size to get the list of
             *  items
             */
            items(audioEffectList.size){ index ->
                /**TCreate Row to hold Image and Text horizontally for Voice Effect icon
                 *  and title, define clickable, fillMaxWidth, padding 20dp and verticalAlignment
                 */
                Row(
                    modifier =  Modifier
                        .clickable(onClick = {
                            selectedIndex = index
                            println("Show selected ${audioEffectList[index].title}")
                            setAudioEffect(CommonUtil.getAudioEffectPreset(audioEffectList[index].title))
                        })
                        .background(color = if (selectedIndex == index) Color(0xFF7393B3) else Color.White)
                        .fillMaxWidth()
                        .padding(top = 20.dp),
                    verticalAlignment = Alignment.CenterVertically
                ) {
                    /**
                     * Add Image, give it a defualt image ic_join_mic, contentDescription,
                     *      contentScale Crop, Modifiers(padding 12dp, height and width 60dp)
                     */
                    Image(
                        painter = painterResource(audioEffectList[index].icon),
                        contentDescription = "icon",
                        contentScale = ContentScale.Crop,
                        modifier = Modifier
                            .padding(
                                12.dp
                            )
                            .height(60.dp)
                            .width(60.dp)

                    )
                    /**
                     * Add Text and use the default list create above to populate the
                     *  title by calling list[index] and give the text black color
                     */
                    Text(
                        color = Color.Black,
                        text = audioEffectList[index].title
                    )

                }
                //Add a divider
                Divider()
            }
        }

    }
}

/**
 * Create a composable function TextField,
 *
 */
@Composable
fun TextField(
    /**
     * Create a TextFieldValue MutableState parameter to TextField,
     */
    textState: MutableState<TextFieldValue>
) {
    /**
     * Within the TextField block, add a TextField
     */
    TextField(
        /**
         * Call textState.value
         */
        value = textState.value,
        label = {
            /**
             * Within the TextField label block, add a Text with default text "Enter channel name"
             */
            Text(
                text = "Enter channel name",
            )
        },
        /**
         * Call textState.value = it, it here is the value parameter of TextField(any value typed in the input field)
         *      textState.value = it means set the input value to textState
         */
        onValueChange = { textState.value = it },

        )
}

/* Remove Greeting Function because we don't need it
@Composable
fun Greeting(name: String) {
    Text(text = "Hello $name!")
}
 */

@Preview(showBackground = true)
@Composable
fun DefaultPreview() {
    val textState = remember { mutableStateOf(TextFieldValue()) }
    VoiceChangerTheme {
        MainView(
            textState,
            {},
            {}
        )

    }
}