


[fusion_builder_container type=”flex” hundred_percent=”no” equal_height_columns=”no” menu_anchor=”” hide_on_mobile=”small-visibility,medium-visibility,large-visibility” class=”” id=”” background_color=”” background_image=”” background_position=”center center” background_repeat=”no-repeat” fade=”no” background_parallax=”none” parallax_speed=”0.3″ video_mp4=”” video_webm=”” video_ogv=”” video_url=”” video_aspect_ratio=”16:9″ video_loop=”yes” video_mute=”yes” overlay_color=”” video_preview_image=”” border_color=”” border_style=”solid” padding_top=”” padding_bottom=”” padding_left=”” padding_right=””][fusion_builder_row][fusion_builder_column type=”1_1″ layout=”1_1″ background_position=”left top” background_color=”” border_color=”” border_style=”solid” border_position=”all” spacing=”yes” background_image=”” background_repeat=”no-repeat” padding_top=”” padding_right=”” padding_bottom=”” padding_left=”” margin_top=”0px” margin_bottom=”0px” class=”” id=”” animation_type=”” animation_speed=”0.3″ animation_direction=”left” hide_on_mobile=”small-visibility,medium-visibility,large-visibility” center_content=”no” last=”true” min_height=”” hover_type=”none” link=”” border_sizes_top=”” border_sizes_bottom=”” border_sizes_left=”” border_sizes_right=”” first=”true”][fusion_text]In this article, we will build an email validity checker. You will learn how to check the status of an email using Jetpack compose and the MailBoxLayer API.

MailBoxLayer is an API that is used to check if an input is a valid email or not. It also shows other information like the email domain, name, including if the email is free or paid. This email can be important in making sure that a user enters a valid email format during registration.
To get started you can click on sign up for free to register and get access to an api key which gives you access to 100 free request
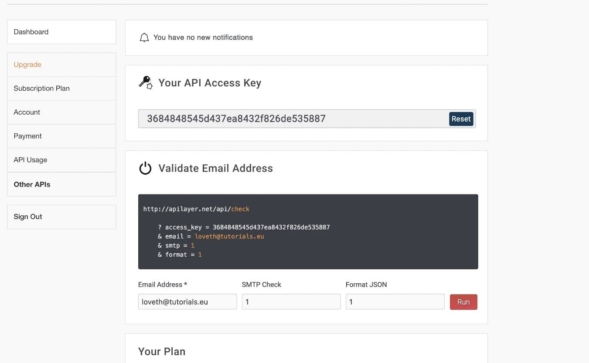
You will find the api key after you have registered and signed in
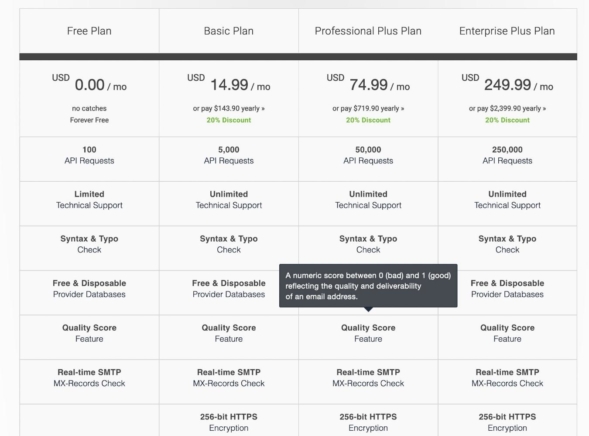
If you want to make more requests then check out the other plans and the additional offers you can get with it like the secure connection with https as the free tier does not include it.
when you click on documentation menu you will find guideline on how to connect to the api which includes the required query parameters, the complete url that connects to the mailboxlayer.
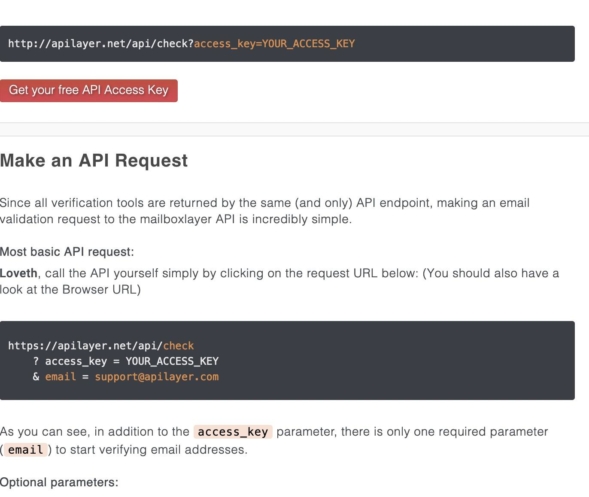
You will also see the expected responses, error codes and responses as well.
Now we will go over to android studio and start writing the actual code
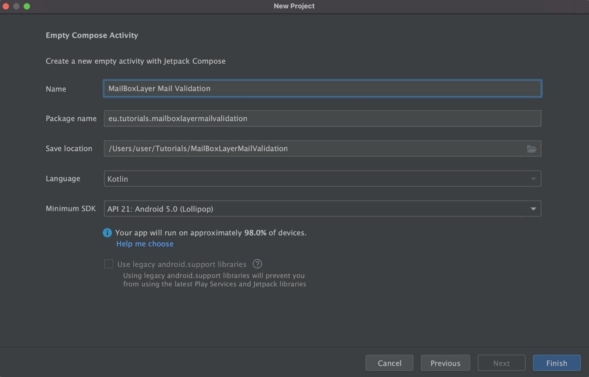
Creating A New Compose Project
To get started, we will be creating a new Empty Compose Activity Project.
After the project is created successfully, open MainActivity.kt and remove Greeting
Function and the references to it in onCreate and DefaultPreview . So that we now have the below codes in the file.
MainActivity.Kt
class MainActivity : ComponentActivity() {

    override fun onCreate(savedInstanceState: Bundle?) {

        super.onCreate(savedInstanceState)

setContent{

MailBoxLayerMailValidationTheme{

// A surface container using the 'background' color from the theme

Surface(color = MaterialTheme.colors.background){
                }
            }
        }
}
}
@Composable

fun EmailScreen() {
}
@Preview(showBackground = true)

@Composable

fun DefaultPreview() {

MailBoxLayerMailValidationTheme{
    }
}
We have also to add a new composable EmailScreen
Building The User Interface for our Email Validity checker
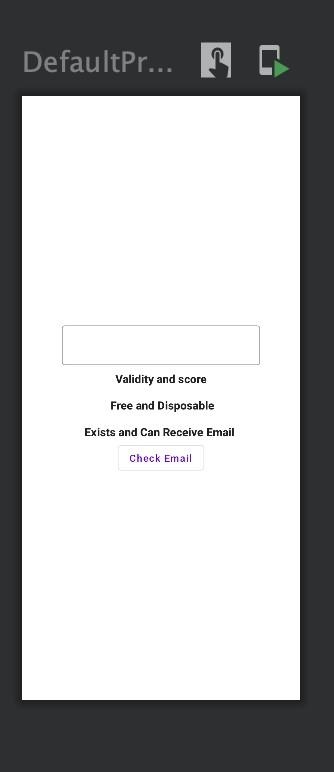
The UI will is a very basic one that will contain an Input field for entering the email address, a text to show the status of the email whether it is valid or not and a button to click for checking the entered email.
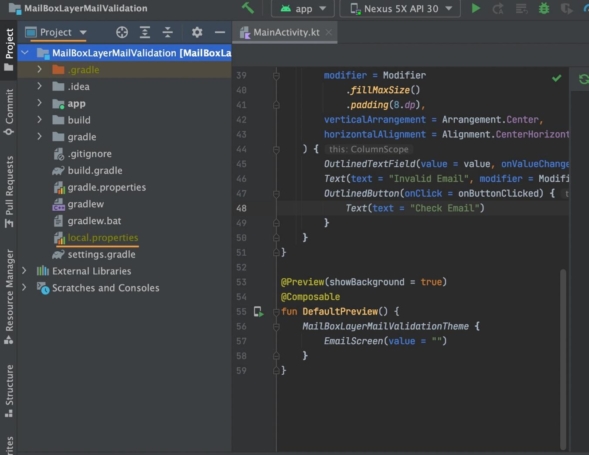
In EmailScreen composable we will add the a Column layout to align all elements vertically on the screen
Column(

    modifier = Modifier

        .fillMaxSize()

        .padding(8.dp),

    verticalArrangement = Arrangement.Center,

    horizontalAlignment = Alignment.CenterHorizontally

){

}
Using the Modifier, we set the Column to fillMaxSize which includes the vertical and horizontal axis with a padding of 8dp for all side. We also align the elements vertically to the center using verticalArrangement and horizontally to center using horizontalAlignment.
Input Composable
Next we will add an OutlinedTextField inside the Column
@Composable

fun EmailScreen(value: String,

                onValueChange: (String) -> Unit={},)

...

{

        OutlinedTextField(value = value, onValueChange = onValueChange)

    }

}
To track the entered characters for OutlineTextField we create two parameters in EmailScreen parenthesis, a String to hold the value and a lambda function with String parameter. In the Column we add the input field with value in EmailScreen parameter assigned as value argument and the onValueChange as onValueChange argument.
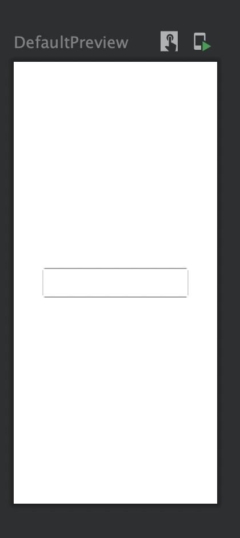
Let’s add EmailScreen to the DefaultPreview.
@Preview(showBackground = true)

@Composable

fun DefaultPreview() {

MailBoxLayerMailValidationTheme{

//Todo 3: Remove call to Greeting Function Greeting("Android")


EmailScreen(value = "")//Todo 8 add EmailScreen to DefaultPreview

}

}
Within DefaultPreview function, we call EmailScreen and set empty String as value. We can rebuild and test.
Status Field
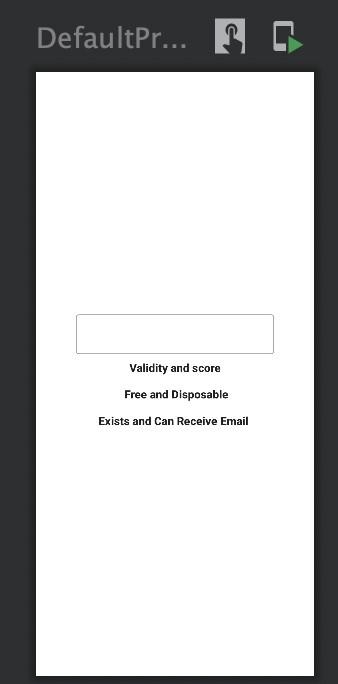
Next is to add a Column with three (3) Text elements to show the validity of an email whether it is valid or not, the score strength, if the email is free, exits, disposable and also if the domain is configured to receive email. Below OutlinedTextField we add a Column composable.
Column(verticalArrangement = Arrangement.SpaceBetween, horizontalAlignment = Alignment.CenterHorizontally){

Text(text = "Validity and score", modifier = Modifier.padding(vertical = 8.dp), fontWeight = FontWeight.ExtraBold)

Text(

        text = " Free and Disposable",

        modifier = Modifier.padding(vertical = 8.dp), fontWeight = FontWeight.ExtraBold

    )


Text(

        text = "Exists and Can Receive Email ",

        modifier = Modifier.padding(vertical = 8.dp), fontWeight = FontWeight.ExtraBold

    )

}
For now we set a default value to the text as an argument which we will update later, we also add vertical padding of 8 dp to add spaces above and below the Text element.
When we rebuild we will have the Text added to the preview
The Button
The final step of the UI is to add the button. Before adding a button we will create a lambda function as a parameter to EmailScreen that will be implemented later which the Button needs.
@Composable

fun EmailScreen(

    value: String,

                onValueChange: (String) -> Unit={},

    //Todo 10: Create a lambda function for the button Onclick which will be imp//lemented later

    onButtonClicked:()->Unit={}) {

...

{

...

OutlinedButton(onClick = onButtonClicked){

Text(text = "Check Email")

}

    }

}
Below the Text we then add an OutlinedButton, set onButtonClicked which we created as the argument to it onClick parameter and within its block add a Text with a text “Check Email” . When we rebuild we can see the changes to the Preview
Now that we have our UI ready, we will go ahead to setup and hide the Api Key gotten from MailBoxLayer website after signup and ensure that we do not push it to a version control system like github or gitlab and the likes since it should be a private key
Securing the Api Key
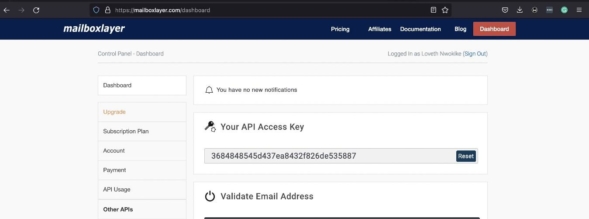
To keep the API key private as it should be we will add it to local.properties file. To find this file make sure to set the android studio view to Project
local.properties file is important to not share with others when making your project open source. You can see it is highlighted with a yellow color because it is ignored by git but if by any chance yours is not then you can as well go ahead to add it yourself to .gitignore file
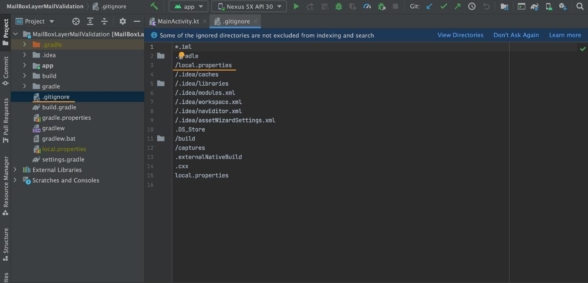
This way it only remains on your computer. Now open local.properties
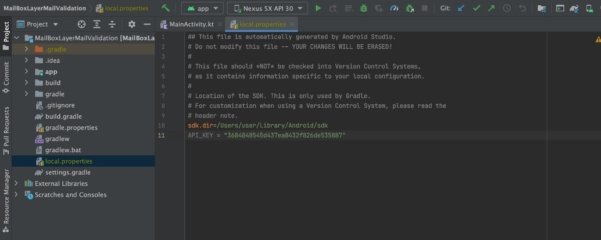
create and add your API key in it. Next change the IDE view from Project to Android
and open app level build.gradle
In the file we will read the api key from the local.properties and create access to it from other files in the project. Above android block we add the following code
Properties properties = new Properties()
properties.load(project.rootProject.file(‘local.properties’).newDataInputStream())
This will initialize Properties class and load local.properties. Next we get the api key from the file and add to the build configuration file. Within default Config we add the following
buildConfigField "String", "API_KEY", "$**{**properties.getProperty('API_KEY')**}**"
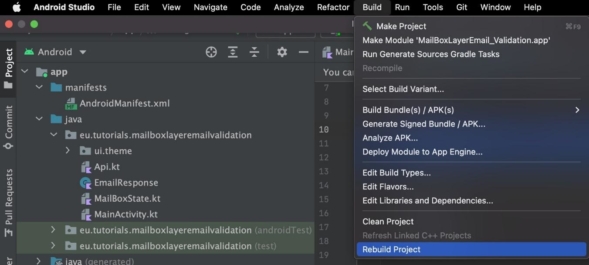
Then we sync and rebuild project
Lets create a new object called Api
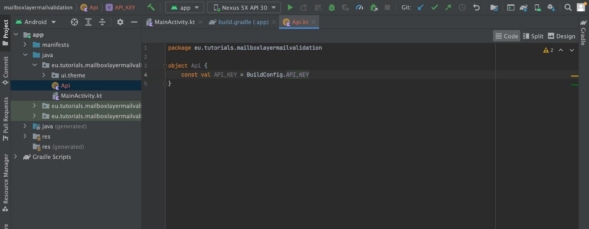
Once we have synced and rebuild the project, we will be able to access API_KEY through BuildConfig.
Now that we have our key setup we will add the Retrofit library dependency and create the service class for connecting to the MailBoxLayer API
Adding Retrofit for Connecting to the Api
To use Retrofit we will add the following dependencies to build.gradle
implementation(“com.squareup.moshi:moshi:1.13.0”)
implementation(“com.squareup.moshi:moshi-kotlin:1.13.0”)
implementation(“com.squareup.retrofit2:retrofit:2.9.0”)
implementation “com.squareup.retrofit2:converter-moshi:2.9.0”
Moshi dependency is responsible for converting the Json response from the api to Kotlin object and vice versa while retrofit is responsible for communicating between the app and the API.
Creating the data object
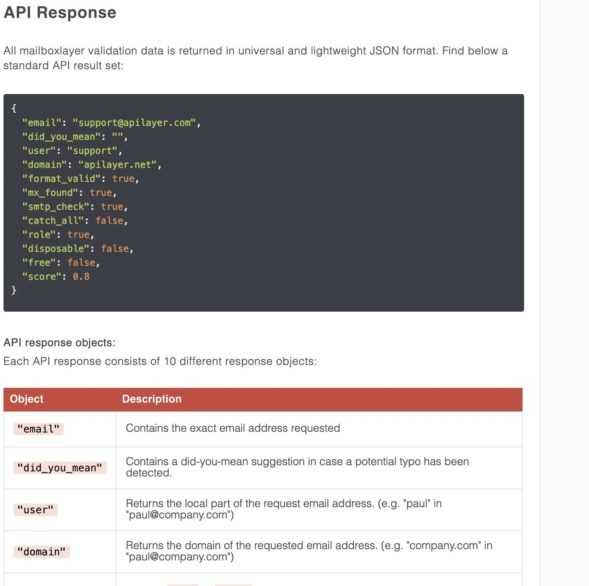
Let’s look at what our response will look like
{

  "email": "support@apilayer.com",

  "did_you_mean": "",

  "user": "support",

  "domain": "apilayer.net",

  "format_valid": true,

  "mx_found": true,

  "smtp_check": true,

  "catch_all": false,

  "role": true,

  "disposable": false,

  "free": false,

  "score": 0.8

}
With the above response we will create a data class that will be mapped to it
data class EmailResponse(val email : String="",

                         val did_you_mean : String="",

                         val user : String="",

                         val domain : String="",

                         val format_valid : Boolean=false,

                         val mx_found : Boolean=false,

                         val smtp_check : Boolean=false,

                         val catch_all : Boolean=false,

                         val role : Boolean=false,

                         val disposable : Boolean=false,

                         val free : Boolean=false,

                         val score : Double=0.0)
For each field in the response we have set a default value.
Creating the Service Class
Back into the Api class, we will create an interface above it for the request method. From the full url sample
<https://apilayer.net/api/check>
? access_key = YOUR_ACCESS_KEY
& email = support@apilayer.com
- The base url is https://apilayer.net/api/
- The Get parameter is “check”
- And the Query’s are access_key and email
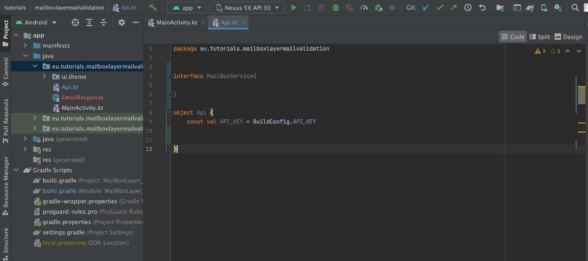
In the Api file we will create an interface
And in this interface, we add a Get request
@GET("check")

suspend fun checkEmail(@Query("access_key") key:String,

                       @Query("email")email:String):EmailResponse
This is a suspend function with Get annotation and “check” as its parameter which is the path after the base url. Then the first query which is the key and the second query that is the email. We set the return type as EmailResponse which is the data class representing the Kotlin response
Setting up Retrofit
Now we will set up the Retrofit library and connect with other libraries its works together with. First we will add a logging interceptor dependency and what this will do for us is monitor the communications with the api and show every response or result on the logcat whether its a success or an error even which might not get to through the code.
implementation "com.squareup.okhttp3:logging-interceptor:4.7.2"
Now in the Api object class we create the base url
private val BASE_URL = "<http://apilayer.net/api/>"
Set up Moshi with KotlinjsonAdapterFactory required to process json in Kotlin
private val moshi = Moshi.Builder()

    .add(KotlinJsonAdapterFactory())

    .build()
Next we add the logging interceptor
private val logging = HttpLoggingInterceptor()

private val httpClient = OkHttpClient.Builder().apply{

logging.level = HttpLoggingInterceptor.Level.BODY

addNetworkInterceptor(logging)

}.build()
And as well build it with the Network interceptor. Finally we will add all of these instances to retrofit
private val retrofit = Retrofit.Builder()

    .addConverterFactory(MoshiConverterFactory.create(moshi))

    .baseUrl(BASE_URL)

    .client(httpClient)

    .build()
Moshi which is the converter is added by calling addConverterFactory, the base url added to baseUrl and httpClient that has the logging interceptor added to client and then build method is called.
Initialize the Service class
Since the service class is an interface and cannot be initialized, retrofit has a method to help with connecting them together.
val service: MailBoxService by *lazy* **{** retrofit.create(MailBoxService::class.*java*) **}**
We use create from the retrofit library to initialize the MailBoxService. Now retrofit is set and we have the connection to the api ready.
Creating the State Class and Connecting To The UI
To prepare the data and response for the UI we will create a state class
class MailBoxState(private val coroutineScope: CoroutineScope) {


    private val _response  =MutableStateFlow(EmailResponse())

    val response: StateFlow<EmailResponse>

        get() = _response

    private val _valid  =MutableStateFlow("")

    val valid: StateFlow<String>

        get() = _valid


private val _smtpCheck  = MutableStateFlow("")

    val smtpCheck: StateFlow<String>

        get() = _smtpCheck


    private val _disposable  = MutableStateFlow("")

    val disposable: StateFlow<String>

        get() = _disposable


    private val _free = MutableStateFlow("")

    val free: StateFlow<String>

        get() = _free


    private val _score = MutableStateFlow("")

    val score: StateFlow<String>

        get() = _score


    private val _mxRecord = MutableStateFlow("")

    val mxRecord: StateFlow<String>

        get() = _mxRecord


}
The class has a coroutineScope as a parameter to allow for launching the suspend function
from the service class. We create a private MutableStateFlow variable for setting the response from the request and a StateFlow variable that is not mutable for exposing the response to the UI. As well we create a private MutableStateFlow variable for setting each status response and StateFlow that is not mutable for exposing each status to the UI. With StateFlow.
Why use StateFlow? Because ui elements recompose to changes to StateFlow and update the data adequately.
Processing the Request
fun checkEmail(emailState: String){

    try {

        coroutineScope.launch{

_response.value =

                Api.service.checkEmail(email = emailState, key = Api.API_KEY)

            Log.d("email2","${response.value}")

_valid.value = if (response.value.format_valid) "Email is valid" else "Invalid email"

}

}catch (e: Exception){


    }

}
This function receives the email to be checked. Using the coroutineScope, we launch the suspend function from the service class within a try-catch block to check the email state. We pass in emailState as an argument for email and the api key as an argument for key and set the response returned from the request to _response state variable.
Checking the Email Validity
We check for each status from the response class and if true we know that the email passed the check and if it is false then the email did pass, We set a text to show a clear message for each status.
Initializing the State Class
@Composable

fun rememberMailBoxState(

    coroutineScope: CoroutineScope =rememberCoroutineScope()

)

        =remember(coroutineScope){

MailBoxState( coroutineScope = coroutineScope)

}
Here we initialize the State class using a remember function and pass in rememberCoroutineScope as argument. With remember function, the class will get called when there is a need for recomposition.
Connecting to the UI
Now that we have the State class ready we will connect it to the user interface. In MainActivity.Kt we will update the EmailScreen composable to have the state class as parameter
state: MailBoxState
We will also change the value for text in the validity Text to read from valid variable from the state class
Text(

text = state.valid.collectAsState().value, modifier = Modifier.padding(vertical = 8.dp))

Within setContent block in MainActivity class, we call the MailBoxState initializer.

val appState =rememberMailBoxState()

val response  =

    appState.response.collectAsState()


var emailState by remember{

mutableStateOf("")

}
We also collect the response and assign it to a variable then create a remember variable for the email. Within the Surface block we call EmailScreen composable
EmailScreen(value = emailState, onValueChange ={

emailState  =it

}, onButtonClicked ={

if (emailState.isNotEmpty()) {

        appState.checkEmail(emailState = emailState)

    }

}, state = appState)
- Here we set emailState as argument for value
- We set a lambda for onValueChange and within this block assign the result from it to the emailState which is any input entered in the OutlinedEdit text .
- For onButtonCLicked we set a lambda and check that the input field is not empty then call checkEmail method and pass in the email state to trigger the request.
- We set appState as the state argument which is the State class.
AndroidManifest file
One last thing we should do is enable internet connection in the manifest file
<uses-permission android:name=”android.permission.INTERNET”/>
We add this above the application tag so our app can connect to the internet
Finally, we have to add the following within the application tag
<application

    android:usesCleartextTraffic="true"

...

</application>
We need this because currently we are using the free plan of the api which only allows http url and android does not allow it by default. When you get a paid plan then you won’t need to add that line.
We can run and test the application
Testing if Email Validity works
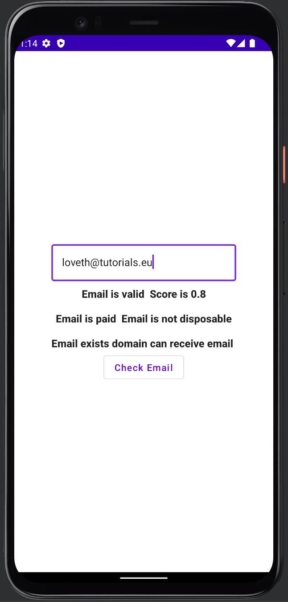
When we enter a valid email and check the logcat with Debug selected
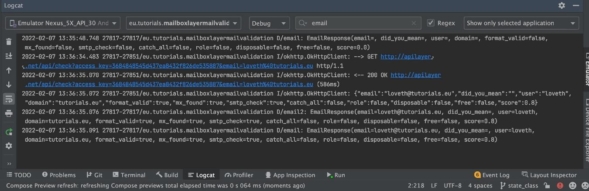
We will see the request made and the different responses from the log we have set.
Using the format_valid which is true we have set the validity field to email is valid.
Now let’s enter an invalid email
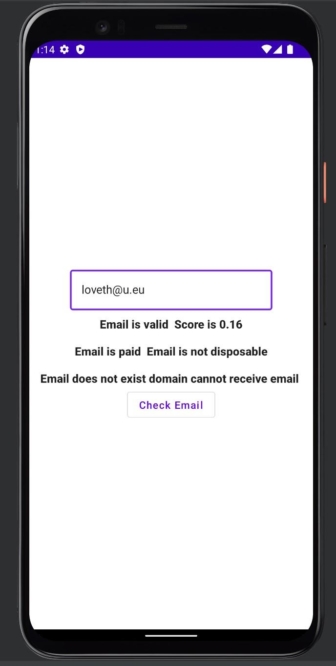
We can see the validity text says invalid email and when we check the log

We will see that format_valid remains false which sets the validity text as invalid.
Now when we check the response returned from the server by typing http into the search box which brings up the results from the interceptor that we have setup
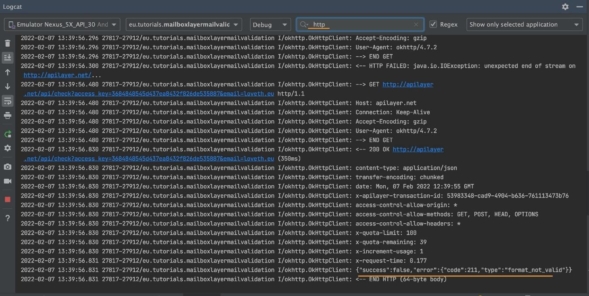
We will see the actual response when an email is not valid.
MailBoxLayerMailValidation for the Email Validity checker
One last thing before we finish, use http instead of https as base url because free version does not support https
private val BASE_URL = "<http://apilayer.net/api/>"
Then in Android Manifest add android:usesCleartextTraffic=”true” within the application tag
<application

    android:usesCleartextTraffic="true"

...


</application>
Thank you Mailboxlayer API!
In conclusion, with MailBoxLayer API you can easily make sure that an email entered by a user during registration is a valid format, extract the email domain and name from the email, and when necessary you can confirm if the email is a free one or not.
By the way! If you are interested in becoming a professional software developer, make sure to check out our courses!
[/fusion_text][/fusion_builder_column][/fusion_builder_row][/fusion_builder_container]