


In this tutorial, we will learn about the new RegisterForActivityResult in android that can be used to start another activity or application and receive a result back. For example when you launch the gallery app from another application and select a picture and get back into the other application to use that photo. We will be using a simple example to show how we can use this API to get a result back from another activity into the activity that started it and then use the result as we wish.
By the way! If you are interested in becoming a professional software developer, make sure to check out our courses!
Here is the sample application.
We will have three activities MainActivity, FirstActivity, and SecondActivity.
MainActivity
In the MainActivity we will have two buttons, the first button will launch the First Activity and the second button will launch the Second Activity. Let’s create the MainActivity layout
activity_main.xml
<androidx.constraintlayout.widget.ConstraintLayout
xmlns:android="http://schemas.android.com/apk/res/android"
    xmlns:app="http://schemas.android.com/apk/res-auto"
    xmlns:tools="http://schemas.android.com/tools"
    android:layout_width="match_parent"
    android:layout_height="match_parent"
    tools:context=".MainActivity">

    <Button
        android:id="@+id/btn_launch_activity_first"
        android:layout_width="wrap_content"
        android:layout_height="wrap_content"
        android:text="Launch First Activity"
        app:layout_constraintLeft_toLeftOf="parent"
        app:layout_constraintRight_toRightOf="parent"
        app:layout_constraintTop_toTopOf="parent" />

    <TextView
        android:id="@+id/tv_first_activity_result"
        android:layout_width="wrap_content"
        android:layout_height="wrap_content"
        android:layout_marginTop="16dp"
        app:layout_constraintLeft_toLeftOf="parent"
        app:layout_constraintRight_toRightOf="parent"
        app:layout_constraintTop_toBottomOf="@id/btn_launch_activity_first" />

    <Button
        android:id="@+id/btn_launch_activity_second"
        android:layout_width="wrap_content"
        android:layout_height="wrap_content"
        android:layout_marginTop="25dp"
        android:text="Launch Second Activity"
        app:layout_constraintLeft_toLeftOf="parent"
        app:layout_constraintRight_toRightOf="parent"
        app:layout_constraintTop_toBottomOf="@id/tv_first_activity_result" />

    <TextView
        android:id="@+id/tv_second_activity_result"
        android:layout_width="wrap_content"
        android:layout_height="wrap_content"
        android:layout_marginTop="16dp"
        app:layout_constraintLeft_toLeftOf="parent"
        app:layout_constraintRight_toRightOf="parent"
        app:layout_constraintTop_toBottomOf="@id/btn_launch_activity_second" />
</androidx.constraintlayout.widget.ConstraintLayout>
- The first button will launch the First Activity
- The text below it will display the result from the First Activity
- The Second button will launch the Second Activity
- The text below it will display the result from the Second Activity
In MainActivity.kt we will create an activity result launcher to start the FirstActivity
private var firstActivityResultLauncher:ActivityResultLauncher<Intent> = registerForActivityResult(ActivityResultContracts.StartActivityForResult()) { result ->
        if (result.resultCode == Activity.RESULT_OK) {
            // There are no request codes
            val data: Intent? = result.data
            //receive data from firstActivity
            tvFirstActivityResult?.text = "First Activity Result Success."
        }else if (result.resultCode == Activity.RESULT_CANCELED) {
            Log.e("Cancelled", "Cancelled")
            Toast.makeText(this@MainActivity,"Result Cancelled",Toast.LENGTH_SHORT).show()
        }
    }
The ActivityResultLauncher is of the generic type which means it can launch different types like intent, URI, string, and so on. In this case, we are launching an intent so we create an ActivityResultLauncher variable of type Intent to register the intent for a result.
The registerForActivityResult lambda returns a result with a result code and data. We check if the result code is Result.OK then we retrieve the data and set to the TextField but if it got canceled for any reason then we notify the user with a toast.
In the onCreate method of the MainActivity,
buttonFirstActivityLauncher?.setOnClickListener{
val intent = Intent(this@MainActivity, FirstActivity::class.java)
    firstActivityResultLauncher.launch(intent)
}
We set click listener on the first button, create an intent for the FirstActivity and use the firstActivityResultLauncher variable to launch the intent.
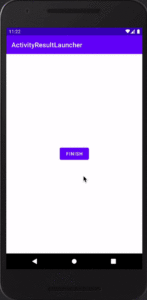
First Activity
In the First Activity we have a button in its layout.
activity_first.xml
<androidx.constraintlayout.widget.ConstraintLayout
xmlns:android="http://schemas.android.com/apk/res/android"
    xmlns:app="http://schemas.android.com/apk/res-auto"
    xmlns:tools="http://schemas.android.com/tools"
    android:layout_width="match_parent"
    android:layout_height="match_parent"
    tools:context=".FirstActivity">


    <Button
        android:id="@+id/btn_finish"
        android:layout_width="wrap_content"
        android:layout_height="wrap_content"
        android:text="FINISH"
        app:layout_constraintBottom_toBottomOf="parent"
        app:layout_constraintEnd_toEndOf="parent"
        app:layout_constraintStart_toStartOf="parent"
        app:layout_constraintTop_toTopOf="parent" />

</androidx.constraintlayout.widget.ConstraintLayout>
when this button is clicked it sets a success with Result_Ok and then finishes the activity
buttonFinish.setOnClickListener{
setResult(Activity.RESULT_OK) // It is used to set the RESULT OK which means it is success action which we wants to send back.
    finish()
}
This way we are back into the MainActivity and its sets the text as assigned when the result is successful.
Let’s see the result
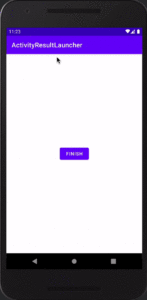
Now lets look at the second button and second activity.
Second Activity
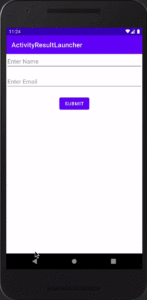
For the second activity we will have two edit text and a button. The first edit text will accept your name, the second one will accept your email and when the button is clicked we can get the entered data, finish the activity and return to the MainActivity with those data. lets see how to achieve this
activity_second.xml
<androidx.constraintlayout.widget.ConstraintLayout
xmlns:android="http://schemas.android.com/apk/res/android"
    xmlns:app="http://schemas.android.com/apk/res-auto"
    xmlns:tools="http://schemas.android.com/tools"
    android:layout_width="match_parent"
    android:layout_height="match_parent"
    tools:context=".SecondActivity">

    <EditText
        android:id="@+id/et_name"
        android:layout_width="match_parent"
        android:layout_height="wrap_content"
        android:hint="Enter Name"
        app:layout_constraintEnd_toEndOf="parent"
        app:layout_constraintStart_toStartOf="parent"
        app:layout_constraintTop_toTopOf="parent" />

    <EditText
        android:id="@+id/et_email"
        android:layout_width="match_parent"
        android:layout_height="wrap_content"
        android:hint="Enter Email"
        android:layout_marginTop="16dp"
        app:layout_constraintEnd_toEndOf="parent"
        app:layout_constraintStart_toStartOf="parent"
        app:layout_constraintTop_toBottomOf="@id/et_name" />

    <Button
        android:id="@+id/btn_submit"
        android:layout_marginTop="20dp"
        android:layout_width="wrap_content"
        android:layout_height="wrap_content"
        android:text="SUBMIT"
        app:layout_constraintEnd_toEndOf="parent"
        app:layout_constraintStart_toStartOf="parent"
        app:layout_constraintTop_toBottomOf="@id/et_email"/>
</androidx.constraintlayout.widget.ConstraintLayout>
In the MainActivity we create two variables as a key for identifying the name and email
companion object{
    const val NAME = "name"
    const val EMAIL = "email"
}
Then we create a second activity result launcher
private var secondActivityResultLauncher:ActivityResultLauncher<Intent> = registerForActivityResult(ActivityResultContracts.StartActivityForResult()) { result ->
        if (result.resultCode == Activity.RESULT_OK) {
            // There are no request codes
            val data: Intent? = result.data
            //receive data from secondActivity
            if (data != null) {
                // Here the data which we have sent from the second activity is received and displayed in the textview.
                val name = data.getStringExtra(NAME)
                val email = data.getStringExtra(EMAIL)

                tvSecondActivityResult?.text = "$name  ==>  $email"
            }
        } else if (result.resultCode == Activity.RESULT_CANCELED) {
            Log.e("Cancelled", "Cancelled")
            Toast.makeText(this@MainActivity,"Result Cancelled", Toast.LENGTH_SHORT).show()
        }
    }
Here we check if the result code is Result_OK we then get the data. We make sure the data is not null before we fetch the name as its type String with the key assigned to it. We also do the same for email, then we finally set them to the second textView in the MainActivity.
Pass the Data from Second Activity .
In the second activity
btnSubmit.setOnClickListener{
// This is used send the custom data with the result.
    val intent = Intent()
    intent.putExtra(MainActivity.NAME, etName.text.toString())
    intent.putExtra(MainActivity.EMAIL, etEmail.text.toString())

    setResult(Activity.RESULT_OK, intent) // It is used to set the RESULT OK and a custom data values which we wants to send back.
    finish()
}
When the submit button is clicked we pass the data from the two edit text using putExtra and set it to the different key which was created in the MainActivity then we set result as Result_OK passing the intent too and finish the activity.
Now when we run the app
You can get the full code for this tutorial HERE and hope this gets you started with using the different Activity Result APIs.