


Introduction
View binding is the latest approach for connecting layout views to there binding classes like Activity, Fragment and Adapters. We will look at how to use view binding with recycler view adapters as its somewhat different from other binding classes but very easy as well.
We are using a new empty activity project and to use view binding we have to enable it in the build.gradle file
Section 1: Enable View Binding
build.gradle
android{
...
//We add buildFeautures block and set viewBinding to true
buildFeatures{
viewBinding  true
}
}
Within the android block we have enabled viewBinding by adding the buildFeatures block and setting viewBinding to true.
To successfully create a recycler view and display a list we will need the following setup:
- A Recycler View
- An item Layout
- A View Holder
- An Adapter
Section 2: Add a Recycler View
Lets add a recyclerView to the activity_main.xml
activity_main.xml
<androidx.constraintlayout.widget.ConstraintLayout
xmlns:android="http://schemas.android.com/apk/res/android"
    xmlns:app="http://schemas.android.com/apk/res-auto"
    xmlns:tools="http://schemas.android.com/tools"
    android:layout_width="match_parent"
    android:layout_height="match_parent"
    tools:context=".MainActivity">

    <androidx.recyclerview.widget.RecyclerView
        android:id="@+id/taskRv"
        android:layout_width="match_parent"
        android:layout_height="match_parent"
        app:layout_constraintBottom_toBottomOf="parent"
        app:layout_constraintLeft_toLeftOf="parent"
        app:layout_constraintRight_toRightOf="parent"
        app:layout_constraintTop_toTopOf="parent" />

</androidx.constraintlayout.widget.ConstraintLayout>
Since there is a textView automatically created with activity_main.xml we modify it into a recycler view by
- Changing the Tag from TextView to RecyclerView
- Remove the android:text attribute which is only required by a TextView
- Change the layout_width and layout_height to use match_parent
Section 3: Create the Item layout
The next on our setup list is the item layout so we create a new layout and name it recyclerview_item.
The sample project is a simple todo list which will show a title and time.

Lets add two TextView to the item layout.
<androidx.constraintlayout.widget.ConstraintLayout
xmlns:android="http://schemas.android.com/apk/res/android"
    xmlns:app="http://schemas.android.com/apk/res-auto"
    xmlns:tools="http://schemas.android.com/tools"
    android:layout_width="match_parent"
    android:layout_height="wrap_content"
    android:padding="16dp">

    <TextView
        android:id="@+id/titleTv"
        android:layout_width="wrap_content"
        android:layout_height="wrap_content"
        android:textStyle="bold"
        app:layout_constraintStart_toStartOf="parent"
        app:layout_constraintTop_toTopOf="parent"
        tools:text="Title" />

    <TextView
        android:id="@+id/timeTv"
        android:layout_width="wrap_content"
        android:layout_height="wrap_content"
        app:layout_constraintStart_toStartOf="parent"
        app:layout_constraintTop_toBottomOf="@id/titleTv"
        tools:text="13:42" />

    <View
        android:layout_width="match_parent"
        android:layout_height="1dp"
        android:background="#c3c3c3"
        app:layout_constraintTop_toBottomOf="@id/timeTv" />
</androidx.constraintlayout.widget.ConstraintLayout>
In the item layout above.
- We have set the constraintLayout height to wrap_content and added a padding with 16dp
- Then we added a TextView for the title with an id of titleTv, a constraint_toTopOf parent and constraint_toStartOf parent, set the layout_width and layout_height to wrap_content, textStyle to bold and tool:text to Title. The tool:text is only visible during design time
- Next we add a TextView for the time stamp with an id of timeTv, a constraintTop_toBottomOf titleTv and constraint_toStartOf parent, set the layout_width and layout_height to wrap_content, textStyle to bold and tool:text to 13:42.
- To add a line for separating each item from another, We add a View with layout_width of “match_parent”, layout_height of 1dp, set background to gray “#c3c3c3” and then a constraintTop_toBottomOf timeTv
We can add this item layout to the activity_main.xml and see how it looks
activity_main.xml
<androidx.constraintlayout.widget.ConstraintLayout
    xmlns:android="http://schemas.android.com/apk/res/android"
    xmlns:app="http://schemas.android.com/apk/res-auto"
    xmlns:tools="http://schemas.android.com/tools"
    android:layout_width="match_parent"
    android:layout_height="match_parent"
    tools:context=".MainActivity">

    <androidx.recyclerview.widget.RecyclerView
        android:layout_width="match_parent"
        android:layout_height="match_parent"
        tools:listitem="@layout/recyclerview_item"
        app:layoutManager="androidx.recyclerview.widget.LinearLayoutManager"
        app:layout_constraintBottom_toBottomOf="parent"
        app:layout_constraintLeft_toLeftOf="parent"
        app:layout_constraintRight_toRightOf="parent"
        app:layout_constraintTop_toTopOf="parent" />

</androidx.constraintlayout.widget.ConstraintLayout>
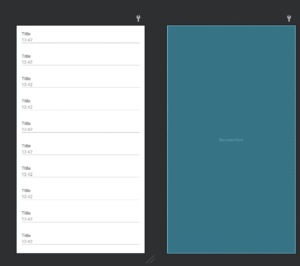
Here is what our list will look like.
Section 4: Create the Adapter
The adapter needs a model so lets create a data class and name it Task
Task.kt
data class Task(val title:String,val timeStamp:String)
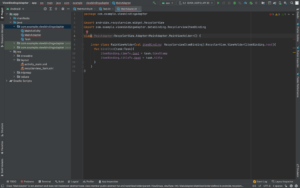
Now we create the Adapter class and name it MainAdapter, inside the MainAdapter class we create an inner class with name MainViewHolder extending RecyclerView.ViewHolder.

The ViewHolder constructor requires a view which is the item layout. Once view binding is enabled, a file is generated for all layouts so one has been generated for the recyclerview_item which we are going to pass into the view holder constructor.
Next we bind data to each item using the data class we created then extend the RecylerView.Adapter and pass in the MainViewHolder as type
class MainAdapter:RecyclerView.Adapter<MainAdapter.MainViewHolder>() {

    inner class MainViewHolder(val itemBinding: RecyclerviewItemBinding):RecyclerView.ViewHolder(itemBinding.root){
      fun bindItem(task:Task){
          itemBinding.timeTv.text= task.timeStamp
          itemBinding.titleTv.text= task.title
      }
    }
}
Click on the red bulb to override three methods from the RecylerView.Adapter class
class MainAdapter:RecyclerView.Adapter<MainAdapter.MainViewHolder>() {

    inner class MainViewHolder(val itemBinding: RecyclerviewItemBinding):RecyclerView.ViewHolder(itemBinding.root){
      fun bindItem(task:Task){
          itemBinding.timeTv.text= task.timeStamp
          itemBinding.titleTv.text= task.title
      }
    }

    override fun onCreateViewHolder(parent: ViewGroup, viewType: Int):
   MainViewHolder {
TODO("Not yet implemented")
    }

    override fun onBindViewHolder(holder: MainViewHolder, position: Int) {
TODO("Not yet implemented")
    }

    override fun getItemCount(): Int {
TODO("Not yet implemented")
    }
}
Now lets add an implementation to each of the methods block.
class MainAdapter(val taskList:List<Task>):RecyclerView.Adapter<MainAdapter.MainViewHolder>() {

    inner class MainViewHolder(val itemBinding: RecyclerviewItemBinding):
    RecyclerView.ViewHolder(itemBinding.root){
      fun bindItem(task:Task){
          itemBinding.timeTv.text = task.timeStamp
          itemBinding.titleTv.text = task.title
      }
    }

    override fun onCreateViewHolder(parent: ViewGroup, viewType: Int):
MainViewHolder {
 return MainViewHolder(RecyclerviewItemBinding.inflate(LayoutInflater
 .from(parent.context),parent,false))
    }


    override fun onBindViewHolder(holder: MainViewHolder, position: Int) {
        val task = taskList[position]
         holder.bindItem(task)
    }

    override fun getItemCount(): Int {
        return taskList.size
    }
}
- First we created a variable for the adapters list in the MainAdapter constructor.
- Then we return MainViewHolder in the onCreateViewHolder() and inflate the layout by passing in RecyclerviewItemBinding.inflate(LayoutInflater .from(parent.context),parent,false)) to the constructor.
- Next we bind each of the items in onBindViewHolder() and
- finally return the size of the list as the itemCount by calling taskList.size.
Before we complete the setup in the MainActivity we need a dummy list so lets create an object class with a list of tasks.
object TaskList {
  val taskList = listOf<Task>(
        Task("Take a Walk",timeStamp = "7:00 am"),
        Task("Eat BreakFast",timeStamp = "8:00 am"),
        Task("Attend a Meeting",timeStamp = "9:00 am"),
        Task("Read a Book",timeStamp = "12:00 pm"),
        Task("Eat Lunch",timeStamp = "2:00 pm"),
        Task("Buy Groceries",timeStamp = "4:00 pm"),
        Task("Watch Youtube Videos",timeStamp = "6:00 am"),
        Task("Eat Dinner",timeStamp = "7:00 am"),
        Task("Go to Bed",timeStamp = "9:00 pm")
    )
}
Now lets finalize the setup in the MainActivity
class MainActivity : AppCompatActivity() {
    var binding:ActivityMainBinding? = null
    override fun onCreate(savedInstanceState: Bundle?) {
        super.onCreate(savedInstanceState)
        binding = ActivityMainBinding.inflate(layoutInflater)
        setContentView(binding?.root)
        val adapter = MainAdapter(TaskList.taskList)
        binding?.taskRv?.adapter= adapter
    }
override fun onDestroy() {
        super.onDestroy()
        binding = null
    }
}
- We have also created a binding for the MainActivity and inflate the layout using ActivityMainBinding.inflate(layoutInflater).
- Then we replaced the setContentView parameter with binding?.root.
- Next we initialize the adapter and set it to the recyclerView using binding?.taskRv?.adapter = adapter and
- Finally we set the binding to null in the onDestroy method to make sure there are no views laying around after the activity is destroyed. We already setup the layout manager in activity_main so we don’t need to do that in the MainActivity.
Now run the app.
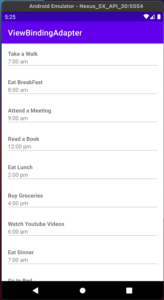
And that is all about populating a recyclerview and using view binding for the adapter class.