


Let’s start with our C# Unit Testing tutorial for beginners which leads developers to guide software development by tests.
TDD improves software design, code quality, and developer productivity by leading developers to focus on solving a small problem at a time while gradually building up the software. It minimizes the risk of implementing unclear requirements. Moreover, tests flag unintended changes to previously implemented requirements during development. Consequently, developers who do TDD right are more productive. Those professionals also code more confidently.
This guide is going to be a rather practical introduction to TDD. The demonstrated workflow might improve your productivity, whether you are an absolute beginner or have some prior experience with TDD.
We’re going to start to build a calculator app with the following features:
- Summation
- Subtraction
- Multiplication
- Division
C# Unit Testing tutorial for beginners – Let’s get started!
Let’s create a new folder and a class library in it:
dotnet new classlib --name Calculation
Likewise, create a test project to test the calculator.
dotnet new xunit --name Calculation.Tests
And open it in an IDE.

Now add the Fluent Assertions library to the test project.
dotnet add package FluentAssertions
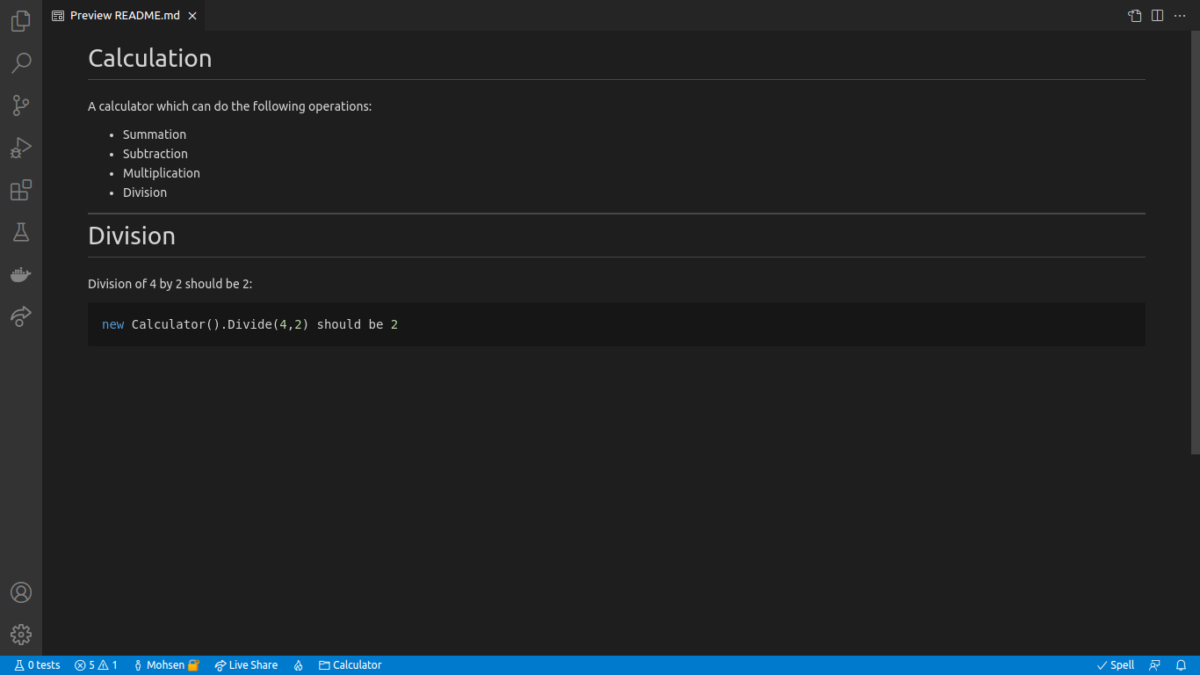
Before jumping into code, it’s best to document the requirements.
So create a markdown file named README.md in the solution’s root folder.
You can start by writing a general overview of what the project does in the read me file.

To keep it concise, we are going only to implement the division.
So let’s add an example to show how the division works in the README.md file.
The read-me file is ready. Isn’t it time to implement the calculator? Not yet!
Tests should be written first. So create a file named DivisionSpecifications.cs in the test project (Or rename the UnitTest1.cs). Then add a test method to the test class.
using Xunit;

namespace Calculation.Tests;

public class DivisionDivisionSpecifications
{
    [Fact]
    public void Test1()
    {

    }
}
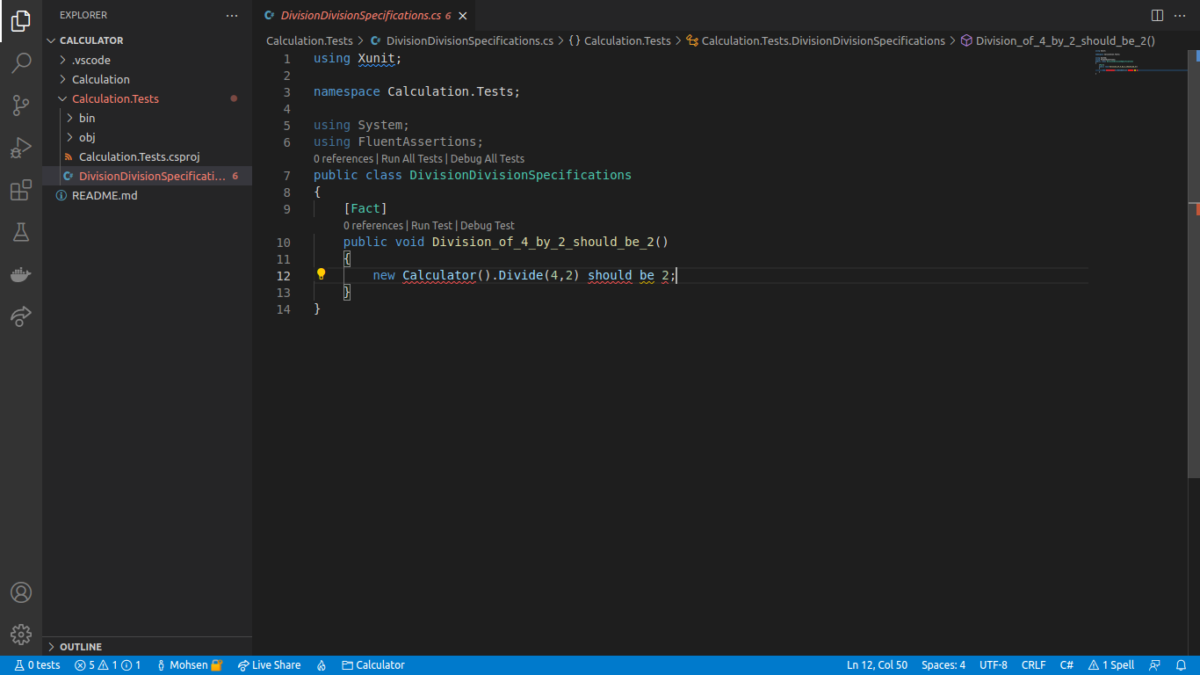
Afterward, open the README.md file, and under the Division section, copy the phrase Division of 4 by 2 should be 2, paste it as the test method’s name, and replace the spaces with underscores:
using Xunit;

namespace Calculation.Tests;

public class DivisionDivisionSpecifications
{
    [Fact]
    public void Division_of_4_by_2_should_be_2()
    {

    }
}
Also, copy the new Calculator().Divide(4,2) should be 2 from the README.md file under the Division section and paste it as the body of the test method.
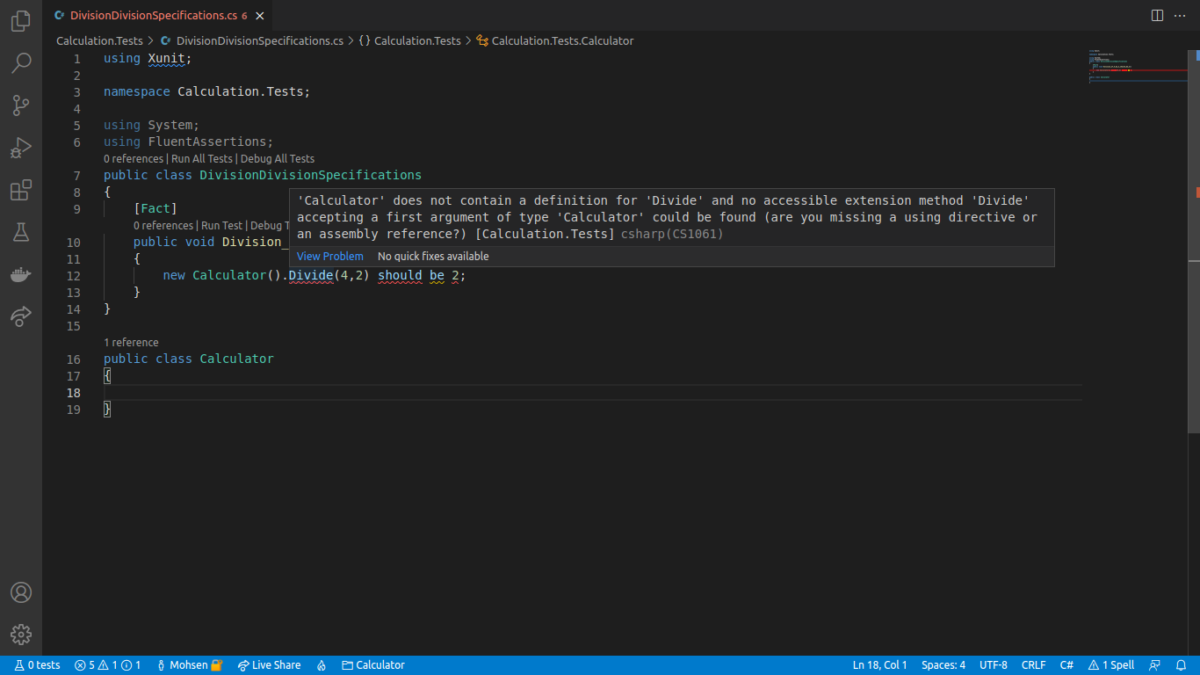
Do you see the errors? That’s your to-do list.
The compiler starts to act like a to-do list and guides you to decide what to implement next at each step until the project build succeeds.
Start from the first (leftmost) error:
The type or namespace name ‘Calculator’ could not be found
(are you missing a using directive or an assembly reference?)
[Calculation.Tests]
It indicates that the Calculator class doesn’t exist yet.
So let’s add the calculator class to fix it. Oh, and by the way, if you like this C# Unit Testing Tutorial please share it with your friends our colleagues :-)

We accomplished the first task on the to-do list. Let’s see what the next one is.
The Calculator class needs the Divide method.
Add the missing Divide method to the Calculator class to make the compiler happier.

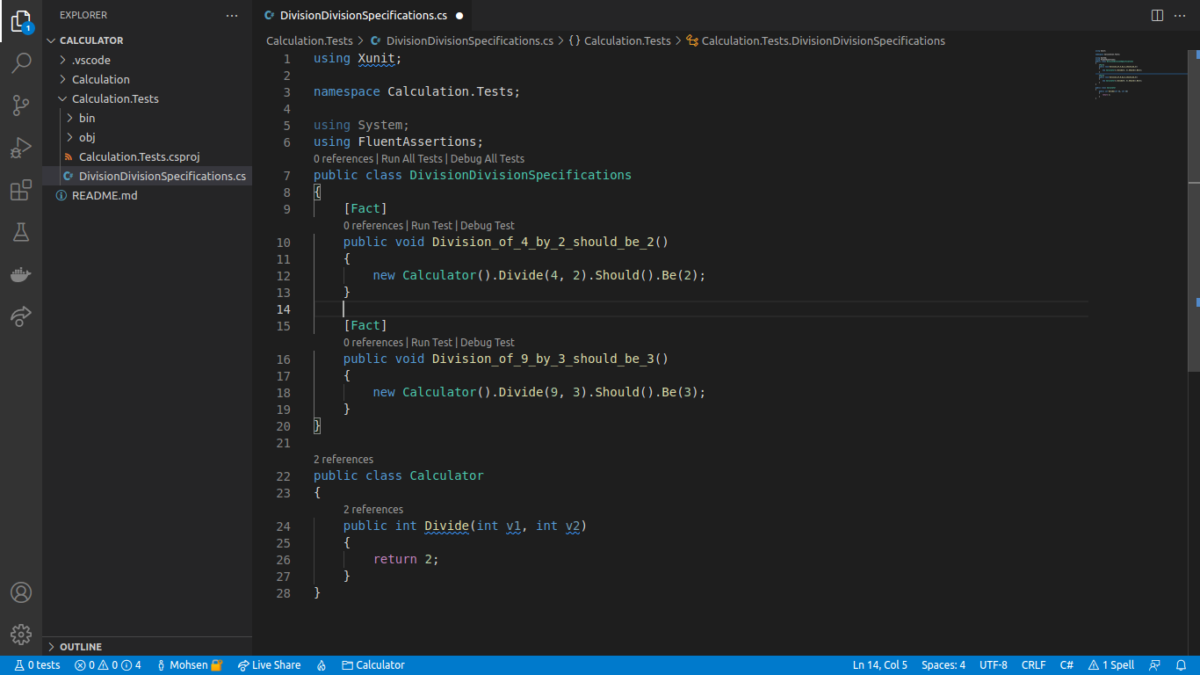
The next error is should. I have added using FluentAssertions statement on top of the test class, as you see.
Now making a couple of tiny adjustments to the code succeeds in the build. Just replace the should be 2 with.Should().Be(2):

The test is built successfully. It’s time to run the test.
You can run the test from Test Explorer or click the Run Test link on top of the test method. I use dotnet cli, though.
I run the dotnet test command in the Calculation.Tests library.

The test fails with The method or operation is not implemented exception.
Errors are our friends! I love them. They tell us what to do while doing TDD and protect the system’s requirements after a system passes its tests.
This one, for example, is asking me to implement the Divide method. I’ll accept my friend’s suggestion because he’s an expert in guiding me through this process. Let’s implement the method to make the test pass.

The is test passed successfully.
What? Does the Divide method really divide numbers?
Well, not every number yet. It currently divides 4 by 2.
So what if I call new Calculator().Divide(9,3)?
Great question! Maybe we should give it a try. Let’s add your example to the README.md file then.

Then add the test method to the test class:
And run it:
dotnet test
A new friend (error) appears:
Expected value to be 3, but found 2.
Let’s fix it:
public class Calculator
{
    public int Divide(int v1, int v2)
    {
        return v1/v2;
    }
}
For sure, we can also run it:

The test is passed successfully. It’s time to refactor (clean up) the code base a bit.
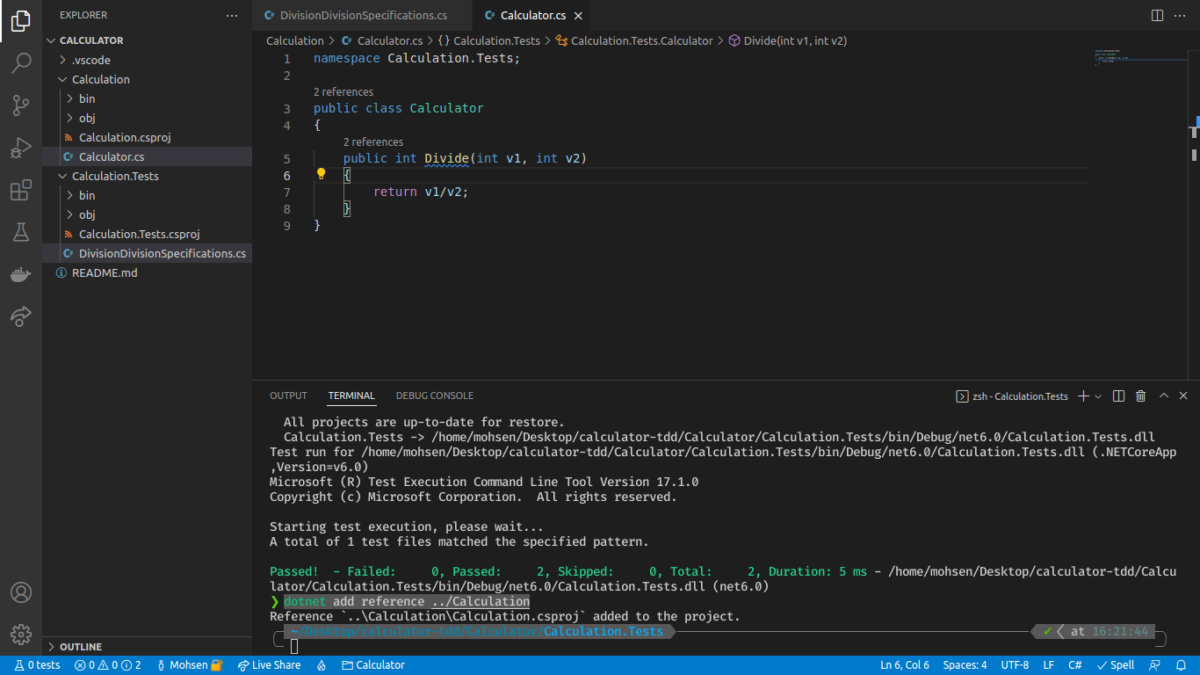
Move the Calculatorclass from Calculation.Test project to Calculation (the production) project.
Then go to the test project’s folder and add a reference to the production project.
dotnet add reference ../Calculation
Then run the test to ensure the recent changes have not broken any requirements.
Eventually, you may clean up the production code to make it readable.
public class Calculator
{
    public int Divide(int dividend, int divisor)
    => dividend / divisor;
}
You can also clean up the tests very carefully.
    [Fact]
    public void Division_of_4_by_2_should_be_2()
    => new Calculator()
            .Divide(4, 2)
            .Should().Be(2);

    [Fact]
    public void Division_of_9_by_3_should_be_3()
    => new Calculator()
           .Divide(9, 3)
           .Should().Be(3);
See how clearly the tests describe the Divide method. That’s why unit tests are called living documentation.
Now that I have the tests, if I break a requirement by mistake, the test would fail (a friend would tell me 4/2 is supposed to be 2, but your recent changes on the Divide method just broke it). Then you can revert the recent changes or remove the test. Unit Testing is like building a safety net to cover the requirements. Developers can confidently change the code. Running a collection of unit tests is much quicker, more accurate, and safer than running the application and manually testing all the requirements that come to mind.
Alight. Everything is cleaned up and works like a charm.
However, I’ve got to be skeptical whenever a system passes its tests. Passing a test doesn’t mean the implementation of the system under test (the Divide method) is completed. As in this case, I have to ask, what if the divisor is zero?
That’s interesting. Never afraid of adding a new test.
Let’s add it to the read me.
new Calculator().Divide(9,3) should be ?
A lot of times, you discover a more profound knowledge about the system by asking such simple questions. As I just asked our Product Owner, it turned out that the result of 9/3 was expected to be 0 for his use cases. 😉
After updating the read me file let’s add the test.
    [Fact]
    public void Division_of_9_by_0_should_be_0()
    => new Calculator()
    .Divide(9, 0)
    .Should().Be(0);
And run the test.
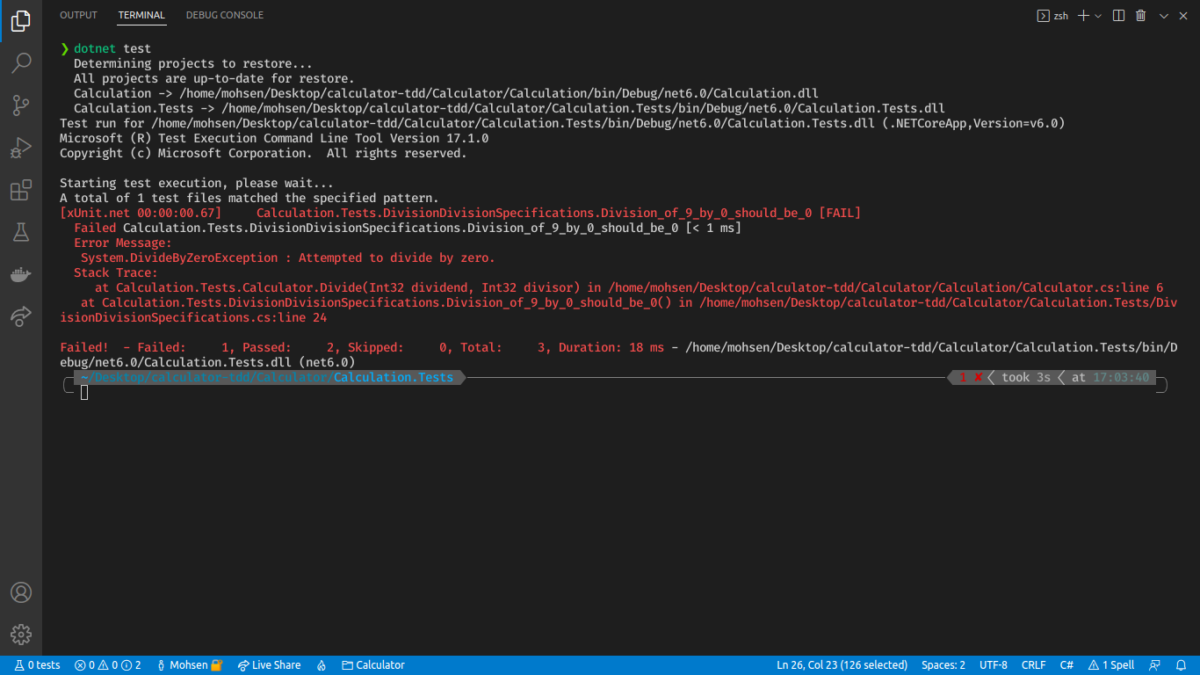
To follow the guidelines of our new friend System.DivideByZeroException who just appeared; let’s update the Divide method.
public class Calculator
{
    public int Divide(int dividend, int divisor)
    {
        try
        {
            return dividend / divisor;
        }
        catch (DivideByZeroException)
        {
            return 0;
        }
    }
}
And run the test.
dotnet test
It’s passed successfully. The code is clean. Time to ask skeptical questions again. What about 12.5/-1.5? You may add the test and continue exercising.
There are many exciting concepts about unit testing that can massively improve the quality of the software you develop and make you a more professional developer.
Summary
- Unit testing is about clarifying the requirements before paying for the cost of implementing software.
- It can improve your productivity since you focus on a small problem at a time during development.
- Start with documentation, then test, implement, clean up the code, and What If Analyze.
- Errors are your friends when you are doing unit testing. But they won’t be friendly in production.
- Be skeptical whenever you think a task is done. Unexpected behavior might occur in production otherwise.
- Minimize the need to use breakpoints, debugging, and testing the system at run time.
- Tests are living documentation. They prove that the system does what it promises.
- Tests act as Safety Net when you change the production code.
Check out our C# progress academy if you want to learn more about unit testing in C#!