


This is an introduction to building a multi-language website in ASP.NET Core, including creating localized resources and language-switching functionality. Building a multi-language website can be challenging, especially when it comes to ensuring a smooth user experience for visitors from different countries. ASP.NET makes this task much more straightforward. This article will explore how to build a multi-language site using ASP.NET.
What is Globalization
In software development, globalization refers to designing and creating software applications that can be adapted to and used by people in different cultures, regions, and languages. This involves developing software that can handle different locales, character sets, time zones, and formats for currency, dates, and time.
Globalized software applications should be able to present information in different languages and locales, handle right-to-left or left-to-right text directions, and use appropriate date, time, and number formats. It also requires considering cultural differences, such as how color, images, and symbols are perceived, to ensure the software is not culturally insensitive or offensive.
Globalization in software development aims to make the application accessible, usable, and relevant to a global audience, regardless of the user’s location or language.
What is Localization?
Localization in software refers to adapting a software application to meet the language, culture, and other specific requirements of a particular country or region. It involves translating text, adjusting date and time formats, currency symbols, and other culturally specific elements, and ensuring the software is compatible with different character sets and keyboard layouts.
The goal of localization is to provide a localized user experience for the software, making it easier for users in different regions to understand and use the application. This can improve the adoption and success of the software in those regions and increase its market reach.
Localization is an essential aspect of globalization in software development and is often achieved by creating localized resources for each supported language and region. These resources can dynamically adjust the software’s behavior and presentation based on the user’s preferences or the system’s settings.
Globalization vs. Localization
Globalization and localization are related but distinct concepts in software development. Globalization is about making software usable for a global audience, while localization is about adapting the software to meet the specific requirements of individual countries and regions.
By the way, did you know that we offer a unique online course that boosts your C# career? Check it out here!
Setting up The Project
Let’s see an example of localization in ASP.NET. First off, let’s create a new ASP.NET project using Visual Studio and add support for localization by installing the Microsoft.AspNetCore.Localization package from NuGet.
Localizing Views
To display the translated strings in your views, you can localize views by using the IViewLocalizer service. To do this, add the following code to the top of your `Views/Home/Index.cshtml` Razor view:
@using Microsoft.AspNetCore.Mvc.Localization

@inject IViewLocalizer Localizer

<h1>@Localizer["Welcome"]</h1>
We use the IViewLocalizer service to access the localized strings in this example. Using the @Inject we injected the service into the view and assigned the instance to the Localizer.
The key `Welcome` is the key to the corresponding translated string for the current culture.
Adding the Resource Files
You can now create resource files for each culture. To do so, right-click on the project, select Add, then New Folder, and name the folder Resources. Inside the Resources folder, add a Views folder and in the Views add the Home folder. In the Home folder add a new resource file for each culture, for example, Index.en-US.resx and Index.fr-RF.resx.
As a result, you must have two resource files in the Resources/Views/Home:
Index.en-US.resxIndex.fr-RF.resx
The resource files will be only applied to the `Views/Home/Index.cshtml`. By default they are matched by path. The folder structure and file names.
Next, add the necessary strings to each resource file. For example, we want to localize the welcome message so we’ll open the Index.en-US.resx file and add the following key value to it:
Welcome | "Welcome to my site"
Also, add the french title to `Index.fr-FR.resx`:
Welcome | "Bienvenue sur mon site"
Configuring the Application
Next, configure your app to support multiple cultures in theProgram.cs file.
Since we’re localizing our views, let’s configure the view localization.
builder.Services.AddControllersWithViews()
    .AddViewLocalization(LanguageViewLocationExpanderFormat.Suffix);
Configure the localization service as follows:
builder.Services.AddLocalization(options => options.ResourcesPath = "Resources"); //The path in which you store the resources.
Notice that we set the Resources as the folder all resources reside in. The ResourcesPath option specifies the location where the resource files are stored.
And to support the cultures:
builder.Services.Configure<RequestLocalizationOptions>(options =>
{
    var supportedCultures = new[]
    {
        new CultureInfo("en-US"),
        new CultureInfo("fr-FR"),
    };

    options.DefaultRequestCulture = new RequestCulture("fr-FR");
    options.SupportedUICultures = supportedCultures;
});
We support two cultures in our app. You can add as many cultures as you need.
Now that the localization service has been added, use the request localization middleware like the following in Program.csto apply the localizations to all requests:
app.UseRequestLocalization();
Add the localization middleware before any middleware that needs localized strings. I added it right after
var app = builder.Build();.
Query String Culture Provider
Now run the app; you can set the `culture` or ui-culture (or both) in the query string to see the Index view as localized. Look at the following example:
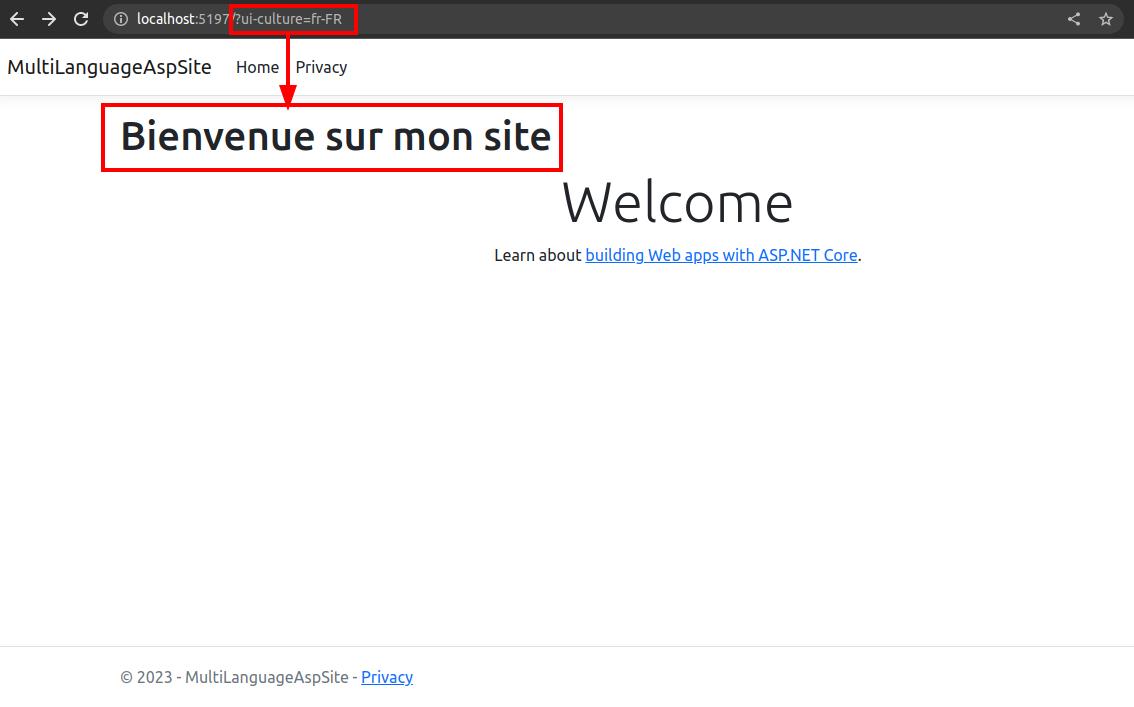
So one of the ways to see a localized webpage is by requesting the desired culture by including it in the query string.
Accept-Language HTTP Header
Another way is to set the request’s Accept-Language. You should see this page when you navigate to `http://localhost:5197`(where 5197 is the port your app listens to).

As you see, the browser has set theAccept-Languageheader to my current OS culture. Most browsers automatically pass users’ culture, which is inherited from the users’ operating systems as the Accept-Header. I can see the view with the same culture if I pass the culture in the query string like this:
http://localhost:5197/?culture=en-US
In addition to the Razor views, you can also access the localized strings in your controllers. To do this, you can use the IStringLocalizer service.
Here’s an example of how you can use the IStringLocalizer service in a controller:
using Microsoft.Extensions.Localization;

namespace MultiLanguageAspSite.Controllers;

public class HomeController : Controller
{
    private readonly IStringLocalizer<HomeController> localizer;
    public HomeController(IStringLocalizer<HomeController> localizer)
    {
        this.localizer = localizer;
    }

    [HttpGet]
    public string Title()
    {
        return localizer["Home Page"];
    }
    ...
}
In this example, we are injecting the IStringLocalizer service into the HomeController. The localizer object is then used to access the localized strings in the controller’s action methods.

In the Title action method, we use the localizer object to access the `”Home Page”` string.
Finally, Add the resource files under a new folder with the name Controllers in the Resources directory. The folder structure must end up like the image on the right.
Now run the app and navigate to the following URL
http://localhost:5197/home/title?culture=fr-FR
You must see the following string:
Page d'accueil
Summary of Building a Multi-language Site in ASP.NET Core
This article discussed some techniques you can use to localize your ASP.NET applications. There’s a lot more you can do for localization. You can also use data annotations to localize the View Models or set cookies or the `Content-Language` HTTP header to select the user’s intended language. You can also use other patterns to address resources for corresponding types. I may write more about them later. But in general, in ASP.NET, you can make your website multi-language relatively easy. Using the localization features in ASP.NET, you can provide a seamless experience for users from different countries, making your website accessible to a broader audience. In the end, you can boost your career by joining our course to learn more about C# and ASP.NET.